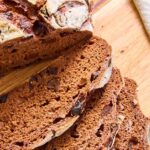
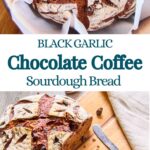
Black Garlic Sourdough Bread with Chocolate
In this Black Garlic Sourdough Bread with Chocolate and Coffee, I combine the tangy notes of rye sourdough with the sweet balsamic-liquorice-umami addictiveness from the Black Garlic, adding cocoa, which supports the fruity notes and adds depth. The espresso heightens the chocolate flavour even more And a few secret ingredients will give you a crusty, chewy loaf reminding you of the best German artisan bakeries and their “Bauernbrot” with a twist.

This post may contain referral links for products I love. For The Pleasure Of Eating earns a small commission on these links at no cost to you, and the links will always be marked with an asterisk* or highlighted in pink.
Why You Will Love This
TL;DR
- Black garlic and chocolate may sound odd, but the combo is surprisingly delicious and addictive
- Uses black garlic to bring deep, fruity umami notes that pair beautifully with chocolate and rye
- Adapted to a rye and white flour blend for a moist, chewy texture reminiscent of German Bauernbrot
- Includes malt extract and powder to enhance the bread’s flavor and crust crunch
- Can be made as a lazy, no-knead sourdough — overnight fermentation in the fridge works wonders
Black Garlic with Chocolate. No, Really.
Admittedly, thinking about garlic, doesn’t usually bring chocolate to mind, but once you’ve tried Black Garlic, it’s really hard not to think about it. Having the shiny black nuggets in the Fridge brings about the most fun recipes. This started as an experiment after I made my Sourdough Oatmeal White Chocolate Chip Cookies with Black Garlic.
I loved them so much, I needed more Black Garlic with Chocolate recipes. And I wanted to make bread, and in my search I spotted this gem of a recipe, which is a white version with sourdough.
I created detailed instructions on how to make your own Black Garlic here.
But make it Rye
Personally, being German, I much prefer bread with rye, so I adapted it to get closer to my all-time favourite “Bauernbrot”, which has part rye, part white flour, and a more chewy, moist (yes, I said it…) texture than white sourdough loafs. Adding malty notes with the malt extract and powder, which support the Black Garlic flavour and adds crunch to the crust is one of my favourite ways to improve bread recipes. It also keeps for longer in a bread box.
Dutch Oven Bread
This is one of the fabulous dutch oven recipes, which work just too well with sourdough bread. It gives you that perfect crispy, but not too tough crust and the amazing rise due to the steam that gets trapped inside. It’s my favourite method for baking.
Also: No handling hot water and no messy oven to clean up after, as you would with most other ways of baking bread due to the need to add steam.
Can be very lazy No-Knead Bread
I’ve tried sourdough bread in countless variations and with both methods of no-knead and the full stretch and fold routine. Since I always leave my sourdough to ferment in the fridge overnight, I found essentially no difference, even when I did the stretching and folding. So I usually skip it, as I’m lazy.
If you love handling bread dough and want to feel all trad-wife-y feel free to do it all. 🙂
Ingredient Notes
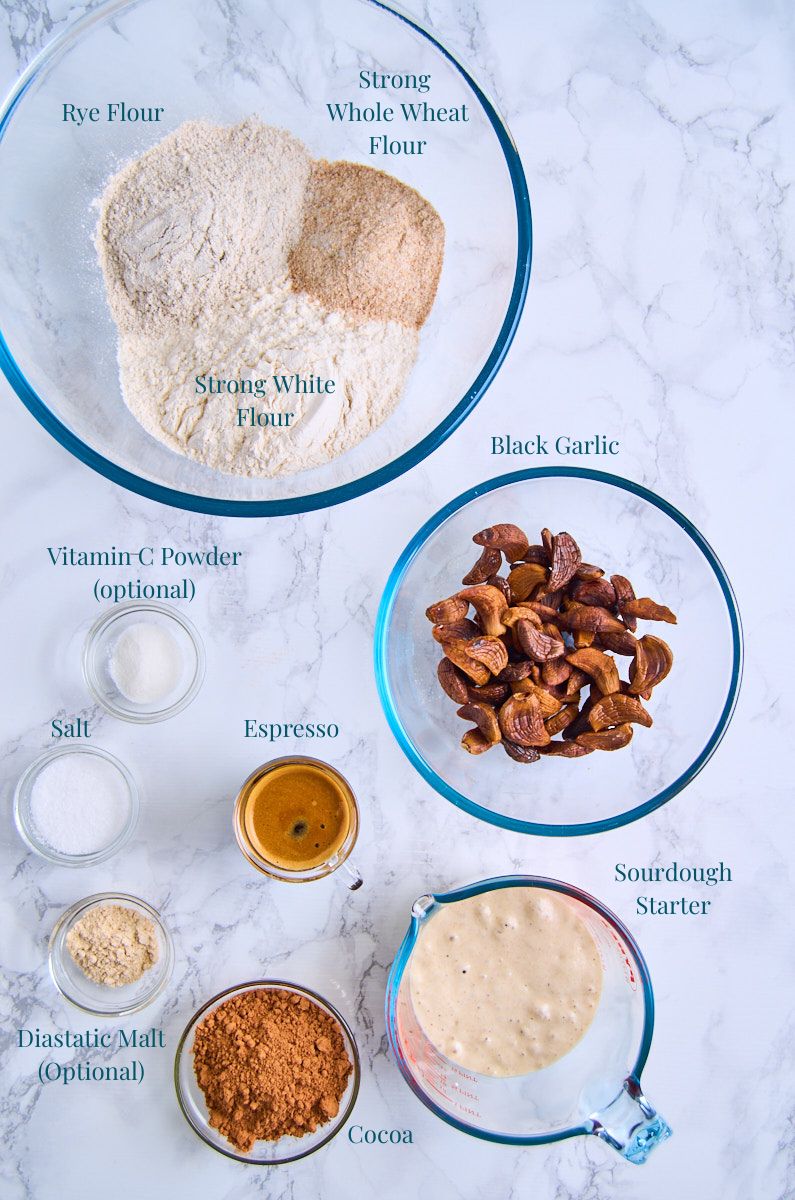
- I’m mixing different flours together for this bread, to achieve the flavour and texture I’m aiming for, which is a moister bread with more bite to it than your standard bubbly and open crumbed sourdough. Experimenting over the years, I found the magic happens around the 1/3 rye to 1-part white flour mark. Plus, a bit of wholewheat for nutty flavour.
Note:
Cups, due to the possibility of compacting the flour while dragging the container through it, can give you wildly different results. Use a tablespoon to gently fill the cup with flour, then drag the back of a knife over it to level. This should give you the closest to the standard 120g per cup of flour.
Alternatively, if you have kitchen scales, assume 120g flour per cup and weigh it out.
In many of my recipes I will give gram measurements for this reason, but you can always switch to the american measurements in the recipe card.
- I’m using rye sourdough starter here, for even more flavour. Though if you have just white, it will work fine.
- Cocoa powder and espresso lend a gentle chocolate flavour. But this is not a sweet bread. You could compare it more to the undertones of Mexican mole, which goes fantastic with savoury dishes.
- The Black Garlic acts as add-in similar to dried fruit here, but not as sweet, which again means it’s very versatile in what you can use it for.
- And while the 2 malty additions of malt extract* (which I promptly forgot in the ingredi9ents picture. So sorry!) and Diastatic Malt are by no means mandatory, they add lots of flavour to the bread and more crunch and colour to the crust.
Equipment used
 Buy Now →
  Buy Now →
  Buy Now →
  Buy Now →
  Buy Now →
  Buy Now →
 How to Make this
What a Difference a Day Makes
If you need to make your first sourdough starter, check this post. If you already made one and are wondering why yours is reacting so differently on different days…I posted a picture of my two fed jars of fed sourdough in it. It was a slightly colder day in the the last post, so they weren’t as active.
On the day of making this Black Garlic Sourdough Bread with Chocolate though, it was a lot warmer, so they were wildly bubbling.
Feed your Sourdough Starter 2 days before baking
Schedule wise, I usually take my starter out of the fridge and feed it by simply doubling the amount I have left (or more if needed) by adding flour and water to equal parts in weight. Roughly. I never weigh it though. I just spoon some flour in, pour filtered water on top, stir. Check if the consistency resembles thick pancake batter/warm peanut butter and add flour or water accordingly if not. Then I let it sit over night. Or, if I forgot in the evening, just for a few hours. Both have worked well for me in the past. Though if you are making this in winter, better find a cosy warm spot for it.

Two Options
Now there are two options here to make this bread: You can follow the instructions below by stretching the dough after it’s first resting period every 30 minutes or so. Or you could simply treat it as no-knead bread, place it in the fridge overnight and only stretch and fold it once in the morning, about 2h before you want to bake. Then give it one final rest while it gets to room temperature.
The results are pretty similar. Check my German Sourdough Rye Beer bread for comparison pictures between the 2 methods.
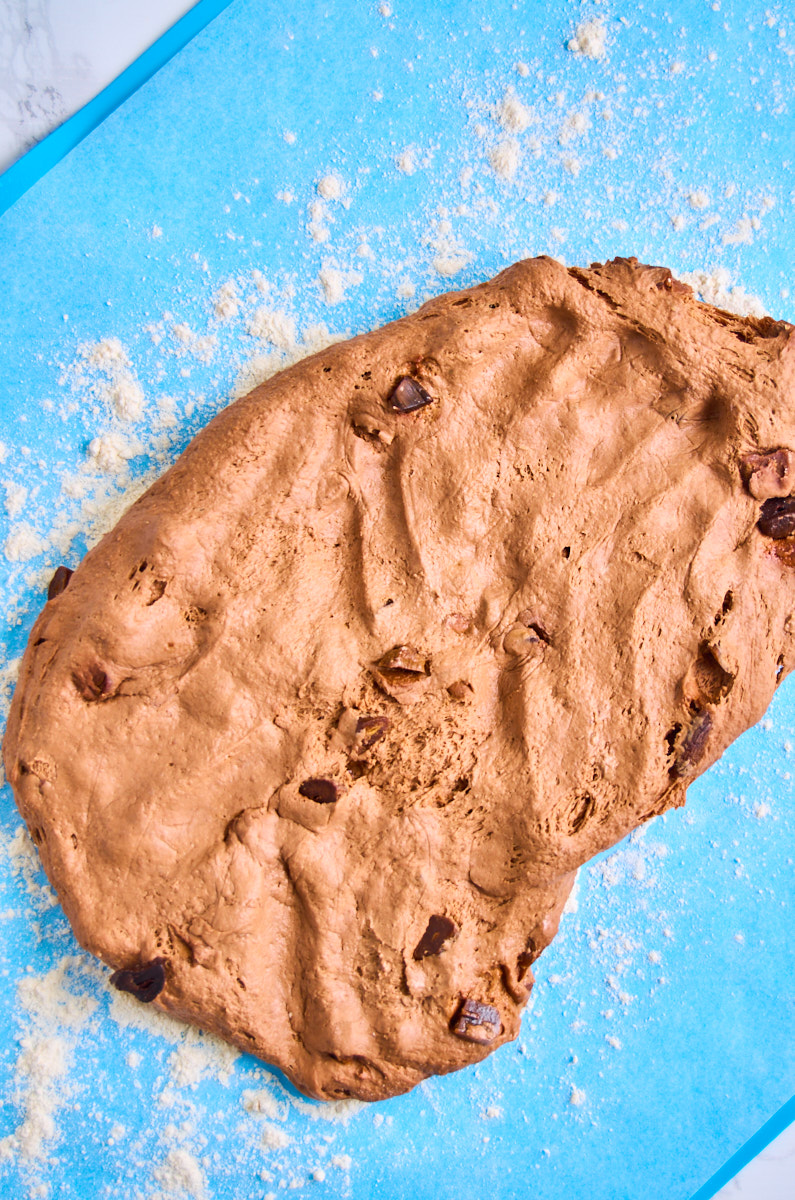
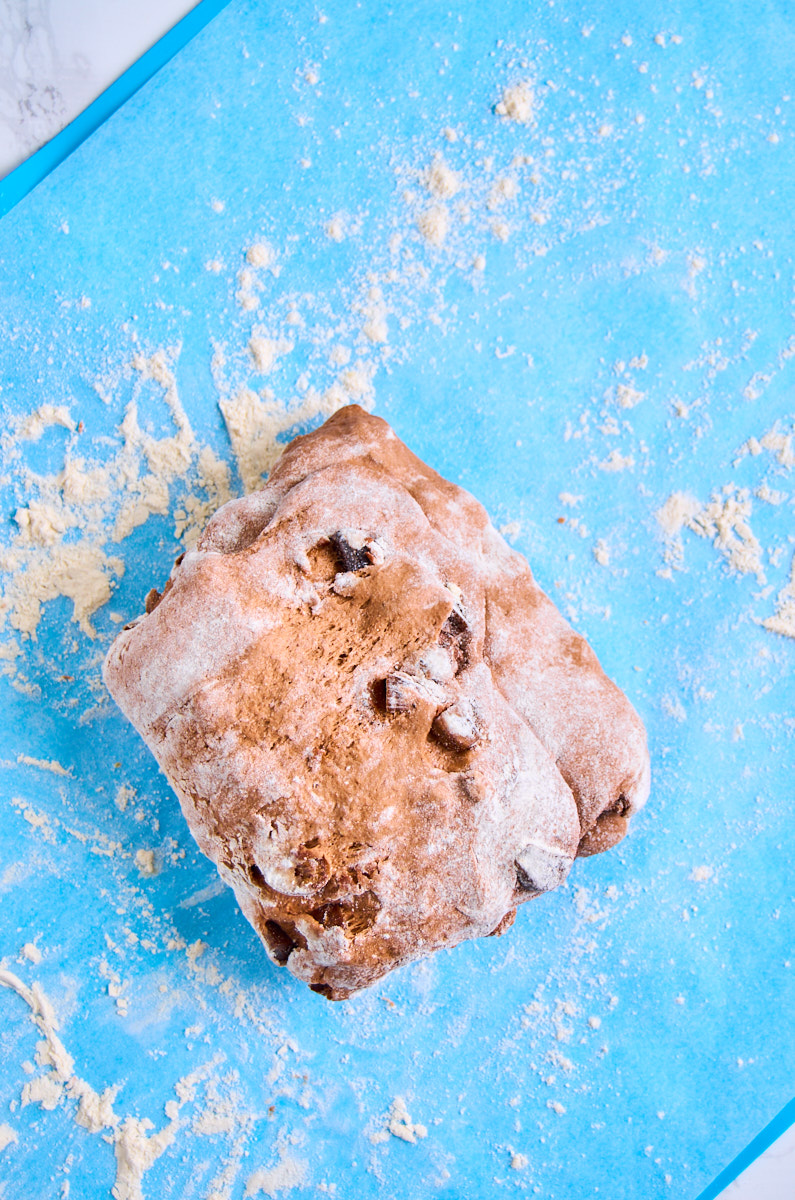
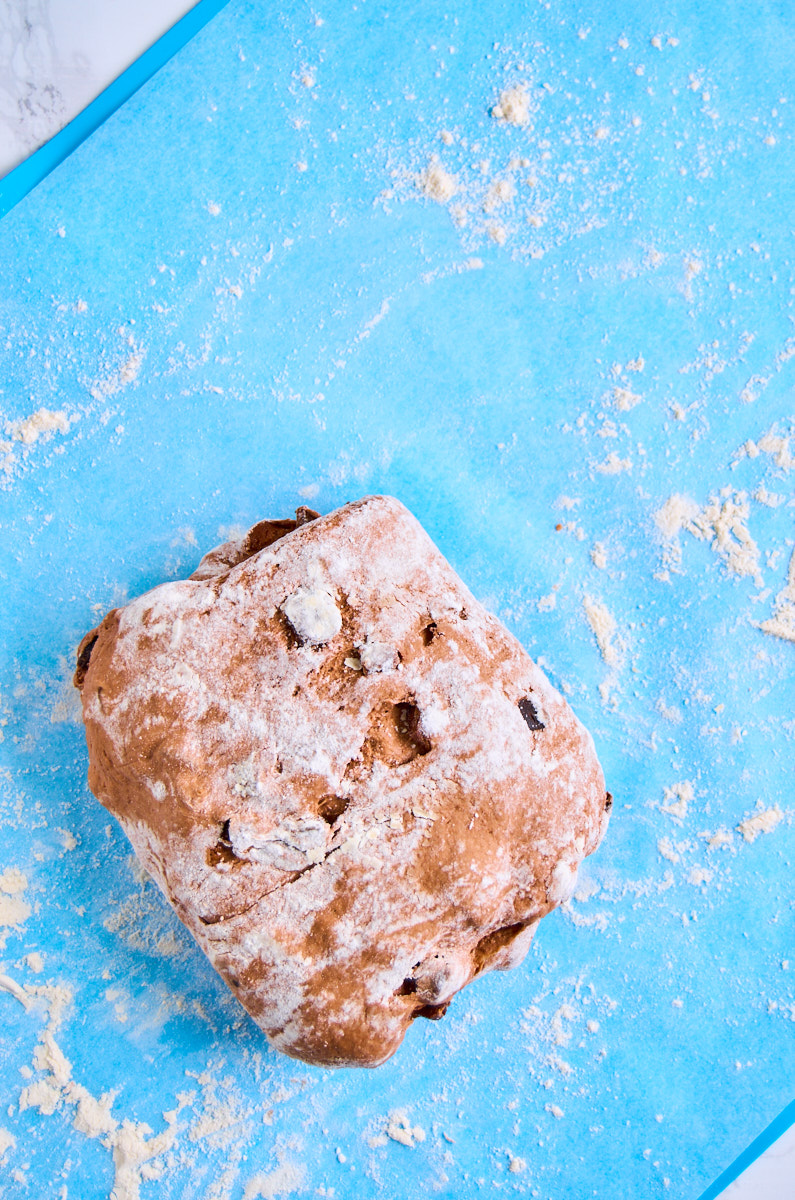
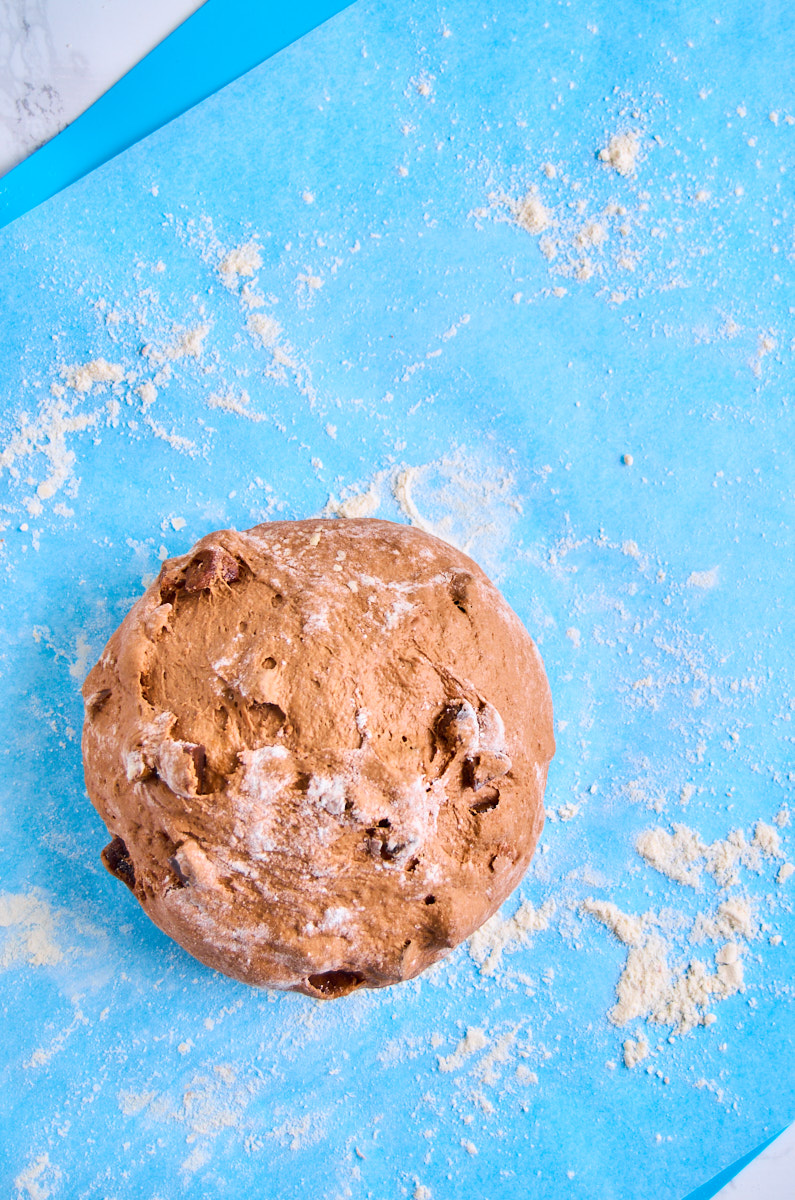
The Stages of the Dough
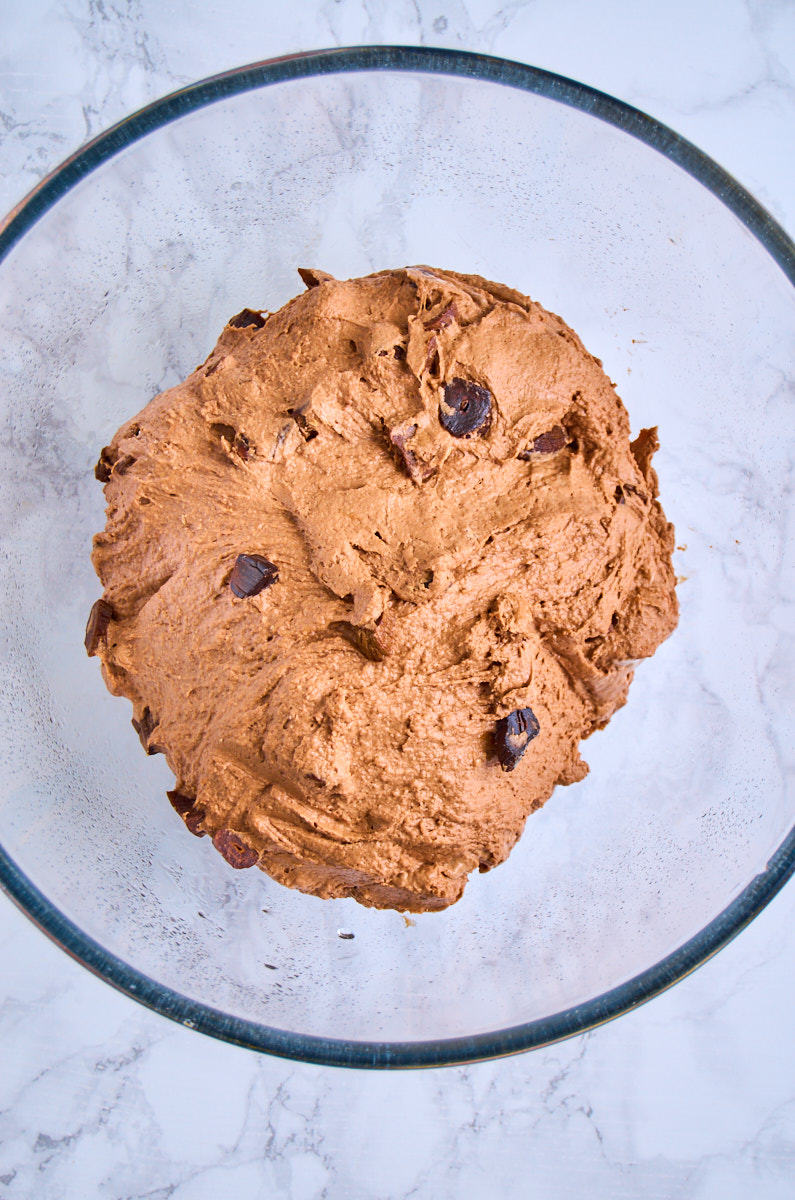
As most rye containing doughs, this makes a pretty sticky one. So don’t throw extra flour at it, to get to the more typical smooth white sourdough. It’s supposed to be pretty wet as you can see here.
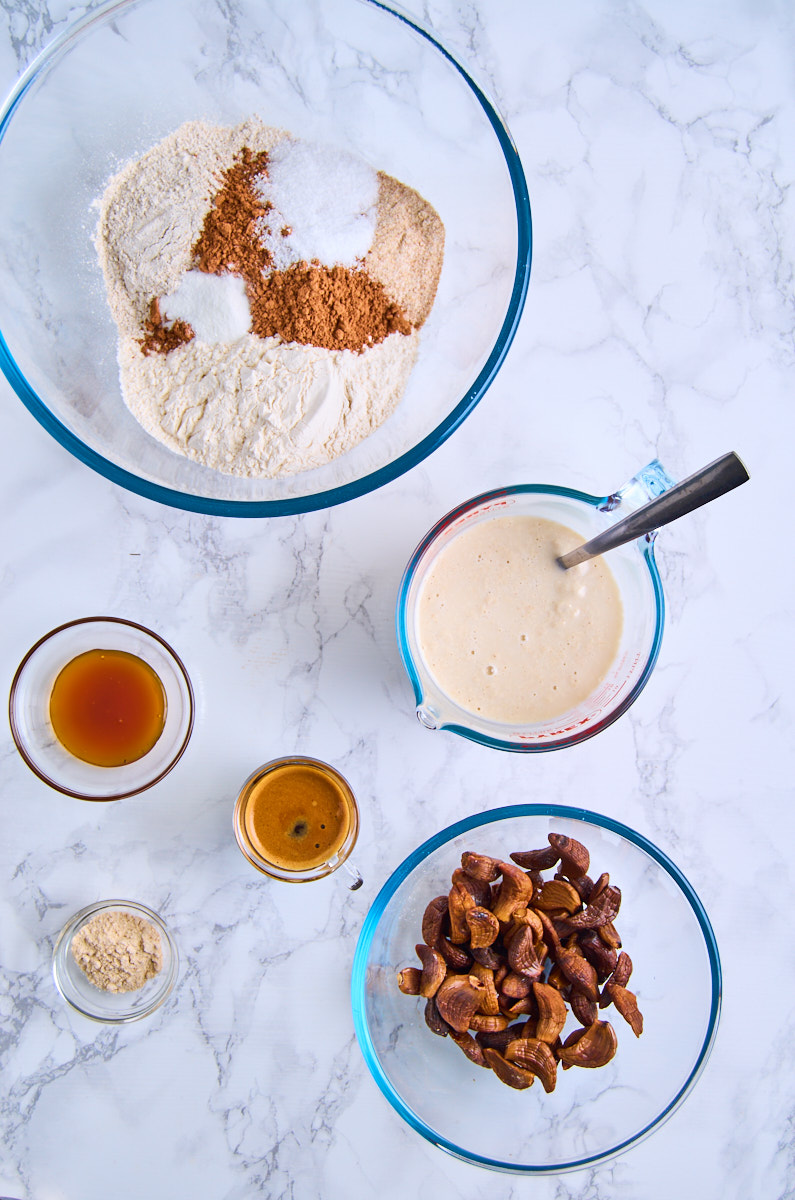
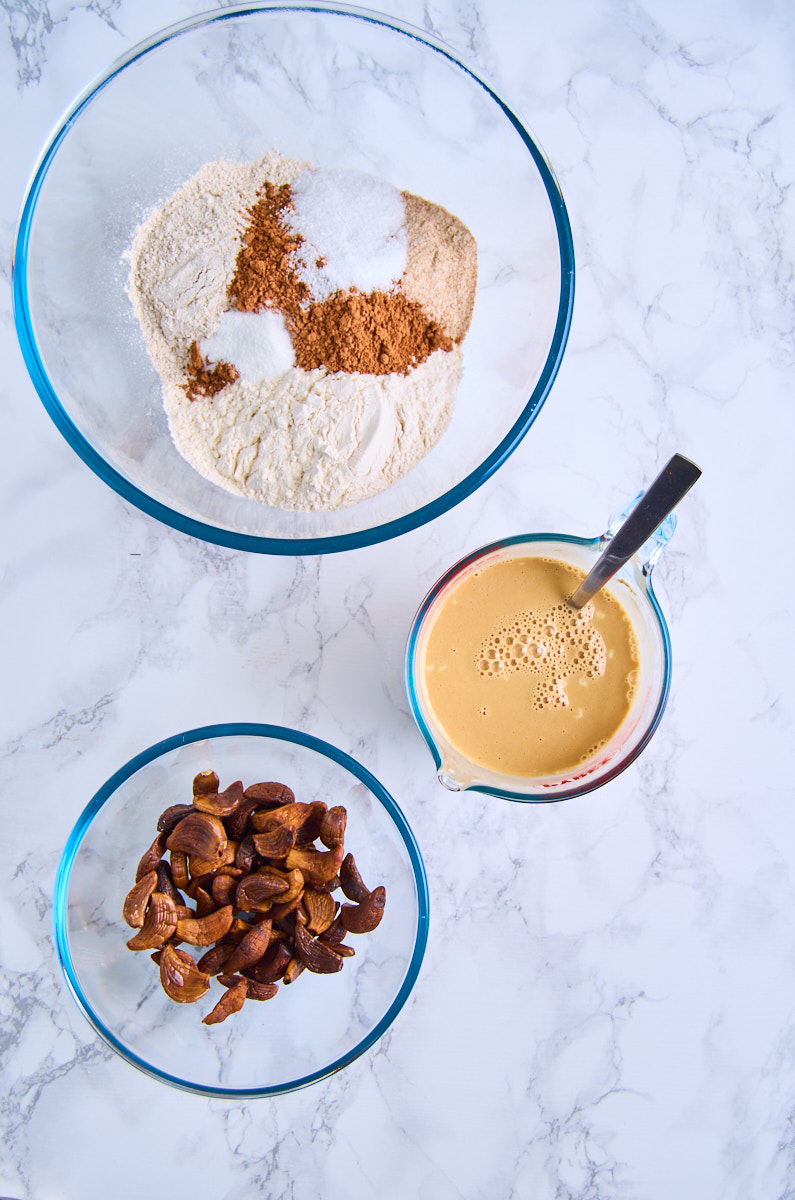
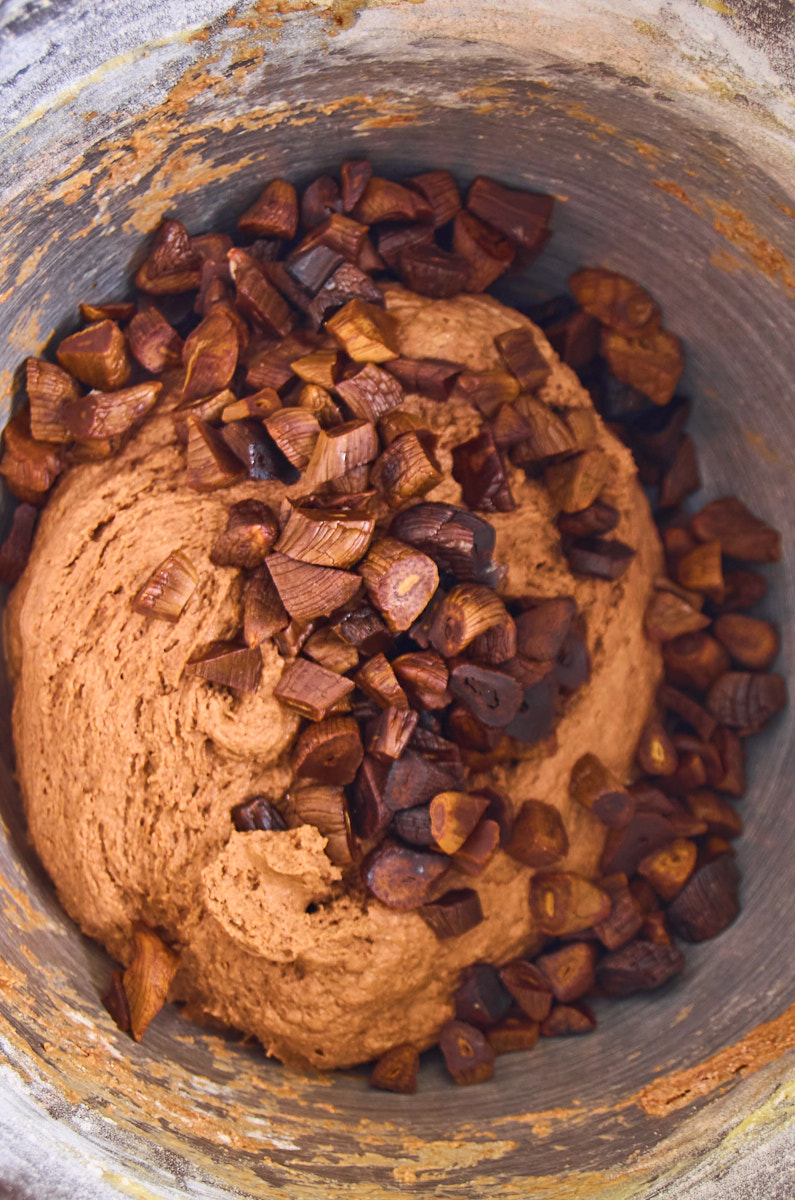
First mix the flours, salt and, if using Viatmin C powder. Add the remaining ingredients except the black garlic to the sourdough starter. Ideally using a standmixer* knead the dough until it comes together, then add the roughly chopped black garlic. I usually keep it in about raising sized pieces.
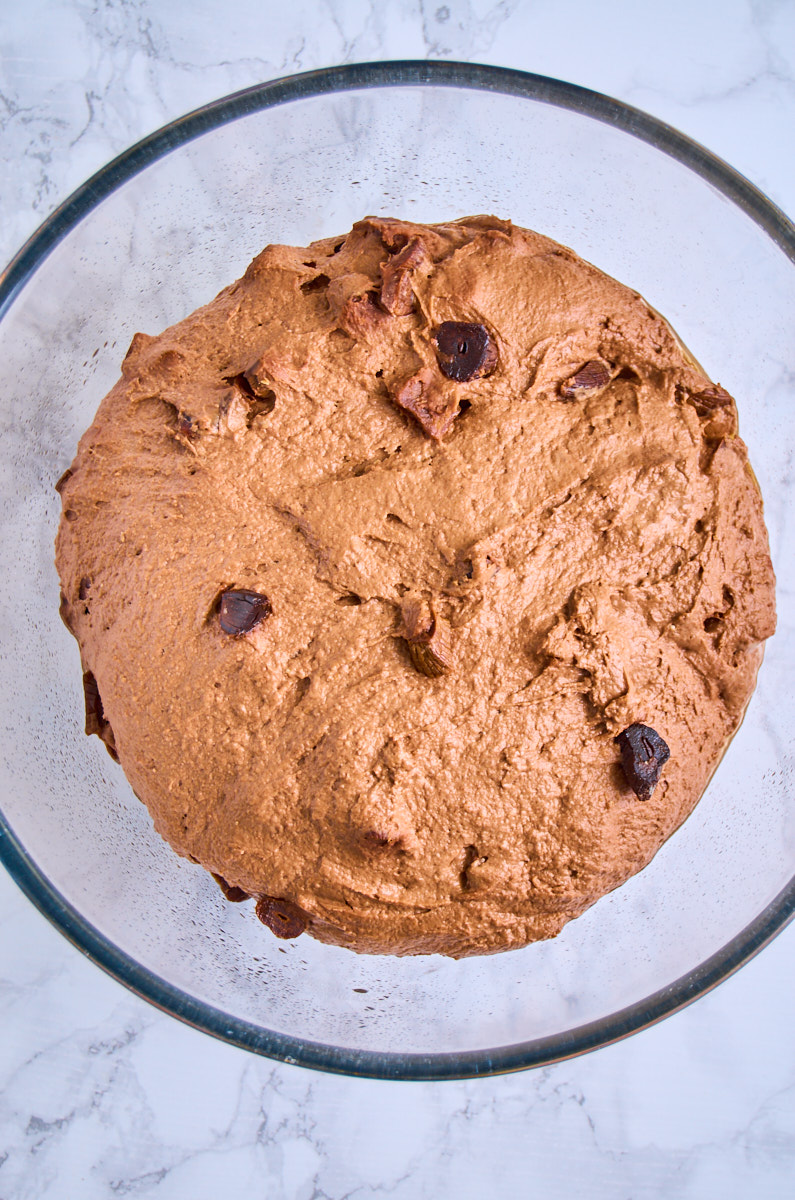
The last picture is after the overnight ferment in the fridge, with the dough visibly doubled.
Don’t be tempted to add more flour
If you do add too much flour, you’ll end up with “Dwarf Bread”: You always find something better to eat and can use it instead of bricks to smack intruders over the head or build pretty sturdy houses with it. Have a wild guess how I found out…
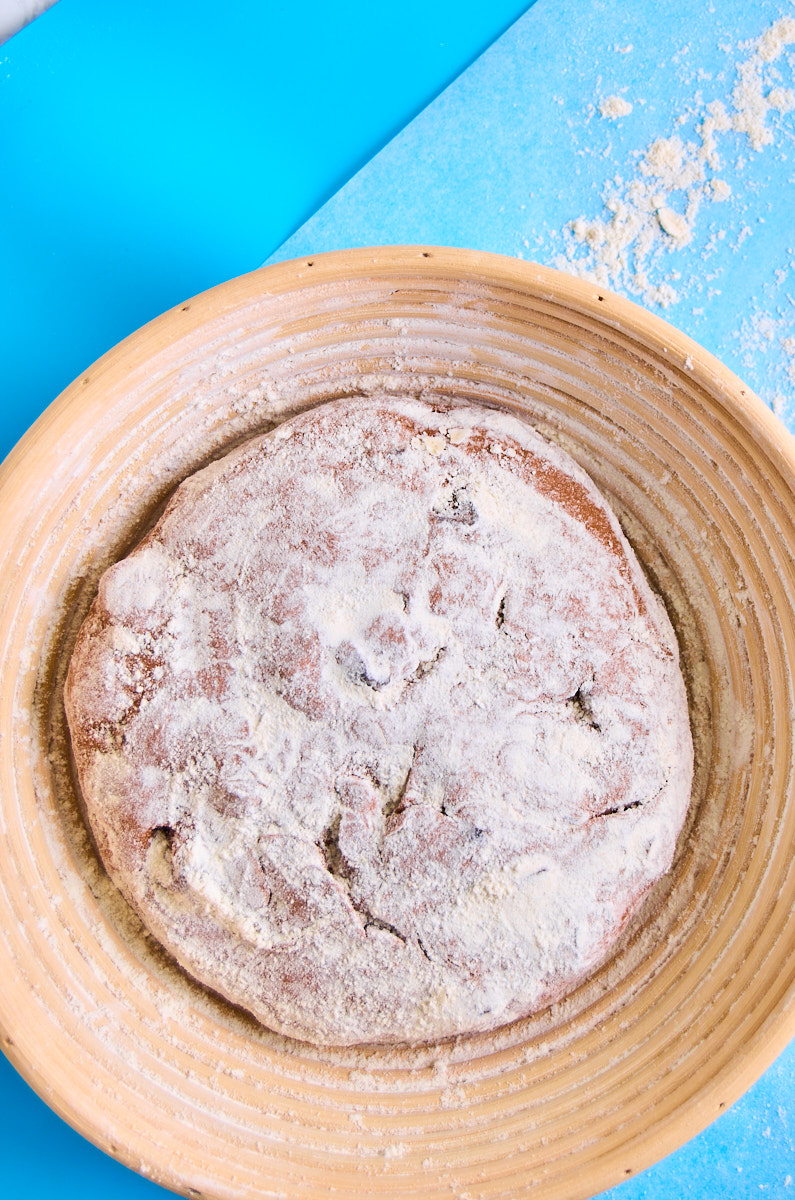
Shape
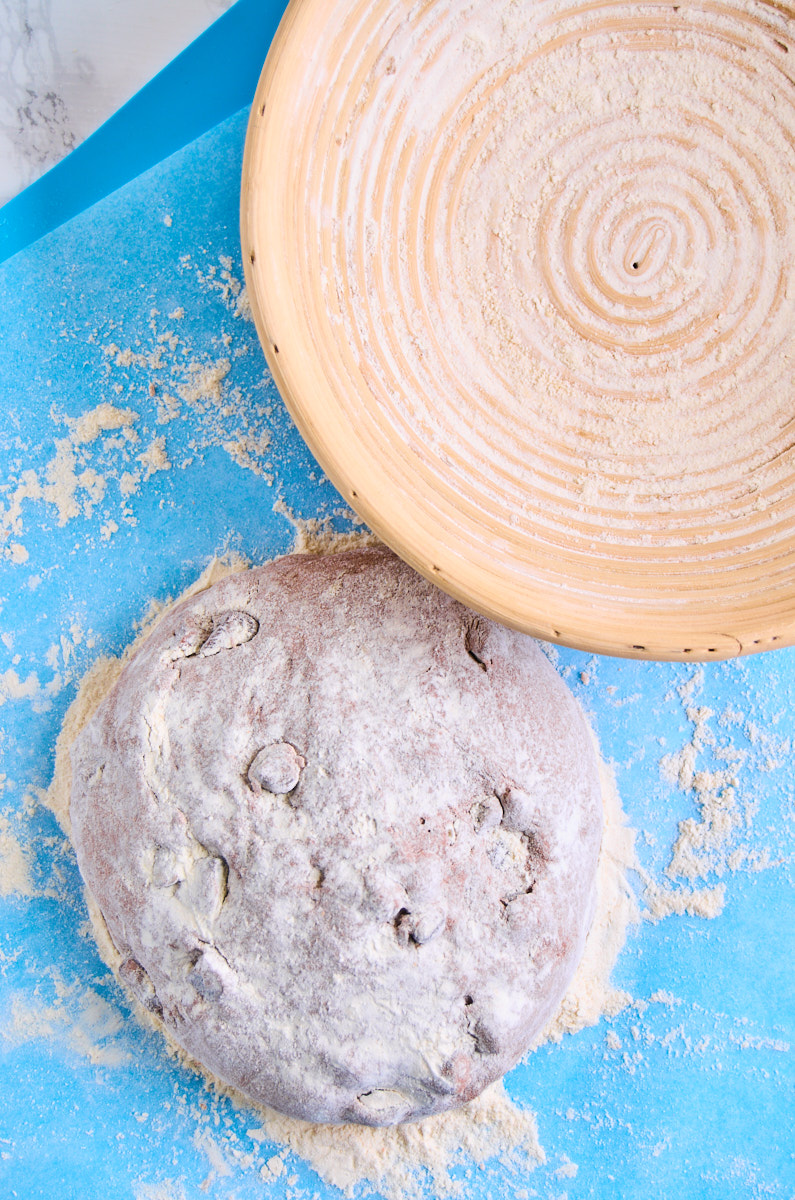
Since this dough is so sticky, I usually cover a sheet of baking parchment with some semolina. You can use flour, as I did for this particular bread, to make the scoring more visible. Though semolina adds even more crunch, which I love. Your choice really. Then tip the dough out on it with help of a silicone spatula. Wet or flour your hands, then stretch and fold the dough in thirds 3 times, each time turning it by 90 degrees, to create some tension. Use your hands to form a round shape, pushing the dough underneath itself while doing so.
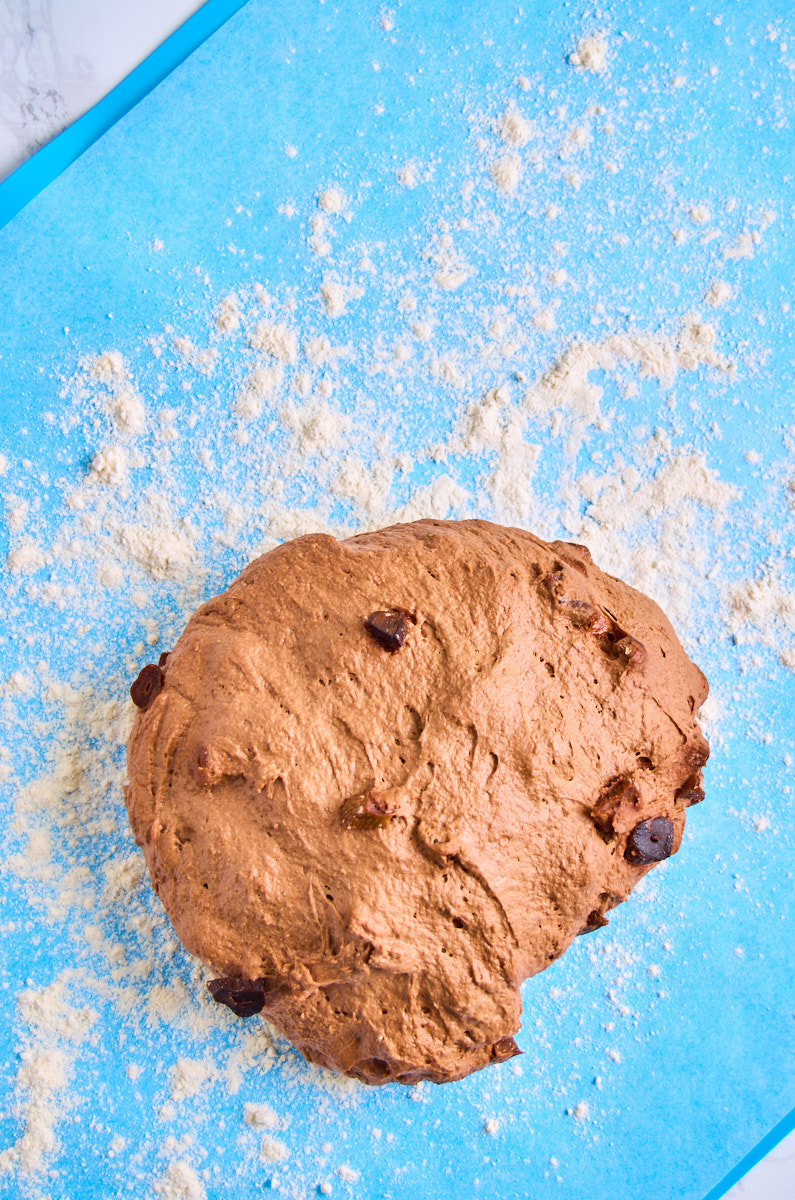
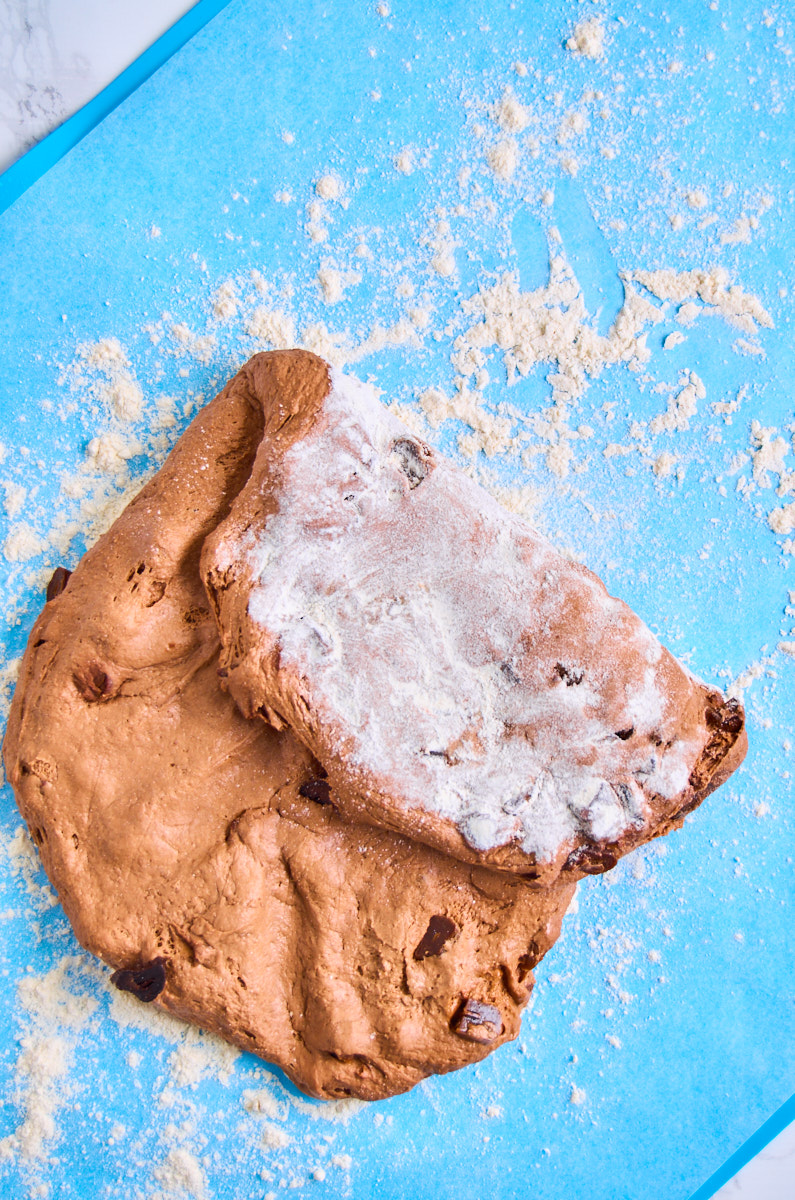

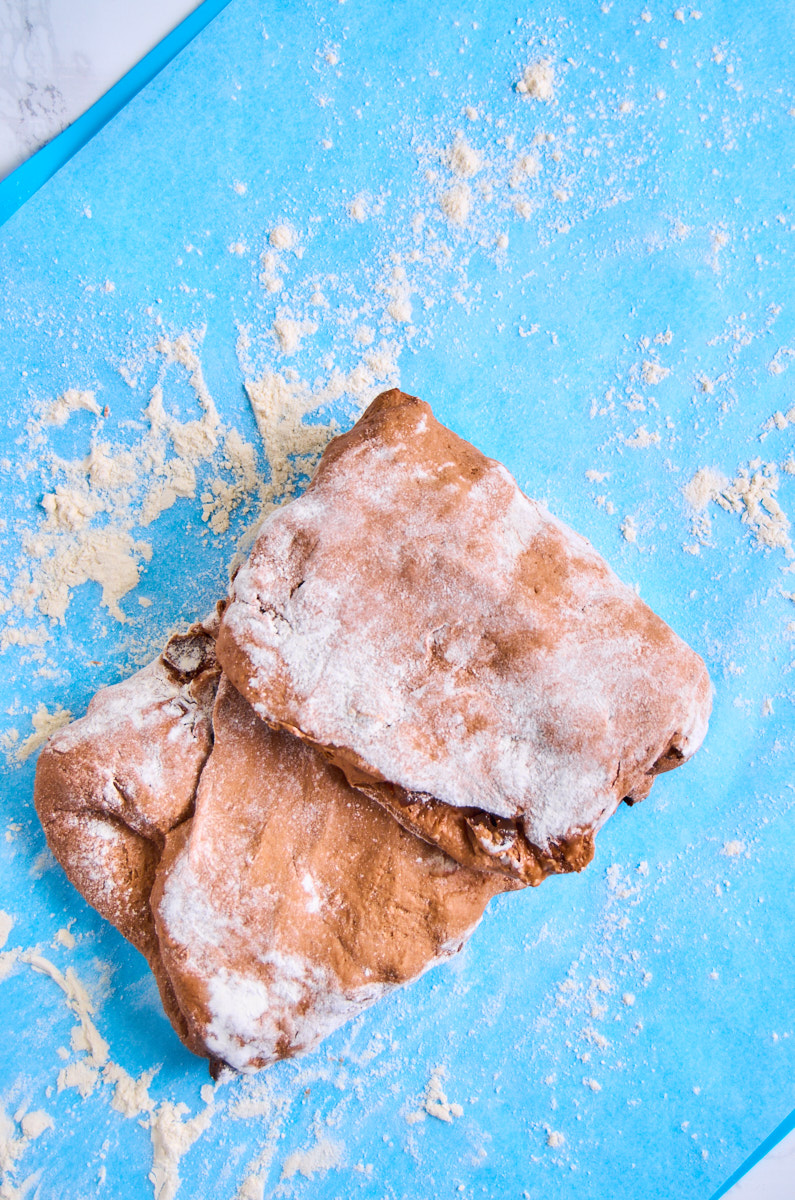
The process here will give you that beautiful domed shape and add some rise. Do all of this gently, to not knock too much of the air out of it.
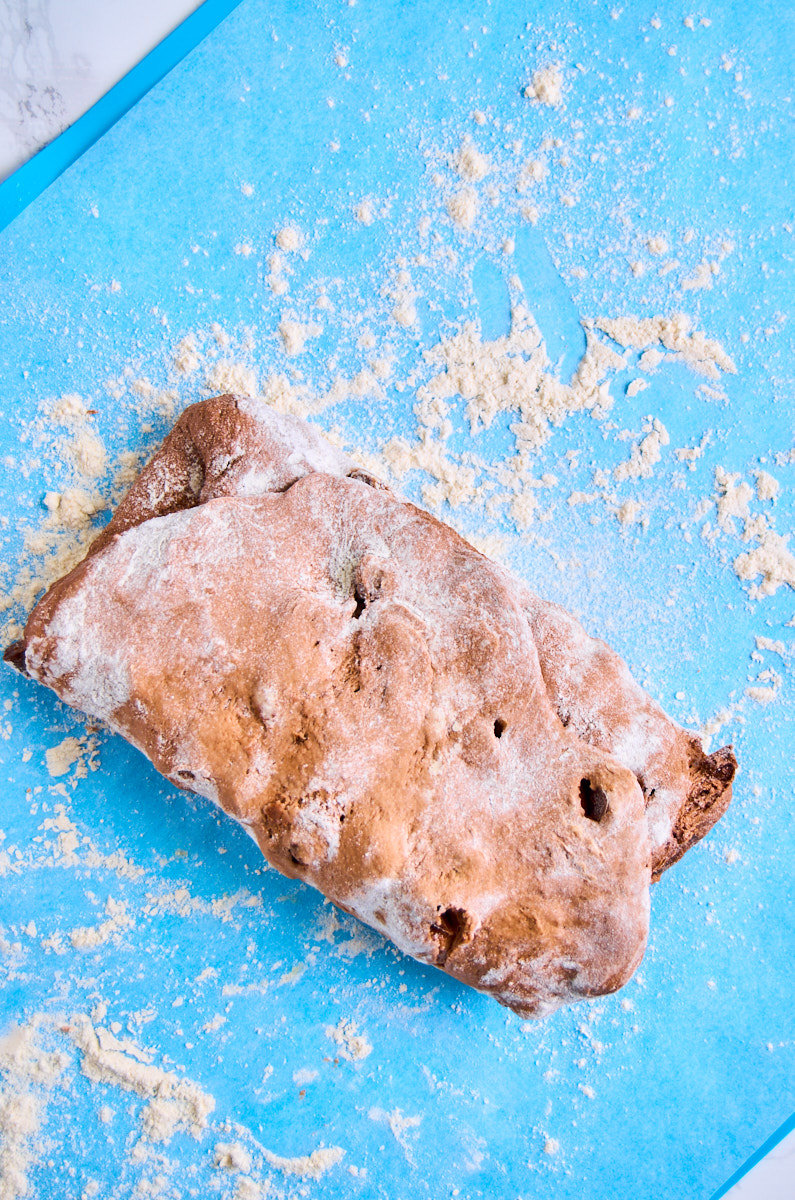
Once you are happy with the shape, you can either put it in a well floured bread basket or leave it on the parchment and transfer it back into it’s bowl. Cover with a damp, clean kitchen towel for its final 2h rest.
Bake
Now it’s finally time to bake! The reward is near.
Preheat your oven to it’s highest temperature. Add your cast iron pot/dutch oven, so it can preheat too.
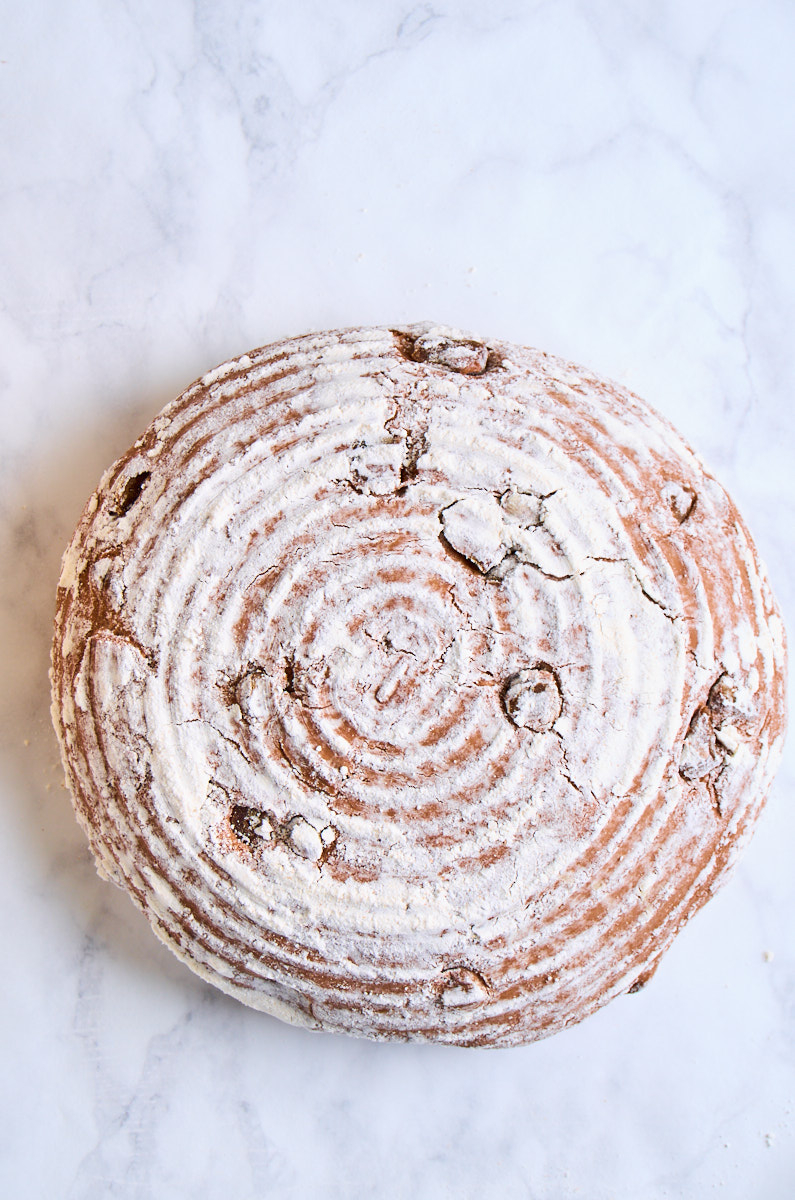
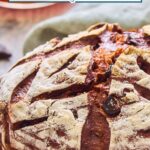
Score your bread. If you want to use one of the super pretty scoring patterns you can find all over Pinterest, I advise you put your dough into the freezer for about 20minutes, which prevents the dreaded dragging of it during scoring. To be honest, I still haven’t mastered the whole thing, but hey, we are all learning, right?
This was today’s attempt anyway:
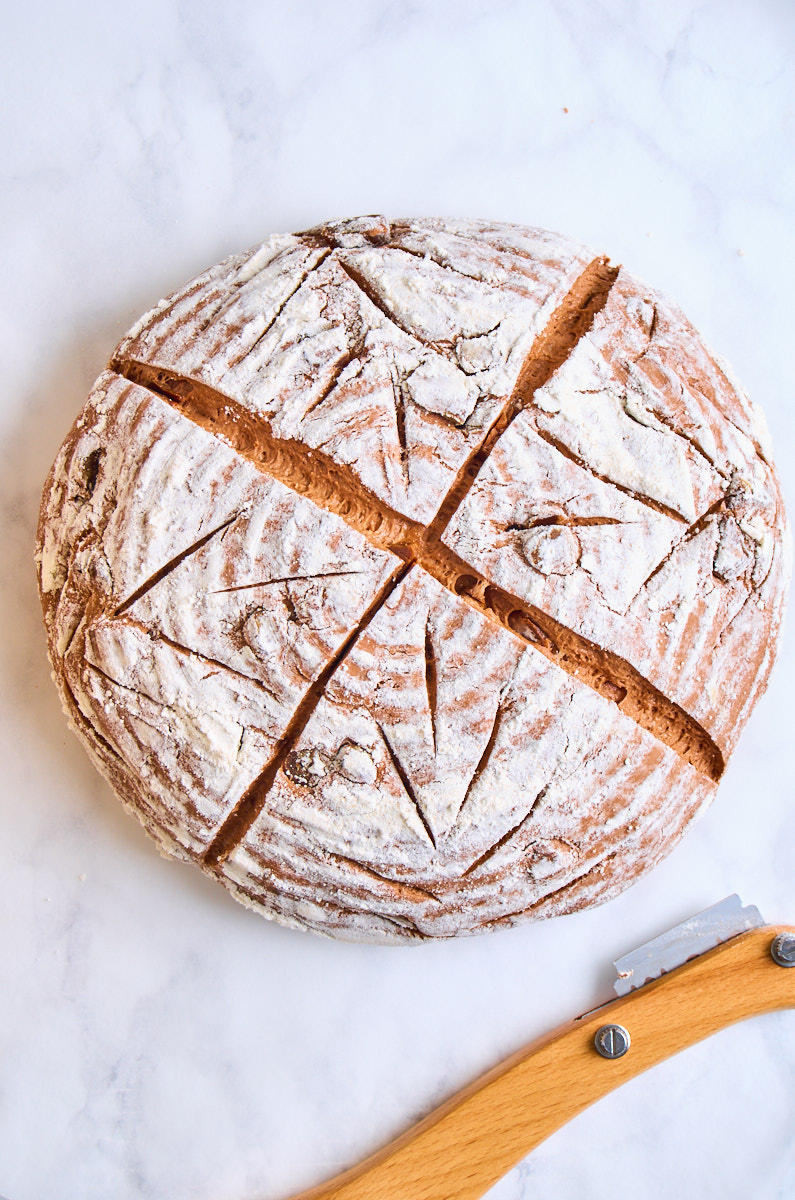
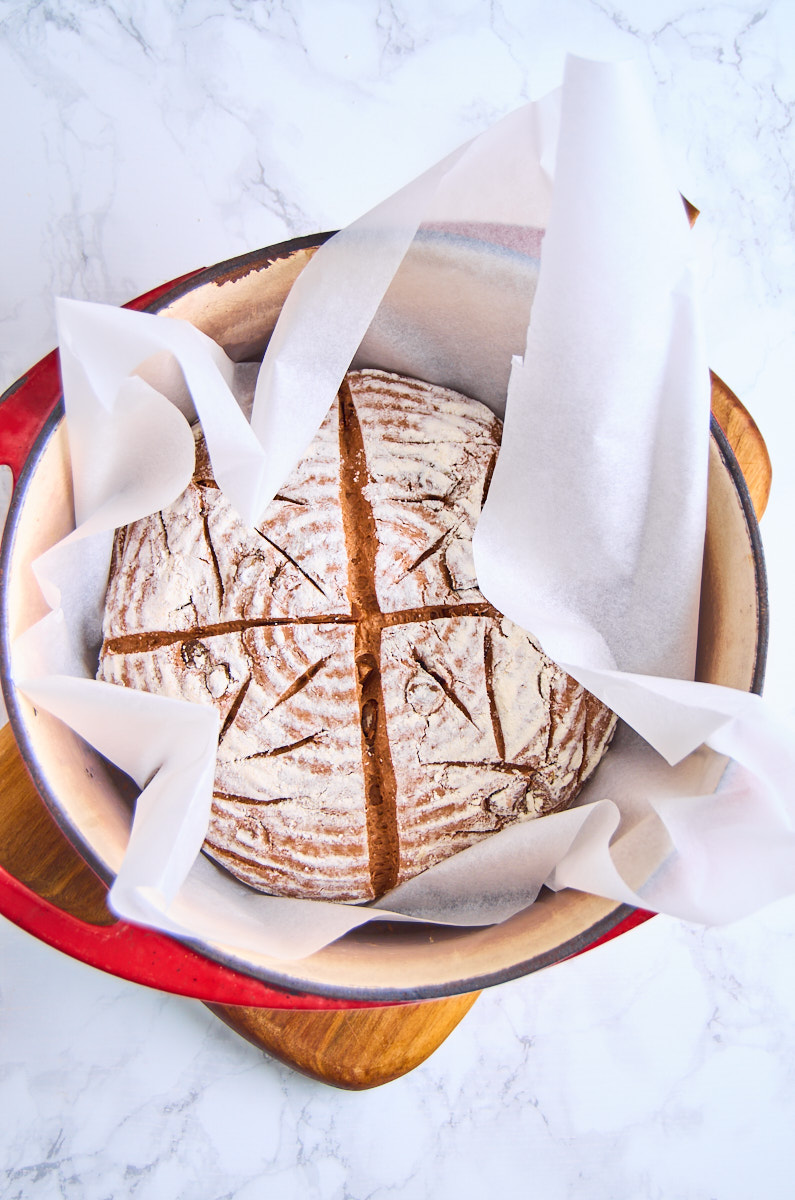
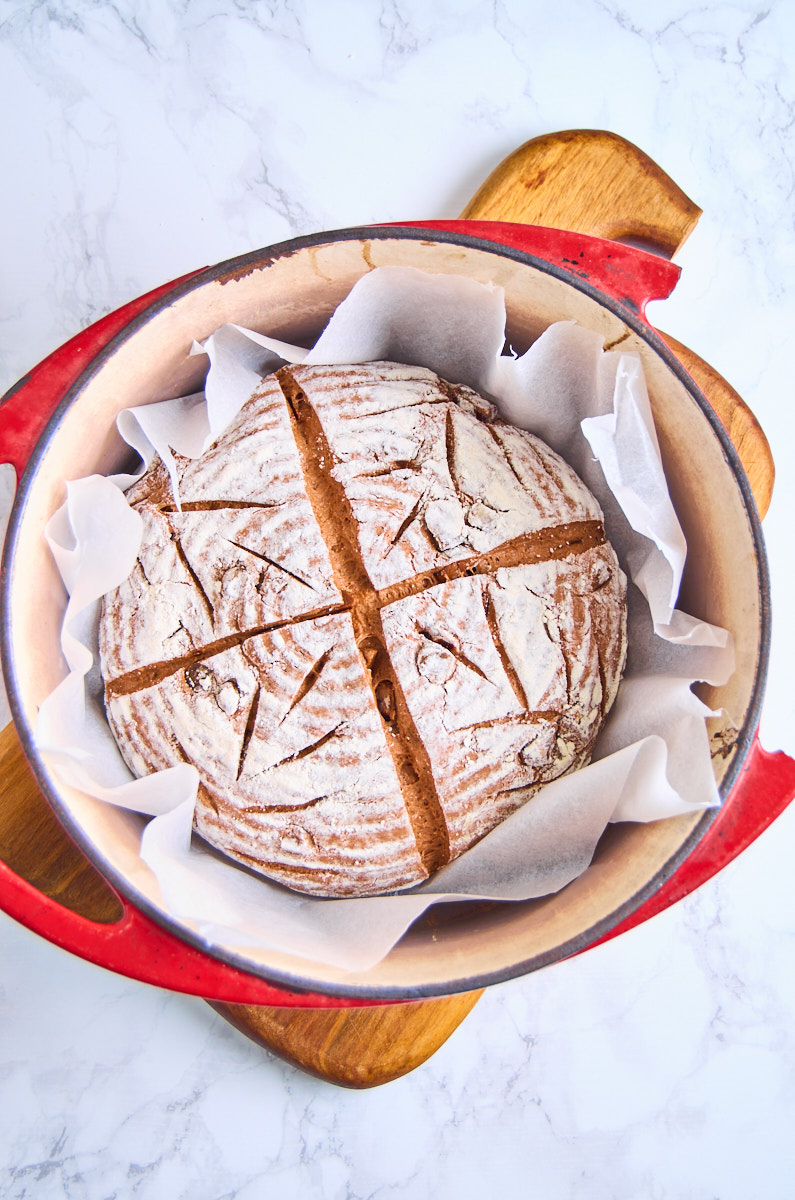
Before I forget it: I usually put the loaf onto baking parchment to lower it into the hot pot, as I have a tendency to burn my fingers. This also prevents any possible sticking, should your dough be a tiny bit too wet. Use scissors to roughly cut off the overlapping corners, so the lid can seal properly.
Why Cast Iron Pot?
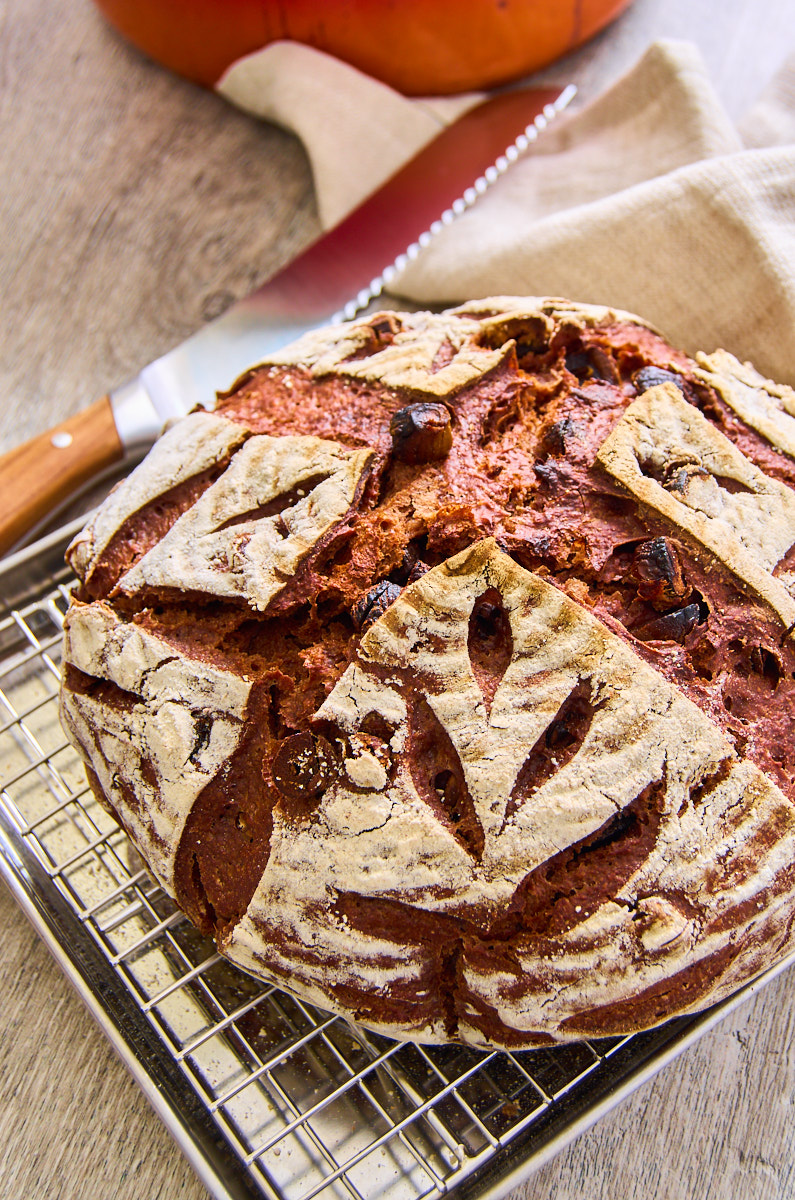
To get that perfect crunchy, but not too hard crust, you need steam. And since very few people I know have a professional convection oven that can produce steam on command (including me), I’m using my dutch oven*/ Cast Iron pot for this. The lid keeps the moisture in and transforms it into steam for the first 20-30 minutes, which gives us the moisture we need. Then, taking the lid off, your bread will develop the beautiful crunchy sourdough crust we want.
And finally:
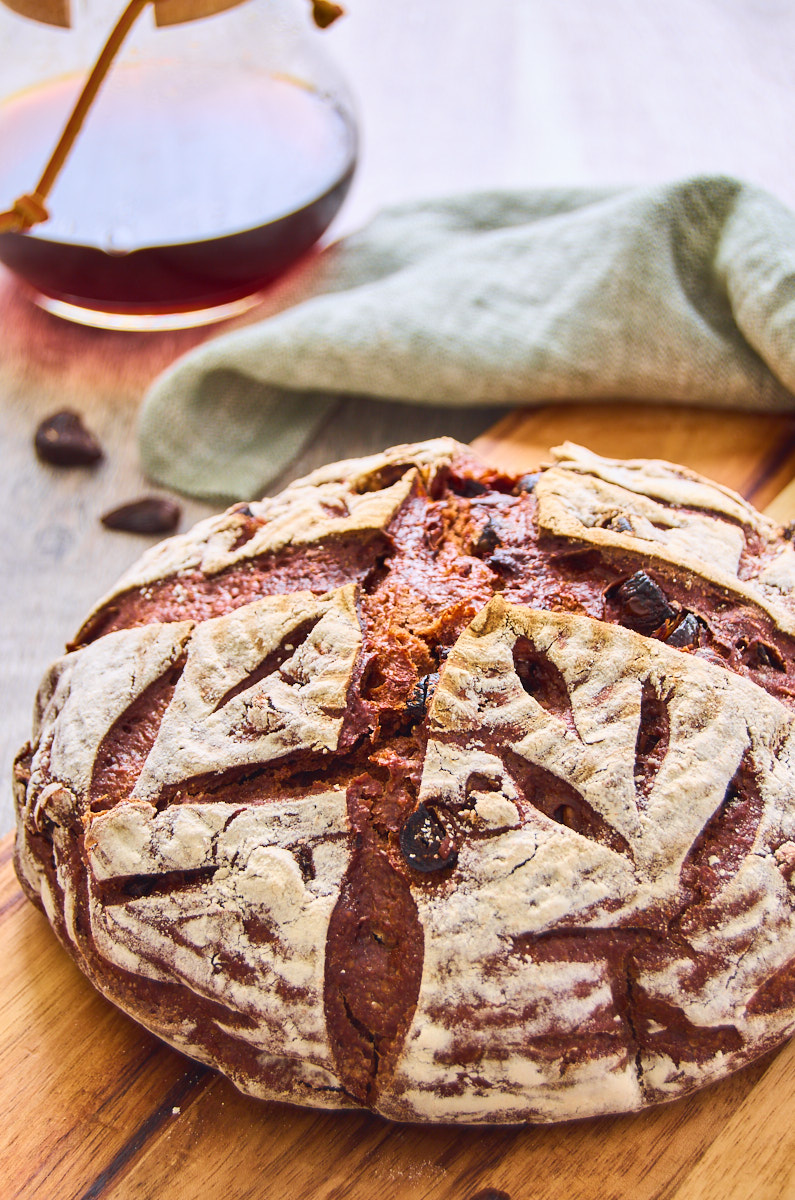
How to Serve
This is an incredibly versatile bread, despite the unusual ingredients. I adore it with fresh, cold unsalted butter, when it’s still slightly warm. I know, I know, we are always told to let sourdough bread cool completely, but I’m not one to follow rules very well. So warm bread it is for me.

I also had it with a bit of apricot jam on top, which was a great contrast. And, oddly enough, a nutty gruyere and some blue cheese, both working incredibly well with the Black Garlic. Oh and, my all-time favourite “Grafschafter Goldsaft” (not affiliated because German Amazon). This is a German sugar beet sirup, which has similar fruity-umami notes to Black Garlic and goes fantastic with any slightly darker bread.
Meal Prep
This Black Garlic Sourdough Bread with Chocolate keeps well in a bread tin on the counter for about 3-4 days.
I usually freeze at least half of it for up to 3 months, so I always have some fresh sourdough bread around when I want it.
For more amazing Black Garlic Recipes check these:


If this Black Garlic Sourdough Bread with Chocolate seems to be a bit too “out there” due to the combination, try my German Sourdough Rye Beer Bread as an easy beginner sourdough recipe. It’s incredibly forgiving in its preparation and utterly delicious.
Now I’d love to hear from you in the comments!
Have you tried this? Did you enjoy it?
What other recipes would you like to see?
And if you enjoyed this recipe, please consider rating, sharing, or leaving a comment – your feedback truly helps my blog grow!
Black Garlic Sourdough Bread with Chocolate
- Total Time: 22 hours 5 minutes
- Yield: 10 slices 1x
- Diet: Vegetarian
Description
In this Black Garlic Sourdough Bread with Chocolate, I combine the tangy notes of rye sourdough with the sweet balsamic-liquorice-umami addictiveness from the Black Garlic, adding cocoa, which supports the fruity notes and adds depth. The espresso heightens the chocolate flavour even more And a few secret ingredients will give you a crusty, chewie loaf reminding you of the best German artisan bakeries and their “Bauernbrot” with a twist.
Ingredients
- 1 cup sourdough starter (active)
- 1 cup water (+ 3tbsp. Room temperature)
- 1 tbsp malt extract (or honey)
- 1 tsp diastatic malt powder (optional. Gives a lovely crust and flavour)
- 4 tbsp strong coffee or espresso
- 1.5 cup strong white flour (+ 3 tbsp )
- 1/2 cup rye flour (+ 2 tbsp)
- 1/4 cup strong wholewheat flour
- 1/4 cup cocoa powder
- 3 tsp kosher salt
- 1 tsp vitamin C powder (optional)
- 1/2–1 cup peeled black garlic cloves (Chopped roughly. depending on how much black garlic you have and like in your bread. DO NOT use raw garlic.)
Instructions
Mix the wet and the yeast
- In a large mixing bowl, combine the sourdough starter, malt extract (or honey), malt powder (if using) and room temperature water. Mix until well incorporated.
Mix the dry with the wet
- Add the strong white flour, rye flour, and whole wheat flour to the bowl. Mix until you get a shaggy dough. You can do this with a stand mixer of you like.
Rest
- Cover the bowl with a damp kitchen towel or plastic wrap and let it rest for 30 minutes. This resting period is called autolyze and helps develop the gluten.
Add remaining ingredients
- After 30 minutes, add the cocoa powder, and strong coffee or espresso to the dough. Mix thoroughly until all the ingredients are evenly distributed.
- Now, add the kosher salt and peeled black garlic cloves to the dough. Knead the dough until the salt and black garlic are well incorporated. You can do this by hand or using a stand mixer with a dough hook attachment.
- Cover the dough again and let it ferment at room temperature for about 4 to 6 hours, or until it has doubled in size. During this time, perform a series of stretch-and-fold techniques every 30 minutes to strengthen the dough.
Ferment
- Alternatively, you can cover the dough and leave it in the fridge overnight, without the stretches. That’s what I do most of the time and the bread comes out perfectly.
Shape
- After the fermentation period, gently shape the dough into a round loaf. Place it in a well-floured proofing basket or a lined bowl, seam side down. Cover the dough and let it proof for another 2 to 4 hours, or until it has visibly risen and feels airy.
Bake
- While the dough is in the final stages of proofing, preheat your oven to 450°F (230°C) with a Dutch oven or a lidded oven-safe pot inside.
- Once the dough has finished proofing, carefully transfer it to the preheated Dutch oven or pot. You can do this by inverting the proofing basket onto a piece of parchment paper and gently sliding the dough into the hot pot. Alternatively, you can place the dough on parchment paper and lift the whole thing into the pot.
- Score the top of the dough with a sharp knife or razor to allow for controlled expansion during baking.
- Cover the Dutch oven or pot with its lid and place it in the preheated oven. Bake the bread for 20 minutes with the lid on.
- After 20 minutes, remove the lid and continue baking for an additional 20 to 25 minutes or until the bread has a deep brown crust and sounds hollow when tapped on the bottom.
- Once baked, remove the bread from the oven and let it cool on a wire rack for at least 1 hour before slicing.

Notes
The equipment section may contain affiliate links to products I know and love.
This Black Garlic Sourdough Bread with Chocolate freezes very well. I usually just freeze half of it, to have fresh bread whenever the mood strikes me. Which is often.
- Prep Time: 15 minutes
- Cook Time: 50 minutes
- Category: Bread, Dinner, Side Dish
- Method: Bake
- Cuisine: German
Nutrition
- Calories: 120
- Sugar: 1
- Sodium: 709
- Fat: 1
- Saturated Fat: 0.3
- Carbohydrates: 25
- Fiber: 2
- Protein: 4
- Cholesterol: 1

This combo of garlic and chocoalte is unique thanks for sharing I have tried and delicious loaf.
Thank you, so happy it worked for you.
I love the tang of sourdough and adding the chocolate and garlic really gave this such a unique complex flavor. I loved it.
Aww thank you, now I don’t feel totally weird for adding garlic and chocolate together. 😉
This black garlic bread was absolutely amazing! Such rich flavors, I loved it.
Thank you! That’s what I love about it too.