Description
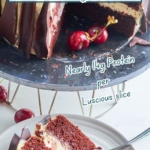
Most people think of Black Forest Cake as a dry, sugary sponge that relies entirely on syrup to be edible. I grew up with the classic Schwarzwälder Kirschtorte, but I always felt it could be more—more chocolatey, moister, and actually a bit better for you. This version uses sourdough discard for depth and chocolate whey protein for a massive nutritional boost, resulting in a cake that tastes like a professional patisserie find but actually supports your goals.
Ingredients
Units
Scale
Protein Chocolate Cake Layers
- 115g coconut oil, melted
- 60g 70% Dark Chocolate
- 120g all-purpose flour
- 325g granulated sugar
- 60g cocoa powder
- 60g Whey concentrate protein powder, ideally chocolate flavor
- 1 1/2 tsp baking soda (8g)
- 1 tsp baking powder (6g)
- 1 tsp fine salt (8g)
- 160g fat free Greek yoghurt
- 225g sourdough discard
- 2 large eggs, room temperature
- 1 tsp vanilla extract
- 190ml coffee, freshly brewed
Cherry Filling
- 1 can cherries in light syrup
- 2 tbsp sugar
- 4 tbsp Kirsch (optional but recommended)+ 1 tbsp for spraying if you want a grown up version.
Protein Cream Topping
- 2 cups cold whipping cream (or plant based alternative. I love Oatly Whipping cream!) (adjust based on need)
- 1/2 cup whey protein, vanilla flavor (concentrate works best)
- 1 tsp vanilla paste (or extract)
Chocolate Shards for sides (optional)
- 7oz (200g) dark chocolate
Decoration
- Fresh Cherries or maraschino cherries (optional)
For the Cake Pans
- Baking parchment
- A little coconut oil or butter
- 2 tbsp cocoa powder or flour
Instructions
Making The Chocolate Cake Layers
Preparations
- Pre-heat your oven to 350°F/175°C
- Line the cake pans with baking parchment (watch the video to see how to do this neatly.)
- For this cake I wanted the sides of the sponge to “climb” a bit up the sides of the pan. So I greased it first with a bit of coconut oil. This also helps with the parchment staying put.
- Then I sifted about 1 tbsp cocoa powder into the first pan and tilted it around over the second pan until it was well coated. You could use flour for this, but I take every bit of chocolate flavor I can get.
- Tip the leftover cocoa into your second pan and repeat until both are coated.
- Now line the bottom with the parchment to prevent any possible sticking.
- Weigh your mixing bowl and write the weight down. This means, you can then weigh it again to get the weight of the batter, divide it by 2 and get the exact amount to add to each cake pan. That way you’ll have very evenly baked and sized layers.
Melt Your Chocolate
- Add coconut oil and chocolate either to a microwave safe bowl or a double boiler and gently melt.
- Allow to come to room temperature while you mix your remaining ingredients.
Mix The Dry Ingredients
- In your large mixing mix flour, sugar, cocoa powder, baking powder, baking soda and salt. A whisk works best for this.
Add The Wet Ingredients
- Add the sourdough discard, eggs, Greek yoghurt and vanilla extract and cooled, melted chocolate with the coconut oil and mix until just combined.
Pour Over Coffee
- Brew some coffee freshly (either Americano or instant coffee). Don’t do this ahead of time, you want it still hot, so it activates the full cocoa flavor and keeps the dough super moist. This works very similar to the Yudane method I used in my Fluffy Sweet Potato Rolls, in gelatinizing part of the flours starches, giving you a super soft interior.
- Whisk until everything comes together in a pourable batter. This will be very runny; don’t be alarmed. It’s working as intended.
Divide Between The Cake Pans
- Now, since you wrote down the weight of your mixing bowl (you did, right?), weigh your bowl with the batter again. Subtract it’s weight from the bowl. Then pour half of it into one of the prepared baking pans and the other half into the second.
- In case you forgot: The batter weighs about 1420g, so you pour about 700g into each of the cake pans. That leaves room for the 20g that might just stick to the sides of the bowl. Of course you could scrape them out, but I think they make a great bakers snack.
- Of course you could just eyeball it (I did so many times). Just make sure to then test them separately for doneness, as one might need longer than the other.
Bake Your Protein Chocolate Cake Layers
- Bake for 35 to 40 minutes, or until a toothpick inserted into the center comes out clean.
- Allow to cool for about 30 minutes in the pans, then turn out onto a cooling rack until completely cooled.
Make The Kirsch Syrup
- Add your Kirsch, cherry juice and sugar to the saucepan. Let it come to a boil on high heat, then turn down to medium high and allow to simmer until you are left with about ¼ cup of super concentrated cherry flavored syrup. Allow to cool.
Prepare The Chocolate Shards for the Decoration
- Add your chocolate chips or chopped dark eating chocolate to a microwave safe bowl and melt in short bursts until liquid.
- Get a large sheet of baking parchment and fold in in thirds horizontally, to give you marking lines for spreading the chocolate. Unfold.
- Drizzle your melted chocolate over the center third, then spread it out relatively thinly with an offset spatula or large knife. You want it just about 2mm thick. Enough that it can be crackly later, but not too thick.
- Starting from one side, roll up your baking parchment into one neat roll and store in the freezer until firmed up and you are ready to use (About 30 minutes will do. Longer is fine. You can do this the day before if you want to get ahead).
- While you are at it, put your cream, cream whisking bowl and whisks in the fridge or freezer too, to get them nice and cold. For the cream: Be careful not to accidentally freeze it, as it can split. You can want it very cold.
Levelling The Cake Layers
- If you want a perfectly flat top (I don’t mind mine being a bit domed), you could flatten your cake disks by slicing off the top with a sharp knife.
- Or use the method I learned from my Grandfather, by running a sharp knife just around the top corner, then grab some sewing thread, lay it into the groove you just cut, cross over itself at the front of the cake and pull. You can see this best in the video.
- Lift off the domed tops and use them as bakers snack or crumbled over ice cream. It tastes incredible, so I’m sure it won’t be wasted.
- Pick from the two bases the one that looks best for the top of the cake.
Soaking The Chocolate Cake with Cherry Syrup
- If you’d like a bit of a grown up, boozy punch in your cake, you can spray it at this point with a little Kirsch. This is entirely optional but very delicious.
- Using about 2 tablespoons per layer, drizzle the concentrated cherry syrup over the top of each cake layer. It will look like a lot, but trust me, you want all that intense flavor in your cake. That’s what makes it into a real black forest cake!
Whip Your Protein Cream
- Grab your cream, whipping bowl and whisks from the fridge or freezer.
- Pour the cream into the bowl and start whisking. Whisk until you are getting a bit of volume, but still a soft, runny texture.
- Add the protein powder (and if you like some extra vanilla extract) and continue whisking on lower speed until you have soft peaks. If using dairy cream, be extra careful not to over-whip once the protein is added, as it thickens quite fast and will turn to butter quickly too.
Layering Your Black Forest Cake with Sourdough Discard
- On a turning cake stand if you have one or a large cake platter start with the bottom sponge you decided on earlier.
- Spread about 1/3 of your protein cream over it.
- Dot all the drained cherries from the can over the cream, pushing them in slightly.
- These will hold up the top layer of your cake, stop it from pushing out the cream filling and anchor it in place. So they are not just delicious, but also very functional.
- Gently lower your top layer onto the cherries and cream and wiggle it in place. This is where you can line up your cake perfectly (or imperfectly if you wish).
- Using your offset spatula, spread another third of the cream in a thin layer over and around the cake.
- This is your crumb coating, which will catch any stray cake crumbs and keep the last layer of cream neat and white.
- For the sides, a bench scraper or rubber spatula works best I found. It doesn’t have to be perfect, as it’ll be covered by chocolate.
- Finish topping the cake with the last third of vanilla cream, spreading it around just like the last, trying to get it relatively even.
- This works best if you start spreading from the center of the cake towards the sides, turning the cake while doing so. It takes a bit of practice to get it perfect, but we are not after perfection here.
- Use a damp paper towel to clean up and cream messes around the cake platter.
Decorate Your Black Forest Cake
Now comes the fun part where you can get wildly creative!
- Get your roll of dark chocolate out of the freezer.
- Gently unroll it, breaking the chocolate into large shards. This sounds far more complicated than it is. You really can’t do much wrong here.
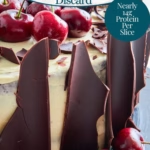
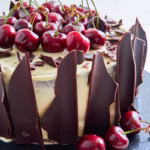
- Break the shards into pieces that fit your cake height and stick them onto the cream with the rounded side towards the cake. This sounds counterintuitive at first, until you see how well it sticks and looks, as the rounding has more surface area to stick to the cream.
- Tumble your cherries on top.
- I used the remaining bits of chocolate to sprinkle over the top.
- Step back and admire your Black Forest Protein Cake masterpiece.
- Yep, you made that!
- Are you sure you want to wait for your guests to try it? I sure didn’t!


Notes
Make Ahead
- The cherry syrup, cake layers and chocolate decoration can all be made the day before. Wrap the cake layers lightly in cling film, so they don’t dry out.
- So on the day when you want to serve this, all you need to do is whip the cream and assemble.
How To Store
- This protein cake is best eaten on the same day but can be stored in a cake transport box in the fridge for up to 3 days.
- The cake’s high moisture content, thanks to the sourdough and hot coffee, also means it stays incredibly moist and tender for the full 3 days.
- I would not advise to freeze it, as the cream topping can split and taste slightly off.
- Prep Time: 90 minutes
- Cooling time: 2 hours
- Cook Time: 40 minutes
- Category: Sourdough Protein Desserts
- Method: assemble, Bake
- Cuisine: German