Description
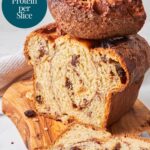
Get ready to bake a bread that combines the comfort of German-style raisin bread with the gut-friendly benefits of sourdough. This soft, enriched loaf, packed with a warm cinnamon swirl, fills your home with an irresistible aroma. What makes it truly special is the boost of protein from simple additions like cottage cheese and protein powder, turning a classic treat into a satisfying, everyday staple that’s perfect for toast, sandwiches, and more.
Ingredients
For the Sourdough Starter
- 25g existing sourdough starter
- 140g flour
- 120g water
Dough
- 375g cottage cheese
- 125ml water
- 50g cup granulated sugar
- 60g protein powder (Whey works best)
- 3 large eggs
- 225g active sourdough starter
- 690g strong white flour
- 10g salt
- 125g butter, softened
Add Ins
- 120g raisins
- 120g walnuts
Cinnamon Swirl
- 110g sugar
- 18g ground cinnamon (about 2 tbsp)
- 30ml milk (I used Oatmilk)
Instructions
Day 1
2 days before baking
Make your Sourdough Starter (Levain)
- In an ideal world, you would feed your sourdough 2 days before planning to bake this bread in the evening.
- If you didn’t don’t despair. You can feed it early in the morning, leave it in a warm place for about 4-8 hours, depending on room temperature, and it should be fine. If yours seems to be taking longer, boil some water, pour it into a cup and place it in your oven with just the light switched on. Place your starter jar beside it and you’ll have the perfect temperature for it to thrive.
- The same goes for the dough later, if your house is fairly cold.
- With a very active and freshly fed starter, I managed to mix the bread dough early in the morning and bake in the evening. However it needs at least 2h to cool, so plan with that.
Day 2
1 day before baking
- I usually start my bread in the evening with enough time for a few optional stretch and folds during the bulk ferment. So about 2h before going to bed/settling in with some Netflix.
- Either melt your butter and let it cool completely or let it soften outside the fridge. Just don’t use it either hot or fridge cold. Both versions won’t incorporate well and have different undesirable effects for this particular dough. Put it to the side until you need it.
Blend cottage cheese and protein powder
- Using about ½ cup of the water in the recipe, start by blending the cottage cheese. I usually do this in my Nutribullet, as the Vitamix is a bit too big for the task. But any blender will work. Or in doubt even a food processor. As long as it breaks up the curds into a smooth liquid.
- Add the protein powder and sugar for the dough. Briefly blend again until no lumps are left.
- Now, you might be tempted to throw in the protein powder right with the cottage cheese, but from the experience of the clumped up mess I scraped out of my blender: I wouldn’t advise you to. It becomes perfectly smooth though as soon as the cottage cheese is liquified first.
Mix the wet
- Stir the blended cottage cheese-protein into the remaining water and sourdough starter. I’m using a dough whisk, but a simple spoon, whisk or fork will do just fine.
- Add your eggs and whisk in as well.
Mix the Dry
- Add the salt to your flour and mix it in well, so it doesn’t come into direct contact with the sourdough starter.
- Many sourdough bakers work it into the dough after the autolyse as it can slightly inhibit gluten formation, just as butter (which coats the flour with fat), but personally I tried both methods and didn’t see much of a difference in the resulting bread, yet a fair amount more work. So I add it from the start.
Mix the wet into the dry
- Pour your creamy protein mix into the flour.
- Either use your stand mixer or start stirring with a dough whisk or wooden spoon. Or just use your hands, whatever floats your boat. Mix until you have a shaggy dough.
- Now, if you want to do it the “correct way”, leave your dough for 30 minutes for the autolyse. Then add the butter and knead it in.
- I admit I’m way too impatient for this extra step and waiting and simply added it right after the first stirring, using my Kitchen Aid on speed 1 for this until I had a smooth dough.
- Cover and allow to rest for 30 minutes.
Note:
This is a soft and sticky dough at this point. It won’t necessarily come away from the sides of the bowl. That’s working as intended. It will after a few sets of stretch and fold.
Prepare The Mix-ins
- While your dough is resting, chop the walnuts roughly, then toast them in a dry pan on medium-high heat until they smell really lovely. Keep an eye on them, as they burn quickly.
- Put in a bowl to allow them to cool.
- Measure out your raisins.
Stretch And Fold
- Once your dough had its first 30minutes of resting, add ½ of the raisins and walnuts on top of the dough.
- Wet your hands to prevent sticking, push them under one side of the dough, pull it up and fold it over the mix-ins. Turn the bowl by 90 degrees, repeat. Do this 3-4 times.
- Cover, let it rest for 30 minutes and repeat with the remaining raisins and walnuts.
- Do one or two more sets of stretch and folds until your dough is visibly stronger and smoother.
Bulk Ferment
- Now it’s time for the bulk ferment. Take your dough out of the bowl. It should be easy to work with already. Shape it into a neat ball. Spray your bowl with a bit of oil and place the dough inside. This makes it easier to take out later. Cover the bowl with cling film or a lid. The Kitchen Aid glass bowl has a loose sitting plastic lid that I find pretty ideal for this.
Overnight (or day) Ferment
- Now leave your dough in the covered bowl in the fridge overnight or at least 6-8h on the counter until it has doubled in volume.
- Alternatively you could shape it as below the evening before, put it into the loaf tin and let it ferment and rise in there.
- Just note that you’ll have to take it out of the fridge in the morning probably and let it finish rising outside, until it has about doubled in volume.
- If you can’t bake the next day, you can leave it in the fridge for up to 48 hours.
Day 3
The day of Baking (or the evening before, if you go with shaping before overnight fermentation)
Shape And Fill With Cinnamon Sugar
- Mix the cinnamon into the sugar. Both brown and white sugar will work nicely.
- Get a silicone baking mat or lightly flour your worktop. Some flour in an old saltshaker works marvellously for aiming. Especially, if you, like me, are very good at sprinkling your floor with flour while dusting the worktop.
- Get your loaf pan and grease it lightly or line with baking parchment.
- Push or roll your dough out about 8-10 inches long, and about as wide as the loaf pan. It doesn’t have to be perfect, don’t worry. Check for and big bubbles and pop them. As opposed to classic sourdough bread with its open crumb, we don’t want holes in this bread!
- Sprinkle generously with cinnamon sugar, keeping back 2-3 tbsp for topping the bread if you like a sweet and crispy cinnamon crust.
- Roll into a loaf, starting on the short side. Do this really tightly, so it doesn’t get holes or come apart.
- Fold in the sides a little while rolling, so the cinnamon sugar mix doesn’t seep out during baking, which could cause it to burn.
- Place the bread seam side down in your prepared loaf pan and cover loosely with cling film or a damp kitchen towel.
Final Rise
- Allow your Cinnamon Raisin Sourdough Protein Bread to rise for 4-8 hours or overnight in the fridge until visibly puffed up over the top of the loaf tin.
Bake
- Pre-heat your oven to 350°F/175°C, placing a baking rack in the middle.
- Score your bread dough all the way through the middle with a sharp knife or lame about ½ inch deep. This will allow it to rise more evenly and prevent uncontrolled cracking on the sides.
- Sprinkle with the remaining cinnamon sugar or brush with optional egg wash or milk, if you prefer a softer crust.
- Once your oven is nice and hot (I usually pre-heat for about 30min to get an even temperature throughout) add your bread and bake for 30 minutes or until nice and golden brown.
- At this point cover it loosely with kitchen foil and bake for another 40 minutes to 1 hour or until it reaches 190°F to 210°F (88°C to 99°C) in the center. Alternatively, if you have no food thermometer, take it out of the loaf tin (using oven gloves) and tap the bottom. It should sound hollow.
- This bread, opposed to many others I made, needs a little longer than the top browning would suggest, to get the center baked perfectly.
Allow Your Sourdough Cinnamon Raisin Loaf To Cool
- Remove your delicious smelling sourdough brioche with protein from the oven. Let it cool in the tin for about 15 minutes, then carefully transfer it onto a cooling rack to prevent moisture from gathering in the tin while cooling.
- And now you’ll hate me but I’m absolutely serious about this one: Let your bread cool. At least 1h until mostly cooled out.
- I know it’s hard, because it smells and looks just SO good! But trust me you’d regret cutting into it too early. At this point the middle is still finishing to bake and firm up. Cutting into it too early can lead to holes and underbaked centres.
Enjoy
- Now that you have patiently waited for your Sourdough cinnamon raisin loaf with protein to cool, slice into it. Pat some butter onto it or your favorite jam and enjoy with a nice cuppa.
- If for some reason you have leftovers, make French toast or a fabulous bread pudding!
Notes
How to Store
- This bread keeps in a bread tin or airtight container on the counter for about 3 days.
- It toasts beautifully and freezes really well for about 6 months.
- I love to eat ½ loaf fresh and keep the other half frozen, so it always feels really fresh. You can also pre-slice it and store it separated with baking parchment in a freezer bag, so you can take out a slice whenever the craving hits.
- Prep Time: 1 hour
- Cook Time: 1 hour 30 minutes
- Category: Bread & Sourdough
- Method: Bake
- Cuisine: American