Description
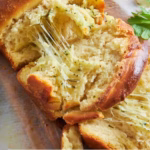
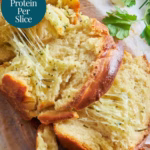
If you grew up with the classic shop-bought garlic baguette, you know how comforting it is—but you also know it’s mostly just empty calories and butter. This sourdough version keeps that nostalgic flavor while adding a bit more substance. By using my “Everything” sourdough brioche base, you get a pull-apart loaf that is naturally soft and tangy, with the added benefit of 13g of protein per slice thanks to the high protein enriched base dough and cheese. It’s a more sophisticated and made from scratch version as side dish for a family BBQ or a dinner with friends that actually leaves you feeling full.
Ingredients
Units
Scale
Garlic Butter Cheese Filling
- 5 Tablespoons/71g unsalted butter
- 2 Tablespoons roughly chopped fresh parsley (or 2 teaspoons dried)
- 1 tablespoon fresh basil, roughly chopped (or 1 teaspoons dried)
- 1 tablespoon rosemary needles, stems removed (or 1 teaspoons dried)
- 2 garlic cloves, roughly chopped or 1/2 teaspoon garlic powder
- 1/4 teaspoon salt, or more to taste
- 3/4 cup (95g) shredded mozzarella, or sharp cheddar (or your favorite shredded cheese)
Optional Topping
- 1 egg for egg wash for a golden brown and shiny crust
- Alternatively brush with more butter
Instructions
The Enriched Dough
- Start by making the Everything Protein Sourdough following the instructions in the base recipe about 3 days before you want to bake this Garlic Cheese Sourdough Brioche.
- Use half of the recipe for this after the bulk fermentation and fridge time.
- Use the other half for another recipe (like the Brioche from the base recipe or Protein Burger buns or Marzipan Wreath) or make two Garlic Pull Apart Loaves by doubling the butter and cheese in this recipe card.
The Garlic Herb Butter
- I used a food processor for this as it’s so quick and easy.
- Simply add all the ingredients roughly chopped to the food processor and run it until you have a creamy, smooth herb flecked compound butter.
- You may have to scrape down the sides a few times to get it all evenly chopped.
- You can prepare the butter up to a week ahead of time and keep it well wrapped in the fridge or even in the freezer for up to 3 months. So a lovely garlic bread is never far away.
- Personally I always make double and freeze half, as it’s so good on all sorts of dishes from the classic steak over fresh bread all the way to baked potatoes.
- Preparations
- Grease a 9×5 loaf pan and line it with baking parchment. This will keep the bread and particularly the melting cheese from sticking.
- Get your rolling pin ready and butter softened if you had it in the fridge. It should be easy spreadable for this.
- Lightly flour your worktop and grab a bench scraper or knife to divide the dough.
Shaping The Garlic Butter Pull Apart Bread
- Get your dough from the fridge when you have everything ready. You want it cold to make shaping easy. Once it warms up, it gets stickier.
- Now, you can decide if you want 8 pieces (making 16 slightly thicker layers, lightly buttered) or 12 pieces making 24 layers, which will soak up more butter. I went for 8 and felt that was plenty.
- Divide the dough, shape each piece quickly into a ball, then pat or roll it into an oval shape, about double the length of the height of your loaf pan.
- That sounds complicated…let me explain: You’ll want to be able to fold each piece in half and reach nearly the rim of your loaf pan when standing upright.
Filling The Protein Garlic Cheese Bread
- Spread butter generously over each piece (think about 1/2 tablespoon), then sprinkle about one tablespoon of cheese on one side.
- Fold the non-cheesy side over the cheesy side, gently press the sides together, just so the cheese doesn’t fall out when you move it.
- Transfer upright, with the closed end towards the bottom of the pan to the loaf pan.
- Repeat will all your dough pieces.
- Your loaf pan will be very loosely filled, but no worries, the dough will expand and fill it completely.
Last Rise
- Transfer your loaf pan into a slightly inflated plastic bag and clip or knot it closed.
- This prevents the dough from drying out during the last rise and keeps it nice and cosy warm.
- Allow to rise for 2-6 hours until visibly puffy.
- Test if it’s fully risen by gently poking the dough with an oiled finger. It should feel puffy and leave a dent that springs back very slowly. If it doesn’t, leave it a bit longer.
- In my kitchen, which is around 70°F/21°C this took 6 hours.
- You can, at this point, put it back into the fridge for up to 2 more days and bake whenever you are ready.
Baking Your Garlic Cheese Bread
- Pre-heat your oven to 350°F/175°C
- Whisk the egg with a tablespoon of water until well combined.
- Brush the top of your loaf with the egg wash to get a lovely golden brown and shiny top when baking.
- Bake for 45- 55 minutes or until golden brown and baked through.
- Rotate by 180 degrees after about 25 minutes if you oven bakes unevenly.
- If you want to make sure the center is done, you can check with an instant read thermometer. It should read about 190°F/88°C when the bread is ready.
- If you feel it browns too quickly (mine did) tent with a bit of aluminium foil for the last 15 minutes.
- Take your now utterly delicious smelling bread out of the oven and brace yourself:
- You’ll have to wait another 10 minutes to allow it to cool and firm up a little in the pan.


Notes
How To Serve
- Take out of the pan by pulling it up with the parchment and serve warm.
- It’s fantastic on its own with a nice cool glass of white wine or beer. I honestly don’t need anything else with it. But of course you can serve this as a side with BBQ (the classic), a dinner spread or just a nice plate of dips and nibbles.
- For me, this is always the first thing that vanishes. So maybe make two.
How To Store
- This Garlic Butter bread, thanks to the Tangzhong stays beautifully soft and moist for up to 3 days in an airtight container at room temperature.
- It freezes really well either as whole loaf or in slices separated with parchment for up to 3 months, so you can grab one and warm it up whenever you like.
- I found that works best at 350°F/175°C in the air fryer for about 10 minutes (depending on the size of your pieces of course). If you moisten the top a little, it crisps back up perfectly without drying out.
- Prep Time: 1 hour 30 minutes
- Fermentation/rising time: 24 hours
- Cook Time: 50 minutes
- Category: Bread, Bread & Sourdough, Dinner, Main Course, Protein Sourdough
- Method: Baking
- Cuisine: American