Description
Finding a whole wheat bread that doesn’t feel dense and uninspiring can be a challenge—and finding one that packs a serious protein punch is even harder. This Whole Wheat High Protein Sourdough Bread bridges the gap perfectly. By combining the gut-friendly benefits of long fermentation with the power of cottage cheese and whey, I’ve created a loaf that is macro-friendly without sacrificing that classic artisan crust and nutty, toasted flavor. Whether you’re a sourdough pro or just looking for a better way to fuel your morning, this easy, no-knead recipe is a total game-changer for your breakfast routine and a lovely side for your soup.
Ingredients
Units
Scale
The Sourdough Starter (Levain Method)
- 15g ripe, existing starter
- 60g whole wheat flour
- 50g water
The Dough
- 180g cottage Cheese
- 60g whey protein concentrate, unflavored
- 330ml water
- 1 tbsp malt extract (or honey)
- 100g sourdough starter
- 600g strong whole wheat flour
- 2 tsp kosher salt
Instructions
Day 1 – Feeding Your Starter (Levain)
Sourdough Starter (Levain)
- Using 1 tbsp/15g of your existing starter (Levain), feed it with 1/4 cup/60g whole wheat flour and just under 1/4 cup/50ml water. Leave it loosely covered overnight until it has doubled in volume, is active, and bubbly.
- If you have no starter yet, here is a link on how to make your own. You just need water and flour.
- How strong your starter is depends on your flour. Use good quality flour to feed it for best results. The consistency should be like very thick, stiff pancake batter.
- How long your starter will take depends on the temperature of your house. In winter it might need longer, in summer significantly shorter.
- To determine if it’s ready check if it has doubled in volume, is actively bubbling, you see nice, strong gluten strands if gently pulling it away from the walls of the jar with a spoon.
- Whole wheat starter is a little less bubbly and active than white. That’s fine. It has a harder job to do.
Day 2 – Mixing The Whole Wheat Dough/Bulk Proof
Blend The Wet Ingredients and Protein
- Check if your sourdough starter is ready by adding a dollop of it to the water. If it floats and is nice and bubbly, it’s ready. Ideally it should just have formed a bit of a dome in its jar, when at peak activity. Though if it just collapsed a bit you’ll be fine too.
- Blend the cottage cheese and protein powder with some of the water and the malt extract or honey until smooth.
- Add the cottage cheese-protein mix to the sourdough starter together with the remaining water and stir until combined.
Mix the dry ingredients
- In a large bowl stir together the whole wheat bread flour and salt. I’m using kosher salt, which has a higher volume per gram, so for me this is 2 tsp. If you are using sea salt, use 1 tsp.
- Stir the wet into the dry ingredients using your dough whisk or spoon, make a little well in the middle of your flour then pour in your wet ingredient blend, stirring as you go. Mix until no dry flour patches remain.
- The dough will be very sticky and lumpy at this point, that’s totally fine.
- Cover and leave it to rest for 30 minutes to 1h for the autolyse, allowing the flour to hydrate.
Stretch and Folds: Building Structure
- If you read some of my other bread recipes, I sometimes say, especially for doughs that don’t have much gluten to begin with, that you could skip the stretch and folds.
- This is not one of those. The stretching and folding helps build a strong gluten structure and will give you great oven spring.
- Wet your hands. This will mostly prevent the sticky dough fingers. Contrary to flour, which makes them worse.
- Push both hands under the dough and lift one side up. Stretch it until nearly the whole dough is lifted out of the bowl, then fold it over itself. Turn the bowl by 90 degrees and repeat. Do this 3-4 times, until the bowl has turned back full circle or the dough feels very resistant to the stretching. You don’t want to rip the gluten strands.
- Cover and allow to rest for another 30 minutes.
- The pictures above are the results right after the first stretch and fold. You can see how fast this develops the gluten structure.
- Repeat the process 2-3 more times after 30 minutes each, until you feel the dough is much smoother, easier to handle and shapes into a neat (if wobbly and sticky) loaf. After the last stretch and fold, either shape or cover and leave to ferment overnight in the fridge.
Shape Your Loaf
- I’m shaping this one into an oval loaf and want as much surface tension as possible. So I’m following a similar process to my High Protein Sourdough Sandwich bread, which gets rolled.
- You can do this the evening before or on the day of baking. If you do shape on the day of baking your dough will need another hour of resting to puff up again.
- Prepare a banneton or bowl by misting it with a bit of water and dusting ideally with rice flour. Opposed to wheat flour, this will not be absorbed by the dough and very effectively prevent sticking, giving you those nice and neatly shaped loaves you see.
- On a floured surface, tip your dough out of the bowl.
- Gently stretch it into a rough rectangle as much as you can. You want the dough to be fairly thin without ripping.
- Do a letter fold by picking up the top two corners from the short side and folding them over the center. Pat gently with your hands, so the dough sticks to itself, preventing any accidental huge air bubbles.
- Pick up the two bottom corners and fold over the center, patting it close again. Gently. You don’t want to squish all the air out, but not leave any big gaps either.
- Turn that “letter” by 90 degrees and gently stretch it a little further. This will have an effect similar to lamination, in that it creates layers and structure in your loaf, stacking all those gluten strands.
- Starting on either top or bottom short side, start rolling your dough tightly, pulling it a little while doing so, until it is one big and fluffy roll.
- Pinch the seam close with your fingers.
- If you want a bit of a neater loaf, you can now push in the sides where the layers are showing and pinch them closed too.
- Using the side of your hands, start rotating the loaf on your work surface, pushing the sides gently under the loaf, creating even more tension.
- Stop when the top looks relatively smooth and domed and feels bouncy.
- Transfer gently into your prepared banneton with the seam side up
Overnight Cold Ferment
- I put my Whole Wheat Sourdough Loaf in the fridge overnight at this point.
- And since I don’t want it to dry out and form a skin, which might bake into a very hard crust later, I use a bit of a trick to keep it moist and in perfect shape while giving it time to rise.
- I found towels decidedly too drying (even when damp) and frustratingly sticky and plastic wrap, no matter how carefully I tried to seal it always had air gaps, leading to dry bits plus was too tight to give my bread enough room to expand.
- Hence I started using (clean) large plastic bags, which works marvellously!
- Push said banneton into a large clean plastic bag, blow a bit of air into it, so it puffs up over the bread and close it with a clip or knot, to get a relatively airtight seal.
- Move into the fridge and allow to cold ferment/proof for at least 8 hours, to get the full flavor. Up to 3 days works perfect, after that it starts to deflate a little.
Day 3 – Baking Your Whole Wheat Protein Sourdough Bread
Pre-heat Oven And Score
- With the Dutch oven inside, pre-heat your oven to 475°F/245°C for 30 minutes to 1h.
- Even if it shows as pre-heated after a shorter time, the longer time is needed to reach the optimal temperature.
- Grab a piece of parchment slightly bigger than your bread loaf.
- If you’d like a really neat scoring, put your plastic bag covered bread loaf into the freezer for about 30 minutes while the oven heats up. This will form a thin, slightly firmer shell that allows you to score very easily without dragging. That’s the trick behind all those pretty scoring patterns you see. Though I admit I rarely bother.
- Carefully tip your dough onto the center of the prepared baking parchment. If necessary, gently push it back into shape. Sprinkle the top with a little flour, then, using a lame or a sharp knife, score your bread.
- You can get as creative or simple as you like.
- One long score, about 1/2 inch/1cm deep, at about a 45-degree angle slightly towards the side of the bread gives you the “classic” opening flap when the bread rises in the oven. Without scoring it would just break wherever it wants under the surface tension and might not rise as high. So one score is a good idea. Anything else is decoration.
Baking Your No-Knead Bread
- Using oven gloves, remove your Dutch Oven from the oven onto a heat proof surface. Take off the lid.
- Be mindful where you put this. I managed to burn a dark ring into a wooden chopping board. Ever since I put it either directly on my stovetop or a baking tray.
- Using the edges of the baking parchment, carefully lower your loaf into the Dutch oven. Close the lid and put it back into the oven.
- Bake for 25 minutes at the high temperature. I found this gives the heavier whole wheat loaves a nice head start in oven spring.
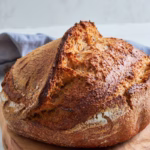
- After that time, lower the temperature to 425°F/220°C take off the lid and bake for 20-30 minutes longer or until deep golden brown with darker edges on the scored parts, where it puffed up.
- If you have an instant read thermometer, aim for an internal temperature of 205°F–210°F (96°C–99°C) to ensure the center isn’t gummy.
- Usually it is baked through at this point, but you can tap the bottom to check: If it sounds hollow your bread is ready. If not, bake for a few minutes longer.
Allow Your Bread To Cool
- Remove the bread from the oven. You can allow it to rest for about 20-30 minutes inside the Dutch oven. After that transfer to a cooling rack to avoid condensation and soggy crust.
- Now comes the hard part. I know this smells really, really good and you want a slice right now!
- But be patient. Leave to cool for at least 2 hours, to get a nice clean cut.
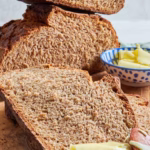
- Enjoy your lovely, nutty bread with some creamy cold butter, knowing you are giving your body the nutrition it needs.


Notes
Tip:
- If you only made yeasted bread before, this dough will seem way too wet and sticky and you’ll be tempted to throw a cup of flour into it, thinking the recipe is totally off and can’t work.
- Resist the temptation and trust the process.
- I sure did add the flour in my first few sourdough attempts and wondered why I kept ending up with “Dwarf Bread” as we called it: Hard as a rock, well suited to smacking intruders over the head, and you always find something better to eat.
- Sourdough by nature is much wetter, softer and stickier than yeasted dough. But it will get easier to handle as soon as you start the stretch and folds.
- Prepare for the magic.
How to Serve
- This whole wheat sourdough bread works fabulous as side for mopping up sauces and soups like this Vegan Tom Kha Soup.
- The less “bubbly” texture is perfect as vehicle for dips like my whipped red pepper tofu dip or the whipped tofu with smoky chili dressing.
- This bread makes a fabulously nutritious and flavorful high protein breakfast sandwich when you top it with some mashed avocado, a fried egg (or crispy fried tofu) and some chili crisp.
- It’s equally good fresh and toasted, emphasizing the nutty flavor with some toasty notes.
- Since I have a rather sweet tooth, I really love this bread freshly baked with some cold butter and honey or some lovely cranberry jam. Though if you want that combined, may I suggest my whipped honey cranberry butter? No need to wait for Christmas. Just make it with jarred cranberry sauce anytime of the year.
How To Store
- Homemade sourdough bread is incredibly meal prep friendly:
- You can prepare it the day before and just push it into the oven in the morning or 3 hours before you’d like to eat it. Or prepare the dough up to 3 days in advance and leave it in the fridge. The sourdough flavor will get more pronounced the longer it ferments.
- All of these breads keep well in a bread tin for about 3 days or up to 5 in the fridge.
- They freeze perfectly for up to 6 months and are excellent toasted.
- Prep Time: 30 minutes
- Fermentation Time: 24 hours
- Cook Time: 1 hour
- Category: Bread, Breakfast, Protein Sourdough
- Method: Baking
- Cuisine: American