Description
You can still enjoy the buttery, crumbly and rich indulgence of classic shortbread while boosting your protein. This recipe takes traditional shortbread, adds the tenderizing quality of sourdough discard, and incorporates vanilla whey protein for a delicious cookie. Enhanced with intense lemon zest, this dough is versatile—it’s perfect for stable cut-outs that hold their shape and is easily finished with an elegant Marbled Royal Icing.
Ingredients
The Dough
- 135g granulated sugar
- 1-2 Tbsp lemon zest (depending on how zesty you like your cookies. I used zest from 2 lemons)
- 170g unsalted butter at room temperature
- 135g sourdough discard unfed, at room temperature. (about 1/2 cup +1 tbsp but it's best to weigh this.)
- 5g vanilla extract
- 225g all purpose flour
- 18g cornstarch
- 60g protein powder (I used vanilla whey concentrate)
- 3g kosher salt
Marbled Royal Icing
- 60ml aquafaba (the liquid from an unsalted can of chickpeas)
- 500g icing/powdered sugar
- 15ml lemon juice (you may need more, to get the right consistency, but start slowly)
- 5ml vanilla extract
- Gel food coloring - Choose your favorite colours. You only need a few drops.
Instructions
- For cookies all ingredients should ideally be at room temperature. Don’t melt your butter, or you’ll get greasy cookies.
- I will give the instructions using a stand mixer, but a hand mixer or simply a sturdy spoon and some elbow grease work just fine. There is no whipping until fluffy, so this is a quick one.
The Dough
Make Lemon Sugar
- Start by zesting your lemon into the sugar. If your lemons are treated, wash them first and dry thoroughly so you don’t get any bitter or waxy flavor in your cookies.
- Using your fingertips, rub the zest into the sugar until it turns a bright yellow and smells absolutely delicious. This will free the essential oils in the lemon zest and give the lemony shortbread its intense flavor.
Cream Butter and Sugar
- Now add the butter in large cubes and all that delicious lemon sugar to your stand mixer equipped with the paddle attachment.
- Start mixing on low just until butter and sugar are combined and creamy. Don’t whip this until fluffy!
- As opposed to sugar cookies, we don’t want the shortbread to rise (hence to baking powder or soda in the dough either) but rather stay crumbly and break with a gentle snap. Whipping would incorporate air into the dough, which would expand in the oven, leading to domed cookies, making it much harder to get an even icing coat.
Add Vanilla and Dry Ingredients
- Now mix in the vanilla extract, sourdough discard and the protein powder. Mix on low until it looks just incorporated.
- Now before adding them to the wet mix, briefly combine flour, cornstarch and salt in a bowl. This is to coat the flour with the cornstarch right away, stopping any unwanted gluten development and preserving the classic snap.
- Add the whole mix to your butter-protein cream and gently combine on low speed until it just starts to come together. Do not mix any longer.
Roll Out The Dough
- Here is the easy way:
- Line your worktop with clingfilm. I found 2 overlapping layers of about 25in/50cm work very well.
- Turn your still crumbly dough out onto the clingfilm.
- Add another overlapping layer of cling film on top.
- Using your hands, start pushing your dough together into a cohesive square (or round) shape.
- Now you can start rolling it out. Instead of lots of gentle strokes, try to apply relatively firm pressure with your rolling pin starting from the center, pushing the dough outward and away from you into all directions until you have one large disk.
For Cut Out Cookies:
- Aim for a large disk that is about 0.2in/5mm thick. The shape doesn’t matter very much, but it should fit onto a sheet pan/board and in your fridge.
For The Classic Shortbread Shape:
- Roll out into a rectangle 8.2in/21cm wide and about 0.3 in/8mm thick for the classic rectangular version.
- The length will essentially define itself when you keep width and height of the dough to these measurements. (Now obviously you absolutely don’t have to be this correct, but that shape will give you 3 rows of cookies in about the typical Walkers Shortbread Fingers size.)
- You could also form a roll and slice later, but because the dough is fairly soft at this point, it will flatten at the bottom. So I wasn’t a fan as it didn’t look very nice.
Refrigerate
- Fold the cling film edges gently over the dough.
- Essentially, the less you handle this dough, the closer to classic shortbread texture it will be. Hence the firm but few strokes while rolling.
- Now I like to slide the large dough disk onto a slim chopping board or a sheet pan, to keep it nice and flat.
- Store in the fridge for at least 2-3 hour or up to 3 days. You want a firm and cold dough for the cutting out. The colder, the easier it is and the sharper your edges will remain when baking.
Cutting Out Your Lemony Shortbread Cookies
- Once your dough is nice and firm, preheat your oven to 350°F/175°C.
- Line 2 sheet pans with baking parchment.
- For this buttery type of cookie I would not use a Silpat, as the bottoms can get a bit greasy without the slight bit of absorption from the parchment.
- Get your cookie cutters or a large knife, depending on your method.
- Lightly flour your worktop (I used a silicone mat) or even keep the dough for the first round of cut outs/ the slicing on the cling film to make them easier to pick up.
For The Rectangular Classic Shortbread Shape
- I like to trim the corners of my dough a little bit (and munch the trimmings as bakers snack), to get nice, sharp edges.
- Making some markings with your knife (I literally used a Walkers biscuit as my guideline, but a ruler or simply guesstimating is fine), divide the dough block into three lengthwise.
- Now cut cookies of about 1/2in/1cm width, until your dough is used up and transfer to your prepared sheet pan.
- These cookies don’t spread much, so leaving about 1in/2cm between them is plenty.
- Use a fork or skewer, to prick holes into them for the typical pattern. In theory this should prevent any unwanted rise. But I found that even the un-pricked roll out versions stayed nice and flat. So it’s purely optional.
The Cut Out Cookies
- I’m fairly sure you know how to cut out cookies just fine, but here are a few tips to make your life easier:
- Try and keep the shapes close together, using every corner of dough you can in the very first roll out. The less you work the dough, the better your texture will be. Crumbly is the aim here.
- Dip the sharp side of your cookie cutters into some flour, to prevent the dough from sticking in them. This is even more important for any fragile patterns that have, say antlers for Rudolf or very delicate star shapes.
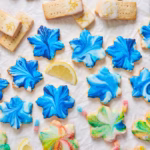
- If you want to use the marbled royal icing later, I found bigger shapes that have a defined center with corners (like a star) work best. I tried dipping some of the leftovers and other shapes, but none looked as impressively patterned as the stars. But then, it’s a matter of taste, so do what makes you happy.
- A palette knife is super helpful when the dough gets a little warmer during the cut out process, as it can easily loosen any stuck pieces and transfer them to the sheet pan.
- Re-roll leftover dough by pushing it back together until you have a relatively smooth ball and the rolling again on a lightly floured surface. But take care to work the dough as little as possible.
- If the dough gets too warm and sticky, put it back into the fridge until firm again.
- Also, if you dough got warm (often the case when baking with kids, as they just take a little longer with the process) re-chill before baking, so it doesn’t spread too much.
Bake Your Sourdough Discard Cookies
- Adding ideally one sheet pan at a time to your oven for even heat, bake the cookies for about 10-14 minutes or until the edges are just starting to brown. They should still be very pale all over.
- I always rotate my trays once after 5-6 minutes, as my oven bakes unevenly.
- Remove from the oven and allow to cool on the pan for 10- 15 minutes, to let them finish baking and firm up a bit. You can now transfer them to a cooling rack to cool completely. I like to simply pull over the whole piece of parchment in one smooth motion, to disturb the still fragile cookies as little as possible.
Decorating Your Cookies
- Since I used the marbled royal icing as post picture, I’ll list this in the main recipe. You can find the other options below in the notes.
- Prepare some sheet pans lined with baking parchment (for easy cleanup), then top with cooling racks, so any drips can run off the cookies instead of pooling around the bases.
Marbled Royal Icing
- Using your stand mixer or a hand mixer with a whisk attachment, whip the aquafaba until foamy. I’m talking a little fluffy, but still liquid. Not meringue like foamy. https://forthepleasureofeating.com/stable-vegan-meringue/
- Add the lemon juice and vanilla, then mix in the icing sugar until smooth. Don’t whisk too long or you’ll have lots of bubbles on your cookies, that can disturb the smooth and shiny surface.
- Assess the texture. It should have about flooding consistency, i.e. drizzle off your spatula and settle into itself within 2-3 seconds. Not too thin though, or it won’t hold the marble patterns.
- If it’s too thin add a bit more icing sugar, too thick add more lemon juice. Some say to add more aquafaba, but I always feel lemon juice improves the flavor dramatically. Especially in these lemony cookies.
How To Apply Marbled Royal Icing
- Pour the icing into a relatively low rimmed bowl (or deep plate), big enough to dip your cookies.
- Using 1-2 (or as many as you like. I made mine with navy blue and sky blue) different gel colours, apply about 6-8 drops of the gel colours across the icing surface.
- Now use a skewer or toothpick to drag the drops across the surface. First vertical, then horizontal. Or leave it at one direction and try it out first. Don’t mix them in fully. You want a defined marble surface.
- Take a cookie and dip the top straight into the icing, then pull it up very straight, allowing the surplus to drizzle off, before turning the cookie over with one smooth motion.
- You might have to experiment with this a little (which is no hardship, as the whole process is pure fun!), to see which turning angle works best for your particular cookie shape. I found angling my stars so the last drip sort of settles on one corner of the star worked best.
- Transfer to a cooling rack and proceed dipping the next cookie. I got about 1/3 batch of cookies done, before the mix got very light in color. At that point simply add a few drops more colour and repeat until all cookies are coated.
- Royal icing needs about 24 hours to fully dry and harden. The cookies can then be stacked in an airtight container.


Notes
I gave the amounts in gram here, as I feel it’s particularly important to weigh flour and sourdough when it comes to cookies. If you don’t have food scales, simply switch the US units and you’ll get the classic cups and tablespoons. Keeping all amount in grams in the original should make the switch easy for the recipe card system.
The Nutrition calculation is without the icing, as you have different options and can happily eat the cookies without icing if you prefer.
Simple Zesty Lemon Frosting
- The amount in the recipe makes enough to brush the whole batch of cookies with it if you want.
- Mix the frosting by adding the lemon juice to the icing/confectioners sugar. Start with ¼, whisk it all in, the see if it needs more to get the right consistency. It should be drizzle-able, but not liquid. Think Royal icing consistency. Maybe a little softer. If you let it flow from your whisk, it forms visible streaks on itself that sink in after a few second it’s ready.
- You can store this in an airtight container in the fridge for up to 3 days, if you want to get ahead. Simply stir and add a little more lemon juice if it feels too firm.
- Now either brush your cookies with the frosting, using a pastry brush or simply dip one half into it as I did. Transfer to the cooling racks and finish all cookies.
- Decorate with a little lemon zest if you like and allow to dry for about 12-24 hours, depending on how thick your frosting is. After that it will be hard enough to stack the cookies in an airtight tin.
The Sparkling Citrus Sugar Finish
- You can use this finish on either of the above icings.
- To mix it, simply combine the sugar and citric acid. You can adjust the sourness to your taste. I like mine proper sour, so I used a 1:1 ration of sugar to citric acid. But feel free to use less if you prefer yours more subtle.
- Now you can either dip a freshly iced cookie directly into the zesty-sour sugar mix or just sprinkle over a little for a tiny sparkle.
- Of course, if you just want sparkle without the sour patch candy flavor, feel free to only use sugar.
- The drying time depends on the icing you used.
Coloured Zesty Sugar
- You could also colour the sugar-citric acid mix by adding a few drop of gel colouring to it, then whisking well. How many you need depends on your colour and how intense you’d like it to be. I found about 10 drops on ½ cup of mix are plenty for really bright color.
- After mixing, pour the coloured sugar onto a plate, flattening it a bit with the whisk or a fork and let it dry for a few hours. You can then store it in a sealed jar for at least a year and use whenever you need some bright sparkles on your food.
How To Store
- The iced and dried Lemony Sourdough Protein Shortbread Cookies keep in an airtight container on the counter for about 5 days (I’m pretty sure my grandma kept them much longer, but I wouldn’t advise it because of the butter) and 10 days in the fridge.
- You can freeze them for up to 3 months. For this I would pack them in boxes, layered with parchment paper, to keep them from sticking. Thaw in the container on the counter until they reach room temperature before eating.
- Prep Time: 1 hour
- Cook Time: 12 minutes
- Category: Dessert, sourdough discard, protein dessert
- Method: Bake
- Cuisine: American