Description
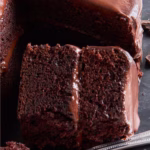
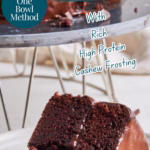
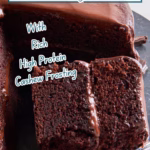
Have you ever tried to decide between a high-protein dessert that tastes dry and unsatisfying and that super moist and fluffy chocolate cake that is just pure indulgence? Yup, me too. I’ve been there, done that, and decided we deserve a better option. Because we should have a chocolate cake that is just as good for us as it tastes. Well… I mean, it does have sugar and white flour, but look, it also has double the protein of your average chocolate cake, features sourdough discard for maximum moisture, and has about 100 calories less per slice. Plus, you get a rich, creamy, high-protein cashew chocolate mousse frosting that’s easy to digest. Try and resist eating a slice right after baking, I dare you!
Ingredients
Units
Scale
Protein Chocolate Batter with Sourdough
- 1/2 cup (115g) coconut oil, melted
- 1/4 cup (60g) 70% Dark Chocolate
- 1 cup (120g) all-purpose flour
- 1 1/2 cups (325g) granulated sugar
- 1/2 cup (60g) cocoa powder
- 1/2 cup (60g) Whey concentrate protein powder, ideally chocolate flavor
- 1 1/2 tsp baking soda (8g)
- 1 tsp baking powder (6g)
- 2 tsp kosher salt (8g)
- 1/2 cup +2 tbsp (160g) fat free Greek yoghurt
- 1 cup (225g) sourdough discard
- 2 large eggs, room temperature
- 1 tsp vanilla extract
- 3/4 cup + 1 tbsp (190ml) coffee, freshly brewed
Protein Chocolate Mousse Frosting
- 3/4 cup (90g) raw cashews
- 1 cup (225ml) oat milk, divided (or milk of your choice)
- 1/4 cup (60g) 70% chocolate
- 3 to 4 medjool dates (pitted)
- 1/2 cup (60g) Whey concentrate protein powder, ideally chocolate flavor
- 3 tbsp (30g) cocoa powder
- 1 pinch of salt (optional but recommended)
- 1 tsp instant espresso powder (optional)
- 2 tsp Amaretto (optional)
Instructions
Making The Chocolate Cake Layers
Preparations
- Pre-heat your oven to 350°F/175°C
- Line the cake pans with baking parchment (watch the video to see how to do this neatly.)
- Don’t grease the sides. This will help the batter to “climb” up and rise nicely.
- Weigh your mixing bowl and write the weight down. This means, you can then weigh it again to get the weight of the batter, divide it by 2 and get the exact amount to add to each cake pan. That way you’ll have very evenly baked and sized layers.
Melt Your Chocolate
- Add coconut oil and chocolate either to a microwave safe bowl or a double boiler and gently melt.
- Allow to come to room temperature while you mix your remaining ingredients.
Mix The Dry Ingredients
- In your large mixing mix flour, sugar, cocoa powder, baking powder, baking soda and salt. A whisk works best for this.
Add The Wet Ingredients
- Add the sourdough discard, eggs, Greek yoghurt and vanilla extract and cooled, melted chocolate with the coconut oil and mix until just combined.
Pour Over Coffee
- Brew some coffee freshly (either Americano or instant coffee). Don’t do this ahead of time, you want it still hot, so it activates the full cocoa flavor and keeps the dough super moist. This works very similar to the Yudane method I used in my Fluffy Sweet Potato Rolls, in gelatinizing part of the flours starches, giving you a super soft interior.
- Whisk until everything comes together in a pourable batter. This will be very runny; don’t be alarmed. It’s working as intended.
Divide Between The Cake Pans
- Now, since you wrote down the weight of your mixing bowl (you did, right?), weigh your bowl with the batter again. Subtract it’s weight from the bowl. Then pour half of it into one of the prepared baking pans and the other half into the second.
- In case you forgot: The batter weighs about 1420g, so you pour about 700g into each of the cake pans. That leaves room for the 20g that might just stick to the sides of the bowl. Of course you could scrape them out, but I think they make a great bakers snack.
- Of course you could just eyeball it (I did so many times). Just make sure to then test them separately for doneness, as one might need longer than the other.
Bake Your Protein Chocolate Cake Layers
- Bake for 35 to 40 minutes, or until a toothpick inserted into the center comes out clean.
- Allow to cool for about 30 minutes in the pans, then turn out onto a cooling rack until completely cooled.
Make The Protein Chocolate Mousse Frosting
Soak The Cashews
- Boil a kettle and pour the hot water over your raw cashews. Leave for about 20-30 minutes. Alternatively you can soak them in cold water overnight.
Melt The Chocolate
- Break the dark chocolate into rough pieces and add to a microwave safe bowl (or use a double boiler) with a bit of the plant milk. Heat in short bursts, stirring in between, until the chocolate is melted.
Blend Your Ingredients
- Drain your cashews.
- Now, simply add everything to your blender, starting with the cashews, followed by the protein powder, cocoa, melted chocolate mix, dates, salt, instant coffee, and Amaretto if using, finishing with the plant milk. This order (mostly) prevents the pesky protein powder sticking to the blades problem.
- Blend until you have a super smooth, fluffy and creamy frosting. Give it a taste and see if you like the sweetness. I find it’s plenty sweet from the dates and protein powder, but if you have a particularly sweet tooth, feel free to drizzle in some honey or add a bit of sugar.
- Allow to cool and firm up about 2 hours in the fridge. You can even make this up to 2 days in advance and let it set fully before frosting your cake.
Assemble Your Super Moist Chocolate Cake
- If you want a perfectly flat top (I don’t mind mine being a bit domed), you could flatten your cake disks by slicing off the top with a sharp knife.
- Or use the method I learned from my Grandfather, by running a sharp knife just around the top corner, then grab some sewing thread, lay it into the groove you just cut, cross over itself at the front of the cake and pull. You can see this best in the video.
- Pick the one that looks best for the top.
- Start by spreading about 1/3 of the cashew chocolate mousse on the bottom cake layer. I like doing this on a rotating cake platter, but frankly, just a normal large plate works fine. A palette knife is super helpful here to get it even.
- Gently place the second cake layer on top. Spread a thin layer of your frosting all over the cake, to catch any crumbs. This is the crumb coating, mean to give you a nice and clean finish.
- Finish by spreading the remaining chocolate coating over your cake. It doesn’t have to be perfect!
- Decorate if you like. A bit of whipped cream/cashew cream looks nice, so do a few raspberries or some seasonal decoration.
- But all in all this is one of those super simple cakes that saves you in case of an urgent chocolate craving!


Notes
How To Store
- This cake is best stored in a cake transport box in the fridge for up to 4 days. Since it has no cream, the frosting tastes exactly the same on day 4 as it did on day 1.
- The cake’s high moisture content, thanks to the sourdough and hot coffee, also means it stays incredibly moist and tender for the full 4 days.
- So this Protein Powder Chocolate Cake is fabulous to make ahead.
- Prep Time: 25 minutes
- Cook Time: 35 minutes
- Category: Sourdough Protein Desserts
- Method: Bake
- Cuisine: American