Description
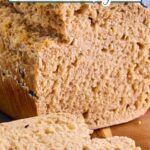
A flavourful and healthier alternative to supermarket bread. Or even to artisan bakery bread, since it’s so easy to make. Most of the work is done by the sourdough, as you just have to mix it together and stretch it a few times. The result is a soft, chewy and fine crumbed bread, holding up to all sorts of toppings.
Ingredients
- 1/2 cup sourdough starter (fed and active)
- 1 1/3 cups water
- 3 cups white Bread Flour
- 1 cup whole wheat Bread Flour
- 3 tsp salt
- 2 tbsp malt extract ( (Health food shops usually have it and I find it very worth adding. Or honey if you can’t find it.))
- 2 tsp diastatic malt powder (I found mine on Amazon DE and a local flour shop stores it now too.)
- 1 tsp yeast (I tend to add a little yeast to wholewheat breads, as it’s a little heavier and the yeast helps with the rise. It’s optional though)
- 2 tsp Vitamin C (optional, lends structure and crunch)
Instructions
Mix ingredients
- In a large mixing bowl or the bowl of a stand mixer combine the sourdough starter and water. Stir well to incorporate.
- Add the white bread flour, fine wholewheat flour, kosher salt, barley malt extract, baking malt powder, and yeast to the bowl. Mix everything together until a shaggy dough forms.
Rest
- Cover the bowl with a damp clean kitchen towel or plastic wrap and let it rest for 30 minutes to 1 hour. This step is called autolyse and helps the gluten develop.
Stretch and fold
- After the autolyse, perform a series of stretch and folds on the dough. To do this, wet your hands and reach underneath the dough, gently stretching one side up and over the rest of the dough. Repeat this process, rotating the bowl each time, until you’ve done this stretch and fold process 4-5 times.
Repeat
- Cover the bowl again and let the dough rest for 30 minutes.
- Perform another series of stretch and folds on the dough, just like in step 4. Cover the bowl and let it rest for another 30 minutes.
- Repeat the stretch and fold process for a third time, cover the bowl, and let it rest for another 30 minutes.
- After the third set of stretch and folds, let the dough rise at room temperature for about 2-3 hours, or until it has visibly expanded and feels light and airy.
Shape and bake
- Line a loaf pan with baking parchment for easy removal later.
- Gently transfer the dough onto a lightly floured surface. Shape it into a long loaf, the shape of your baking tin, by folding the edges towards the centre, creating tension on the surface of the dough.
- Place the shaped dough into your loaf tin. Cover it and let it rise at room temperature for another 1-2 hours, or until it has visibly risen and feels puffy. Alternatively, you can leave it overnight in the fridge at this point, to take it out a few hours before you want to bake it in the morning, to let it come to room temperature.
- Preheat your oven to 450°F (230°C).
- Once the oven is preheated, score the top of the dough with a sharp knife or a bread lame (You could skip this step like I did, but your bread will randomly rise on whatever side it feels like), brush with a little water and add any seeds you might like to the top.
- Bake the bread uncovered for 20 minutes. Check for browning and cover loosely with aluminium foil, if it’s already golden brown, bake for another 20-25 minutes, or until the bread sounds hollow when tapped on the bottom.
- Once baked, remove the bread from the oven and tin right away and let it cool on a wire rack before slicing.


Notes
The equipment and ingredient section may contain affiliate links to products I know and love.
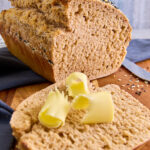
I particularly love this as quick dinner (Abendbrot as we say in Germany. Or “Girl Dinner”, according to the newest TikTok trend) with any cheese or charcuterie I have in the fridge. Or leftover roast chicken, layered on black garlic aioli, together with crunchy lettuce and tomatoes. Maybe a few olives or fruit on the side and you have yourself a feast.
This bread freezes beautifully. Either sliced, so you can take them out and just toast, or, as I usually do, cut in half, so you can have each half at its best.
The below is based on the estimation of about 12 slices. Which depends very much on your slice preference. Mine are about 80-100g per slice. Not that I weigh them every time, but that is the average when I did.
- Prep Time: 30 minutes
- Fermentation Time: 8 hours
- Cook Time: 45 minutes
- Category: Breakfast, Dinner, Side Dish
- Method: Bake
- Cuisine: American
Nutrition
- Calories: 161
- Sugar: 1
- Sodium: 588
- Fat: 1
- Saturated Fat: 0.2
- Carbohydrates: 33
- Fiber: 2
- Protein: 6
- Cholesterol: 0.2