The Everything Protein Sourdough: One Enriched Dough, Many Ways
If you always wanted super versatile dough recipe that can be used for anything from Brioche over Burger Buns all the way to festive afternoon tea bakes, and is made with sourdough and protein, this is it!
I wanted to see if I could take the versatile “all-purpose” enriched dough concept popularized by Claire Saffitz and adapt it for a high-protein sourdough version that doesn’t compromise on texture. After several rounds of testing—and a few lessons learned along the way—I’ve landed on a base recipe that hits that buttery, pillowy brioche mark while packing 10g of protein into every slice, while staying soft and moist for days.
This post may contain referral links for products I love.
For The Pleasure Of Eating earns a small commission on these links at no cost to you.
- Why You’ll Love This
- The Ingredients
- Substitutions
- Equipment Used
- How to Make this
- How To Store
- FAQ
- Other Recipes You Might Enjoy
Why You’ll Love This
TL;DR
- Reliable Texture: Achieves a buttery, soft brioche that stays light even with added protein.
- Protein-Packed: Each slice offers about 10g of protein—roughly double the amount of a standard enriched loaf.
- One Dough, Many Bakes: A versatile base that works for everything from burger buns to festive German wreaths.
- Stay-Fresh Secret: The combination of Tangzhong and sourdough keeps this bread moist for days, so it doesn’t dry out like typical protein bakes.
- Sourdough Benefits: Long fermentation helps break down proteins, making the bread easier to digest and more flavorful.
Buttery, Soft and Incredibly Versatile
When I stumbled over the NYT times video with Claire Saffitz, one of my favorite recipe creators, and her video on the All-purpose enriched bread dough I knew I wanted to create a dough like this with sourdough and protein, so you can use it for countless recipe variations and all sorts of bakes.
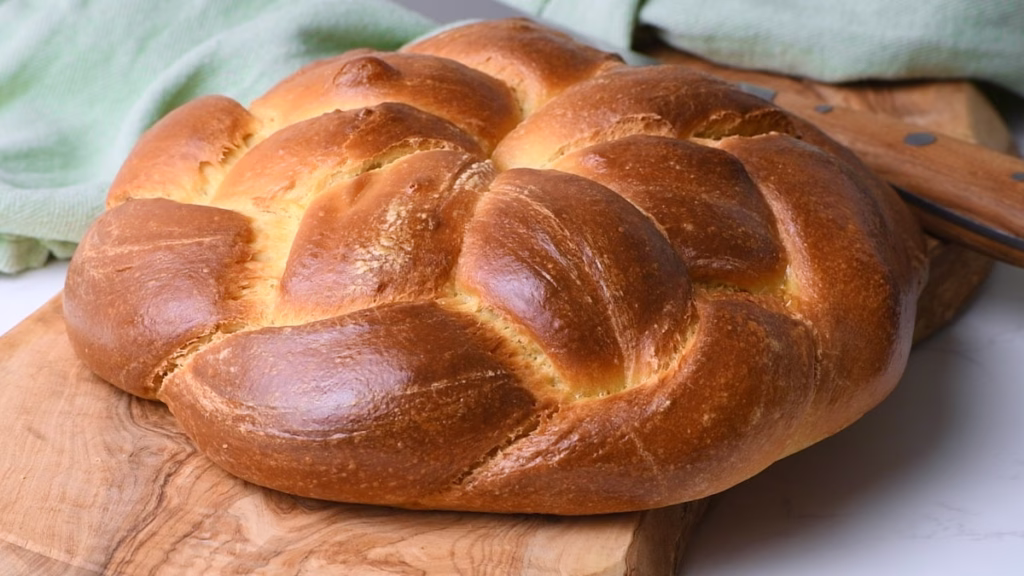
It took a little testing to get the basic recipe, which I’m showing you here in form of a Brioche, just right:
Fluffy, buttery, soft and easy to work with. And I’m super happy with the result!
I’ve been using it in different iterations for weeks now and every single one was utterly delicious!
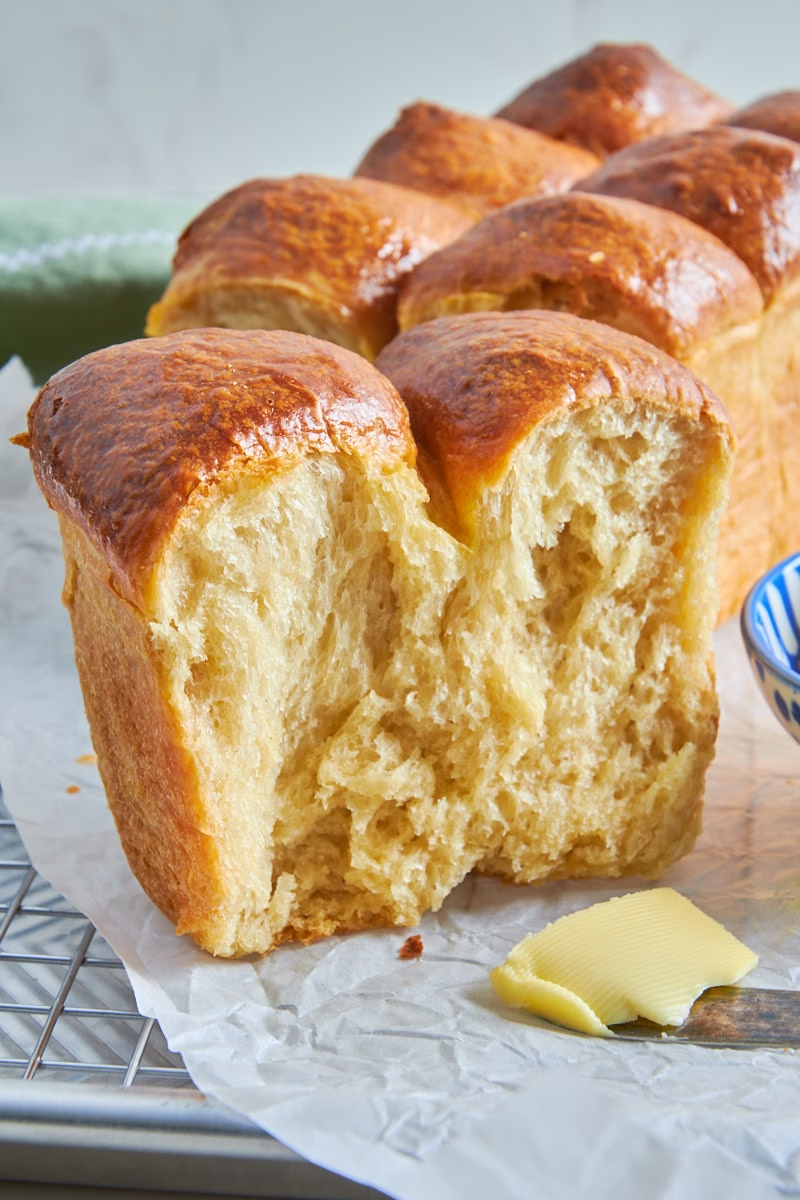
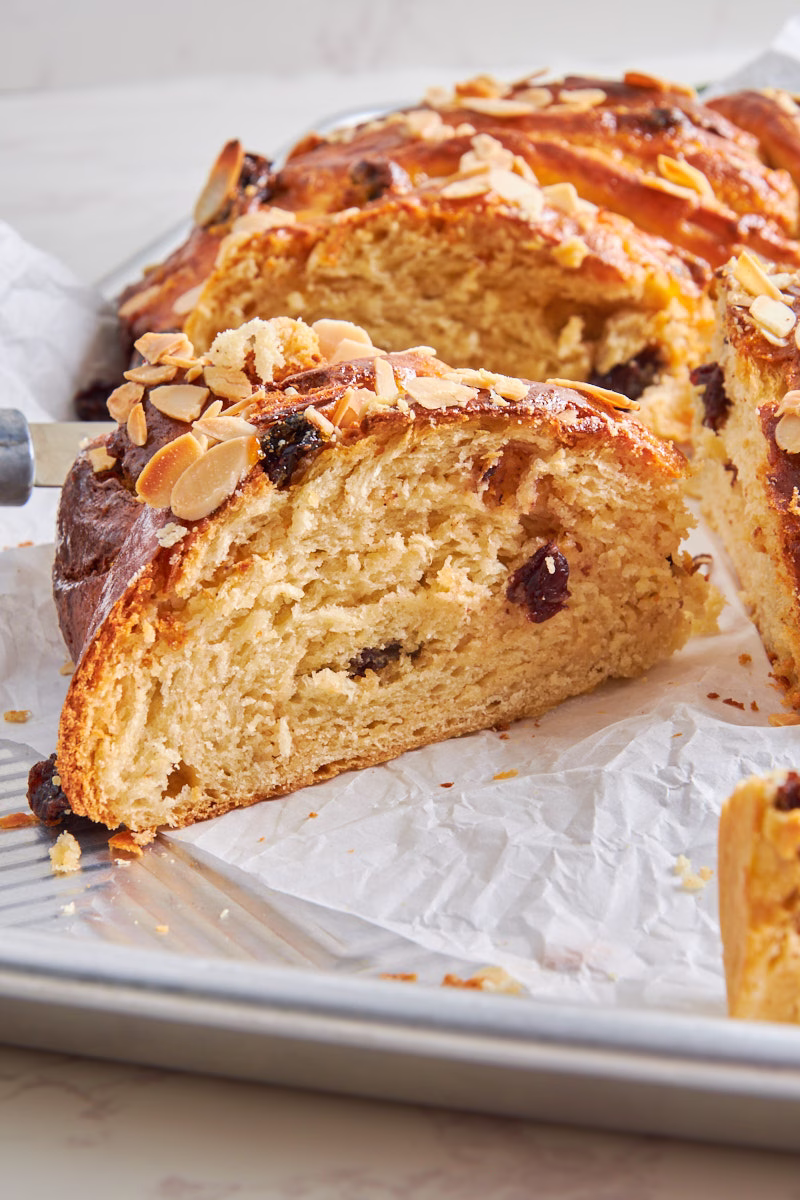
10g Protein Per Slice. The Best Excuse For Eating Brioche
Now I would be amiss to forget mentioning the protein content for this bread: As per my goal I about doubled the content of a typical Brioche to about 10g per slice of this tender and fluffy beauty.
Is it super healthy? Well look, it’s an enriched dough, so it has a good bit of butter.
But if you ever needed an excuse to eat Brioche to your hearts content, the added protein is surely it!
And frankly, I ate more than my fair share of it over the last few weeks.
All in the name of recipe testing of course…ahem. The things I do for you!
Makes Two Brioches
This recipe makes 2 brioches. This might seem a lot, but it’s much easier to knead this amount of dough in a stand mixer than it is to work a smaller amount.
Plus the 5 eggs I used to get the hydration and texture just right is tricky to divide.
Plus: More Brioche is better! You can use one for breakfast and make the other into a heavenly bread & butter pudding for example. Or freeze it, so you never run out of brioche!
Feel free to use half of it for burger buns or any other recipes you like.
Why This Works (The “Secret” Ingredients)
If you’ve ever tried adding protein powder to bread, you know it can come out a little on the dry side. And with enriched dough, that’s exactly the opposite of what we need!
So for me, after experimenting with different sourdough protein recipes over the last years, it felt a bit like the final boss of protein baking: I wanted to about double the protein content per portion but keep the amazing texture and taste of a really good brioche.
And frankly, even being from Germany, where we have a bakery at every corner, I often was disappointed by their version. They were oddly lacking flavor and dried out within a day.
So here is how we fix all those issues and get a dough that can be endlessly adapted:
- The Tangzhong (The Moisture Lock): By cooking a small amount of flour and milk into a thick, mashed-potato-like paste first, we pre-gelatinize the starches. This locks in moisture so the “thirsty” whey protein doesn’t steal it all from the dough and is the method used in Japanese Milk bread to create the incredible softness.
I used this method before in my Brioche Feuilletee, back then without protein, and adored the outcome. - Greek Yogurt (The Tenderizer): Yogurt does triple duty here. The acidity helps relax the gluten (counteracting the potential “rubbery” tendency of whey), and the extra fat keeps the crumb tender. Plus, it adds even more protein to the mix.
- Sourdough (Breaks down Protein): Sourdough contains enzymes called Proteases that break down protein into easier bioavailable components. This doesn’t just help your body to absorb them better but also keeps protein bread soft and moist.
- The “Everything” Versatility: The combination of protein powder and sourdough gives this dough a lot of “tensile strength.” It’s sturdy enough to hold a heavy marzipan filling for a German “Kaffee Kranz“, but light enough to squish into a perfect burger bun.

How To Use This Dough
Over the next few weeks I will give you recipes that use this dough as their base.
Today we are starting with the very basic brioche. I know “Brioche” always sounds scary, but trust me, it’s easier than you think.
And once you got a feel for the basic dough I’ll show you how to make
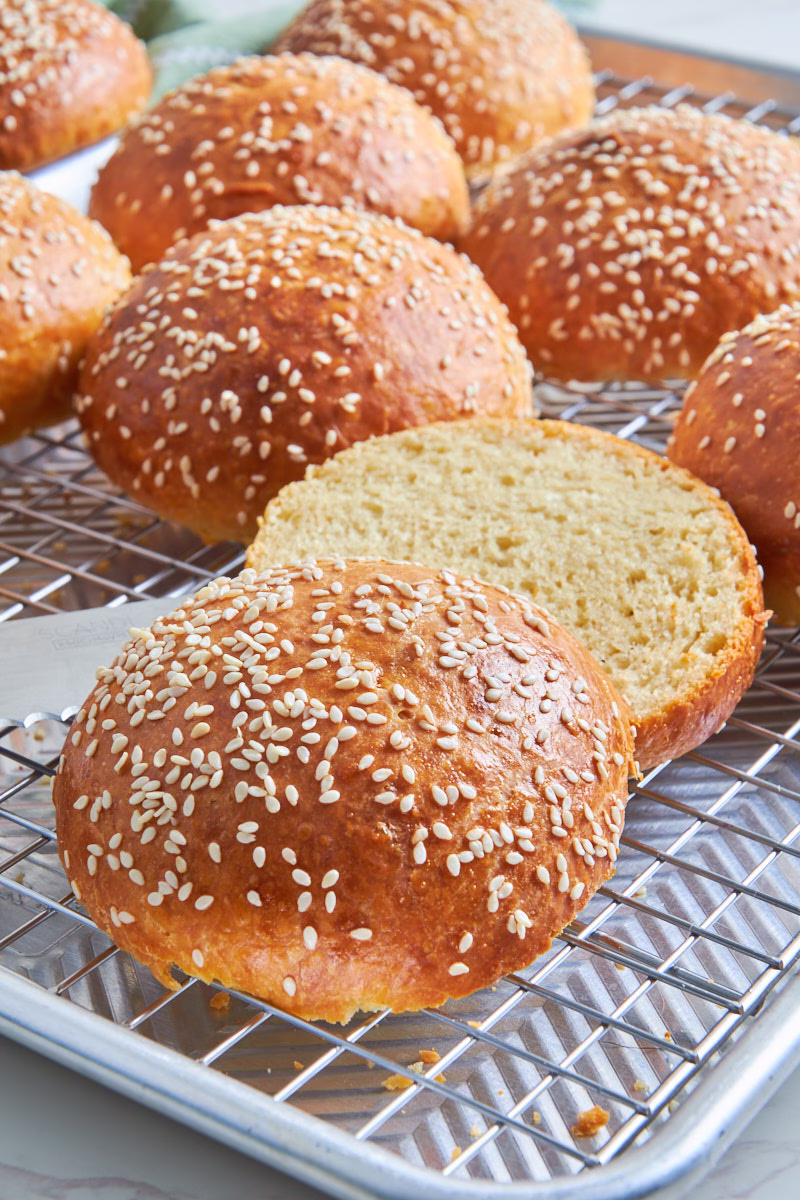
Soft Brioche Burger Buns

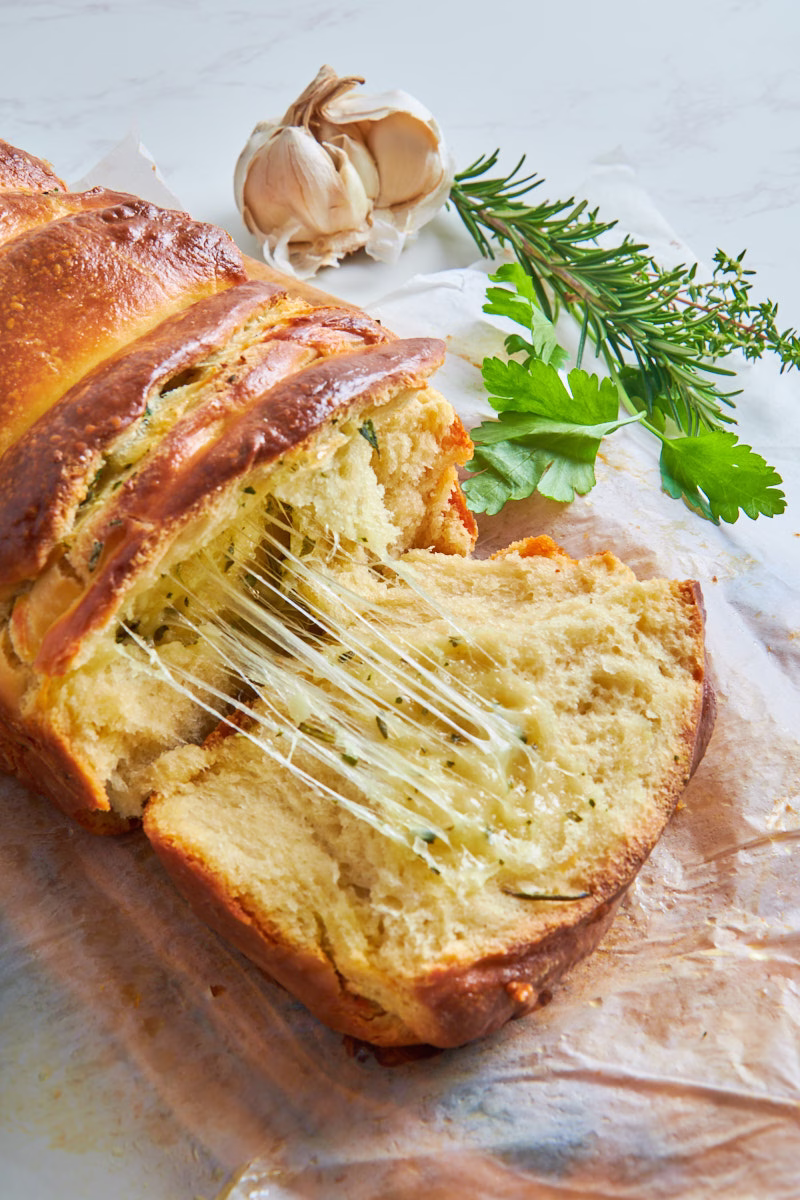
Garlic Cheese Pull-Apart Sourdough Bread

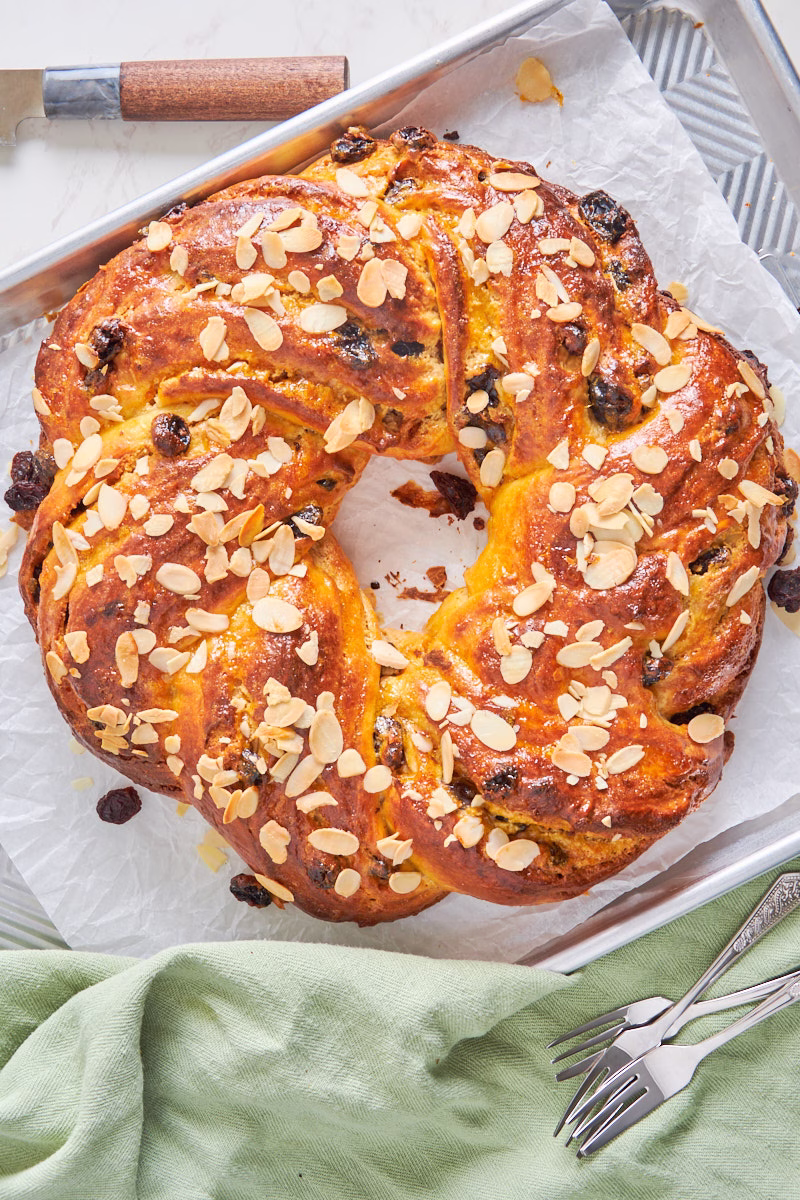
High-Protein Sourdough Marzipan Wreath (Kaffee Kranz)
Sourdough Blueberry Cheesecake Danishes with Protein


There are a million other ways to use this dough (Cinnamon rolls for one, though the ones I shared last week are made with a slightly leaner dough version), Danishes, all sorts of braided loaves, a millions of small bakes…you name it.
So you can get wildly creative with it and I’d love to hear what you use it for!
Story Time
The “Final Boss” Dough
Here is a story about this dough and why I call it “The Final Boss”. Brioche in and of itself is one of those doughs that needs careful balancing and a bit of TLC.
When making this the first 4 times, I felt things where going smoothly and perfect, so I filmed the video, took the pictures for the basic Brioche, the burger buns and wrote the recipe for the master dough. That was mid March here in Ireland. I had tested the Marzipan Wreath and Garlic bread, but not photographed it yet.
So after posting, I went and made the dough again. Same ingredients, same method.
But there was one change: Spring had sprung. Or rather we had a week of lovely warm weather (around 15 degrees celsius that is) here, my heating decided it was needed anymore as my house was warm enough.
It turned into soup!
And suddenly my previously soft but workable enriched dough turned into…soup. Well, more of a batter consistency really. But certainly not workable anymore. I tried it multiple times, after all it had worked, changed methods, kept it cooler, but nope, it would not budge.
The balance of moisture vs. gluten was totally off.
Why? My suspicion is (without having the means to do a full scientific experiment), that the moisture in the air of the house went up when the heating was off. I have underfloor heating (air to water), which is lovely, but makes for fairly dry air. And once it’s off, it quickly balances back to Irelands high humidity.
And the dough, which was just at its limit of moisture absorbtion, together with the protein powder, which is hygroscopic (attracting moisture) it went over the edge.
How I fixed it
While I attempted tiny adjustments first (a little more flour, a little more protein), none of them got it to the point of universally easy to work with.
So I decided on a slightly more drastic step: I swapped the AP for bread flour, which has a higher protein/gluten content and, because that alone didn’t solve the issue, raised the flour and protein content by 50%, yet the liquid (read egg and yogurt) content only by 25%, used an even stiffer sourdough starter than before and modified the Tangzhong minimally with an ever so slightly higher flour to milk ratio, getting to the goldilocks consistency I was aiming for.
Here are pictures of said bread flour version. I got a little bored with the pan shape, so went slightly off script with half of my dough. I made both pan and the braided version, but only filmed the braided one:

The result was a weather independently stable dough. But I had over corrected a little and felt it lost a little of its characteristic soft fluffyness. Back to the drawing board.
This time I divided the already mixed liquid dough base in half and added AP flour to one half and used part bread/part AP for the other. I baked both in the exact same pan together, one half made up of the AP rolls and the other half using the bread/AP mix.
They both baked nicely (as expected), but the mix of bread and AP flour won hands down in texture.
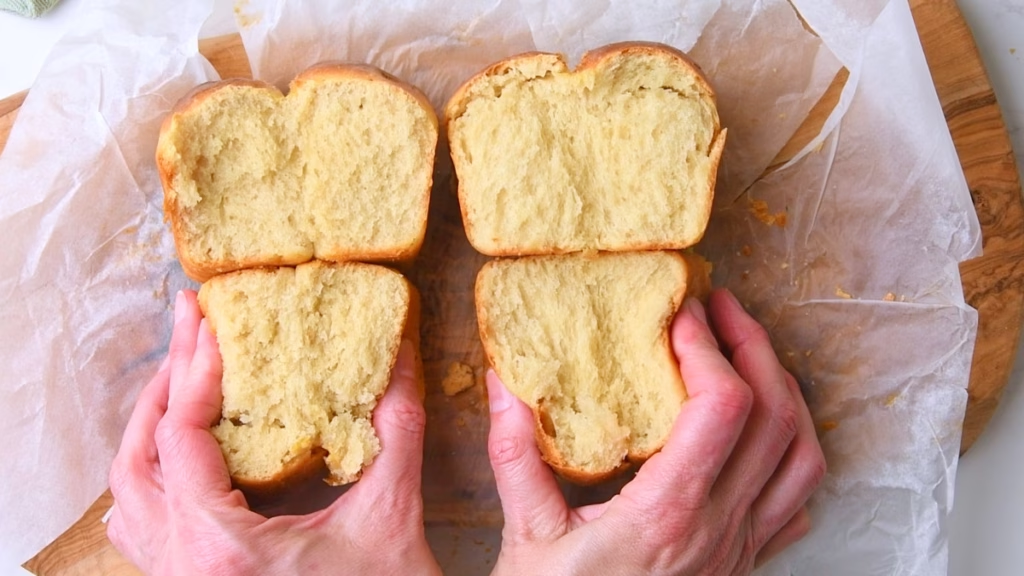
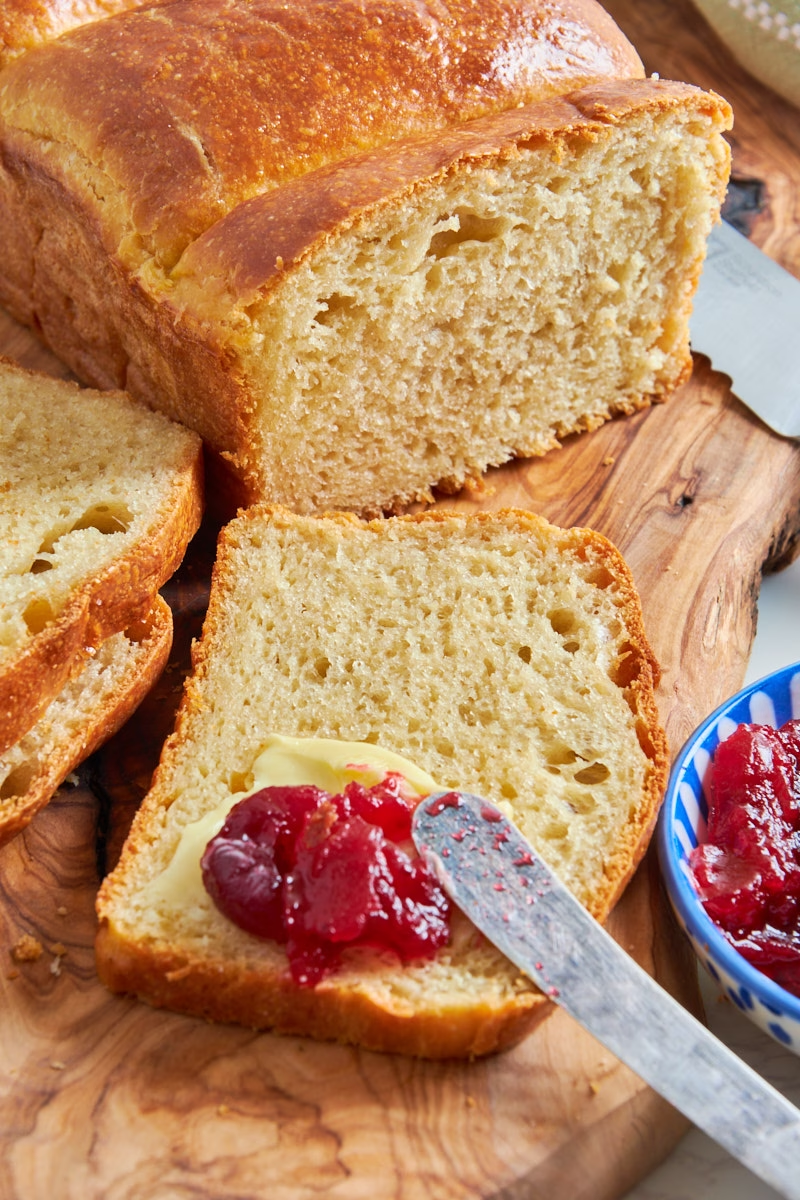
It had the same characteristics as my initial dough: Dreamily soft and fluffy, strands gently peeling off when you pull on them with a golden and buttery interior, yet surprisingly light and unbelievably tender.
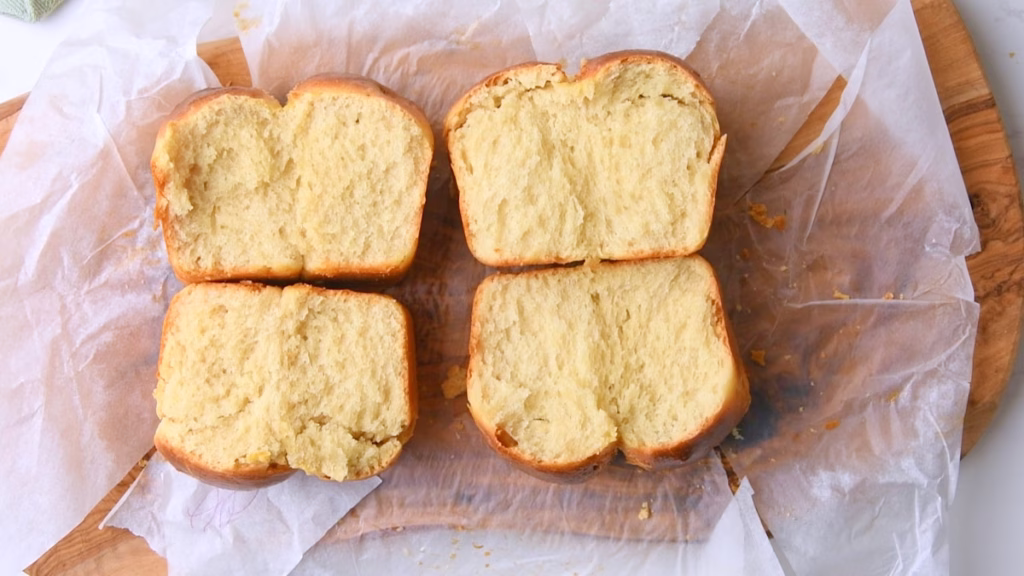
Here are the two side by side. On the left pure AP flour (using purely bread flour oddly enough looks the same) and on the right the mix of AP and Bread flour, which is softer, more elastic and “squishier”.
You can see on the right that the AP version has shorter gluten strands, leading to a slightly more crumbly result, while the bread flour mix is bouncing back easier.
So I finally (after eating different brioche versions for now bordering on 3 weeks!) managed to create the perfect protein sourdough Enriched base dough. Phew.
But doesn’t this make too much?
In earlier posts I got the odd comment that around 750g flour feels like A LOT of dough. And I get that. After all we are used to those supermarket sized loaves around half the size. But frankly, I rather make a large portion of dough once and divide it into two loaves or two entirely different recipes, than baking nearly every day.
I’m lazy like that.
Ingredient Notes
As usual, just the most relevant ones that I feel need notes. The full list including amounts is in the recipe card.
The Tangzhong
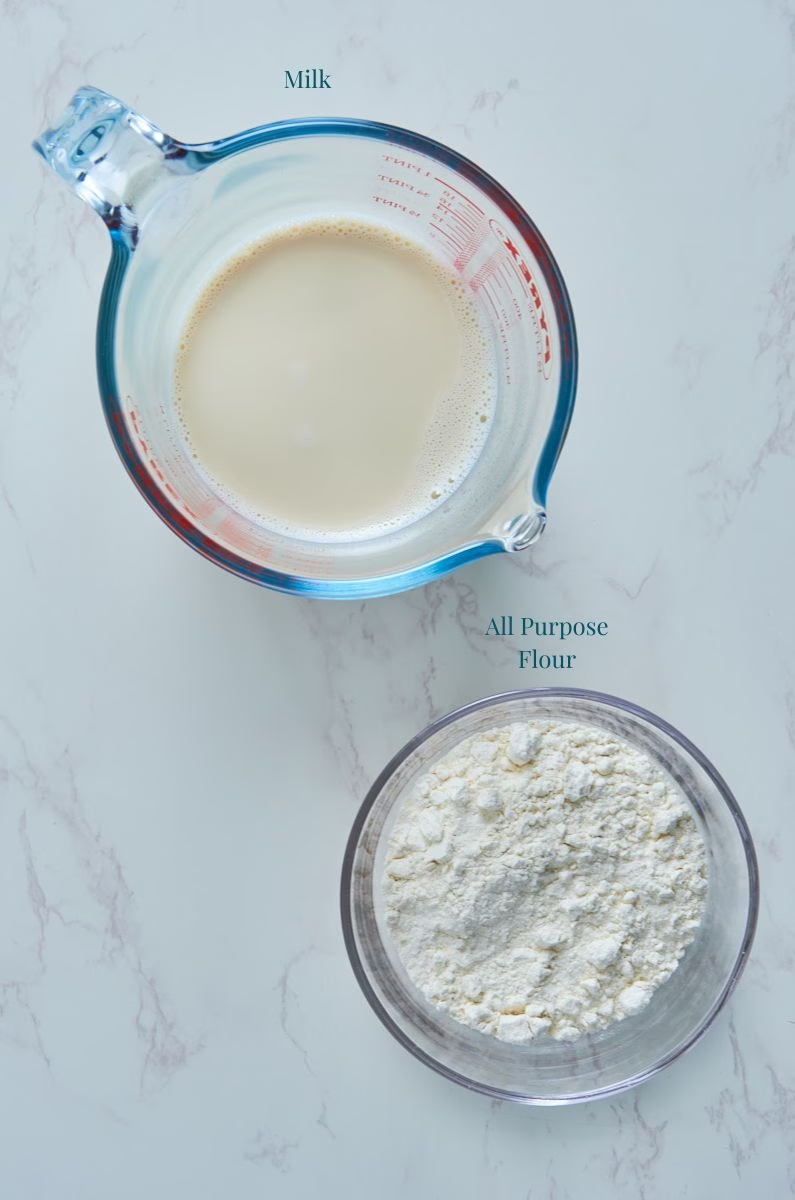
- Milk – The original from Claire uses whole milk, but since I never have milk at home I used my go to substitution Oatly Barista, which is very similar in consistency and outcome to whole milk. I have it in my morning coffee, so I knew it’s fine with being heated, as needed for the Tangzhong, the first secret weapon to keep the bread super fluffy and moist for days.
- All Purpose Flour – In my modifications for a sourdough-protein version that is working reliably (see “Story Time” above) I switched from AP flour to bread (strong) flour to a mix of both in the main dough. The Tangzhong uses very little, so either will work. I used AP for it.
The Dough
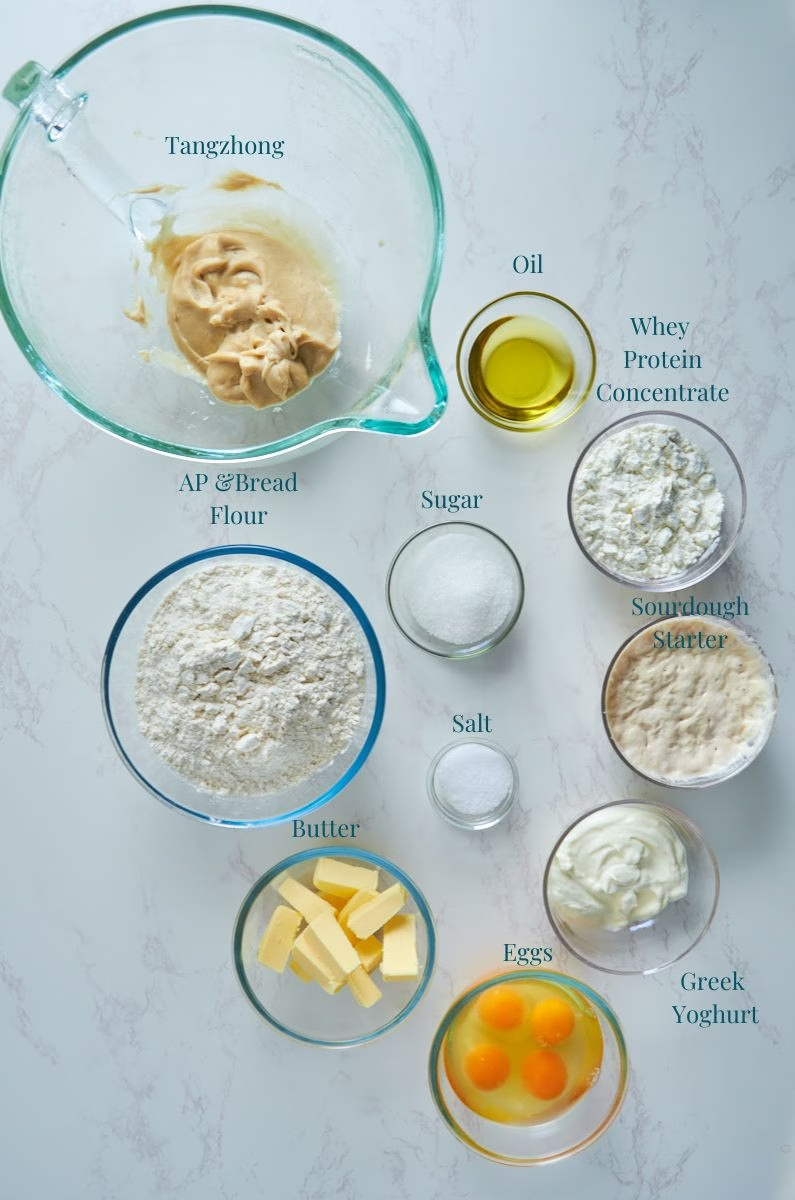
- Eggs – I’m using large eggs. You’ll want them to be cold. For once we are going entirely against the “everything at room temperature” advice for most bakes.
- Sourdough Starter – If you have no starter yet, follow my recipe to make your own.
- You want it to be active and bubbly for the protein brioche dough. I’m using a slightly different feeding ratio of 1:8:6 for this recipe, which keeps my sourdough active for longer, giving me more flexibility in my baking schedule and leading to a very strong starter. This ratio also leads to a less acidic outcome, which in Brioche is lovely, as you want it a bit more neutral tasting than, say, rye bread and adds less water to the already very high hydration enriched dough.
- Greek Yogurt – Full fat, for extra tender Brioche. This not just joins forces with the sourdough to add a really lovely gentle tang, it also further tenderizes the dough, balancing the protein powder, which can, if used on it’s own, dry out a dough. Plus of course added protein is fabulous. Many original Brioche recipes use buttermilk for the tang, so this will taste very familiar.
- Whey Protein Powder – Whey concentrate to be exact, as it still has a bit of fat and lactose (minimal) helping with the softness and moisture of the Brioche. For once I firmly advise you to use unflavored, as the flavored version creates a very different dough (nearly batter-like) structure due to the sweeteners in it in this particular recipe. Mine is from MyProtein.
- This is neither affiliated nor sponsored. Just the powder I found to taste best after trying a fair few. If you never found one you actually enjoy, give this one a try. I feel it leaves none of the typical protein aftertaste in my baked recipes, which is a huge bonus!
- Butter – Any butter will do, though I prefer the Irish butter due to it’s high fat content and amazing flavor.
- Oil – You can use a mild olive oil or any unflavored oil you like. This goes into the dough right from the start and adds to its ability to hold moisture, keeping it soft for days.
- Flour – After weeks of trying to find the perfect ratio for this bread I settled on a mix of bread and all purpose flour. This results in the best texture (See pictures above).
substitutions
When using substitutions be mindful that using too many can have unintended results. While the vegan ones of course work together, they might need slight modifications in the amount of flour. Though for this particular recipe, due to the high amount of eggs in it, I have no fully vegan/egg free version, as I feel it’ll change the flavor too much.
Get a feel for your dough. You can watch the video to see how mine behaves at different stages, so you know what to look for.
Different brands of products (think protein powder as example) may also lead to slightly different results and flavor.
The Tangzhong
- Milk – While I use Oatly, you can use of course whole milk or any full fat milk substitute. The most important part here is the moisture.
- Flour –You can use either AP or Bread flour for the Tangzhong.
The Dough
- Greek Yogurt – The vegan version works fine here, ideally Full Fat.
- Whey Protein Concentrate – Casein powder works well, but needs about 1-2 tbsp added milk in the Tangzhong. So does upcycled (unflavored) Barley protein, which needs 1-2 tbsp less milk in the Tangzhong.
- I have not tried to bake with any pea based vegan protein powders, as I deeply dislike the flavor and texture of them to begin with, so I’d rather not have them in my baked goods. Though I’ve heard Orgain Vanilla flavor works pretty well.
- If you give it a try, please tell me what you think! You’ll likely need to add 1-2 tbsp water, as they do soak up more than whey concentrate.
- I would not recommend using whey isolate, as it has a much stronger drying effect. It lacks the fats found in concentrate, which leads to a much thirstier, tougher dough.
- If you’d like to make this recipe without protein powder, simply replace 1:1 with more flour. Start with about 2-3 tbsp less milk, as protein powder absorbs more than flour.
- Butter – Vegan butter will work nicely. Make sure to use one with the highest fat content you can find. Around 80% is closest to real butter.
- Egg – For this brioche, because it has 5 eggs, that make up a bit part of it’s structure and flavor, I would not recommend replacements.
Top Tips For Success
- The consistency of the Tangzhong can make or break your dough success. I describe the consistency as “creamy potato mash-like” and that means your whisk should leave visible streaks in it that don’t fill in. It should hold it’s shape for a bit. And once cooled a little, you’ll be able to touch it without anything sticking to your fingers.
I got that wrong in two later attempts and was wondering why my dough became a batter like mess. In doubt, cook a 20 seconds longer than you think is enough. - Two Types Of Flour – Many recipes will work using flours interchangably and I’ve tried this recipe with both Bread and AP flour exclusively (see “Story Time” above). If you have only bread or AP flour you can still make this dough, but the texture won’t be the same. I got that particular dreamy tender fluffyness only when mixing bread and AP flour.
- The type of Protein Powder matters – In my marzipan wreath recipe (coming soon) I decided to try vanilla whey concentrate instead of unflavored whey concentrate from the exact same brand and line. It changed the dough texture from dough to…well…batter. So I had to change flour and protein amounts and add unflavored protein powder to get it back to being workable. The sweetners and other additions in the flavored version can dramatically alter the dough in a recipe that is very close to the edge of what flour can support.
- Cold Ingredients – While most baking recipes ask for room temperature ingredients this dough would get way too soft and might even feel greasy if you use room temperature butter and eggs. Keep them cold.
- It’s sticky. Keep it cold. – Sourdough and enriched dough even more so is and remains a little sticky to the touch, even after the overnight fermentation. We counter that by giving it plenty of fridge time, which solidifies the butter and makes the dough workable. However, even with that it will stick slightly. Go with it. It’ll make the most gorgeous Brioche!
- Develop the gluten BEFORE adding the butter – This is crucial for enriched dough.
Let me explain: Butter coats the flour and inhibits gluten formation, so if you add it too early, before enough gluten strands where developed, your dough can’t form the network that is supposed to hold the butter, leaving you with a greasy mess.
If you add it once the gluten has formed, it coats the strands, making for that perfect fluffy and buttery texture that rises beautifully. - Enriched dough needs time – Because the ingredients (eggs and butter) are fairly heavy, the dough needs a long time to proof. Don’t rush it. I tend to feed the sourdough 3 days before I want to bake and go from there, just so I can give it at least 8 hours bulk proof time outside of the fridge, a cold ferment and another at least 6 hours at room temperature after shaping until it’s really puffy and risen.
- The time is entirely hands off – so you won’t have to tend to your sourdough brioche during those hours. It’ll reward you with one of the fluffiest of bakes that ever came out of your oven!
Equipment Used
- Saucepan – For making the Tangzhong. Note: It will stick to the bottom of the pan a little while heating. Once you transferred the Tangzhong into the mixing bowl, soak it with a little water to wash that off easily.
- Blender – As in so many of my recipes I blend the liquid ingredients with the protein powder first, to avoid any potential lumps in the dough later. While you could mix the protein powder with the flour, I had varying success with that method. Hence blending.
- Stand Mixer – I don’t usually use a stand mixer for high hydration dough, but due to the butter and eggs this dough is very sticky in the beginning and needs a LOT of kneading to work in the butter properly. So unless you love kneading for a very long time (or use it as workout and don’t mind sticky dough fingers) I would highly recommend using a stand mixer.
- Now, you see me using a Kitchen Aid Artisan here and for the amount of kneading needed it just about works, though it gets warm.
- Be mindful though about their potential to overheat! Knead on speed 1 only until everything is well incorporated.
- I tried kneading it fully using the Kitchen Aid but stopped once it got a bit too hot for comfort, so I switched to stretch and folds before adding the butter, to develop the dough fully first, then knead some more to work in the butter.
- Loaf Pans – You’ll need two of them or bake in batches. Mine is the Nordic Ware 1lb loaf pan, which is just the right size to give you a perfectly risen Brioche and is super easy to clean.
 Buy Now →
  Buy Now →
  Buy Now →
 How to Make this
Example Bakers Schedule
| Time | Action | Note |
| Day 1: 6:00 PM | Feed Levain | Mix your 1:7:6 starter. Let it sit at room temp overnight. |
| 6:05 PM | Make Tangzhong | Whisk milk and flour for the Tangzhong in a saucepan as per instructions, then set aside to cool. |
| Day 2: 9:00 AM | Mix Dough | Blend Wet Ingredients. Mix with flour, salt, Tangzhong and starter. |
| 10:00 AM | Stretch & Folds | Perform 3–4 sets of folds every 30 minutes. Then knead in the butter. |
| 12:00 PM | Bulk Ferment | Let the dough sit undisturbed (Counter) for 6-8 hours |
| 8:00 PM | Cold Ferment | Move the dough to the fridge for at least 4h or overnight to firm up. |
| Day 3: 8:00 AM | Shape | Shape and place in loaf pans |
| 8:30 AM | Final Proof | Put the Brioche in the “plastic bag tent” and leave it at room temperature for 6-8 hours or until noticeably puffed up. |
| 3:00pm | Bake | Pre-heat the oven and bake. |
Day 1 – Evening
Feed Your Starter
- Mix your water and flour with a tablespoon of your existing starter until you have a very firm but “stir-able” dough. It should become relatively hard to stir towards the end of mixing. This is to give you a really strong starter that will stay active for hours. So you don’t have to schedule your day around your sourdough’s activity.
Make the Tangzhong
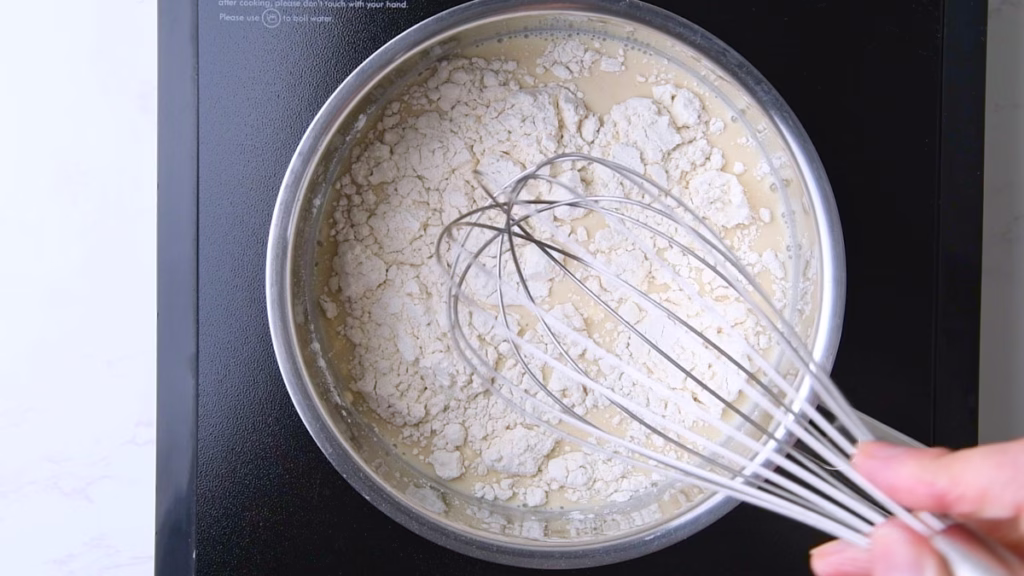

- In a saucepan whisk together your flour and milk for the Tangzhong. Set to medium heat and keep whisking. The mix will first look very liquid and then form up all of a sudden. Do not take your eyes off it and keep whisking until you have a paste the consistency of creamy potato mash.
- A whisk should leave a visible trace that doesn’t fill in. In doubt cook 20 seconds longer rather than shorter.
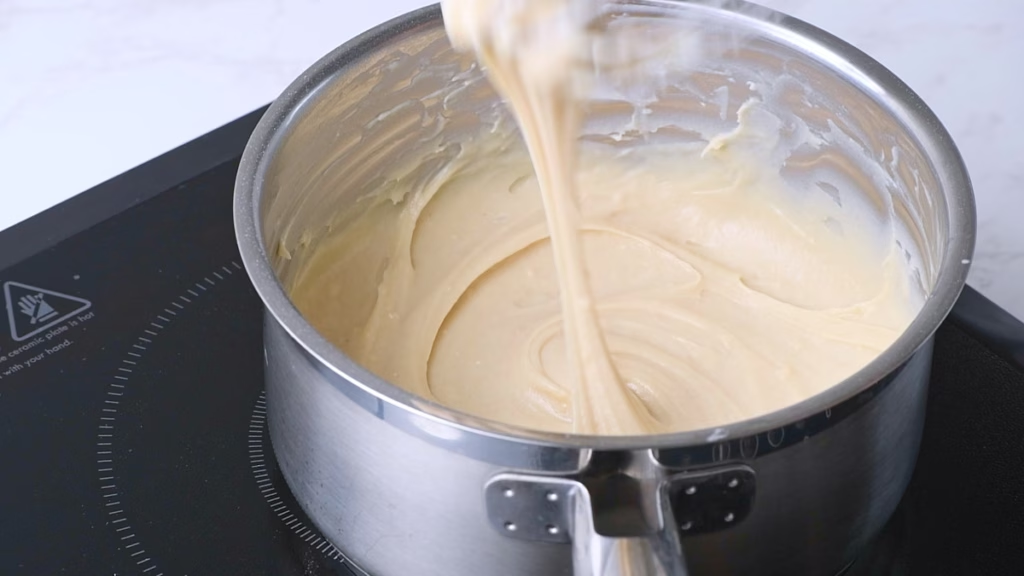
- Take off the heat and transfer immediately to your stand mixer bowl.
- Once cooled a little, you’ll be able to touch it without anything sticking to your fingers. That’s how you know you have the right consistency.
- Cover and allow to cool overnight while your sourdough is becoming nice and active. In the fridge is best.
- In case you didn’t make it a day ahead, make sure the Tangzhong is cool when adding the remaining ingredients. You don’t want to heat up butter and eggs accidentally!
Day 2 – Mixing The All-Purpose Enriched Dough
Blend Liquids and Protein
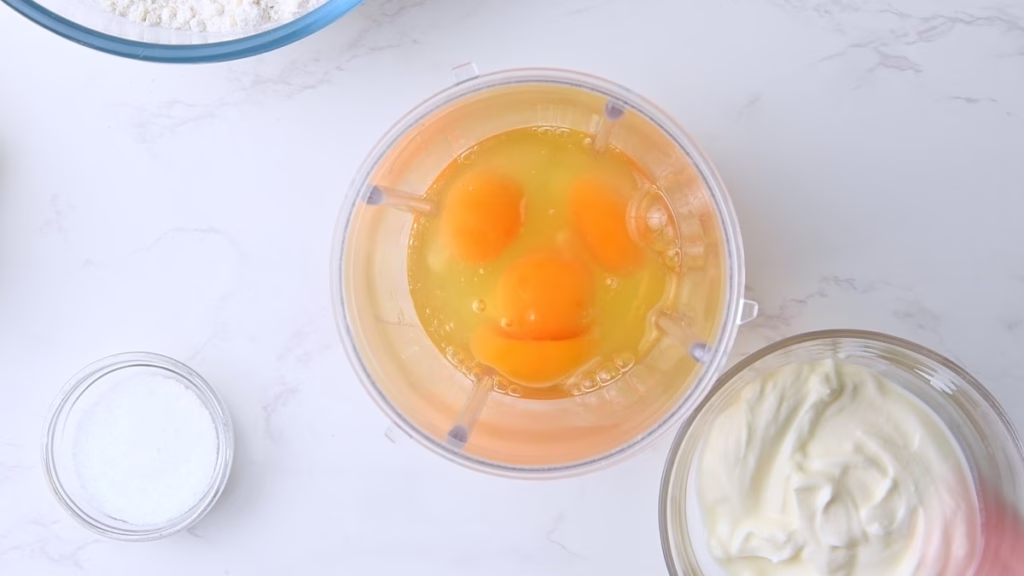

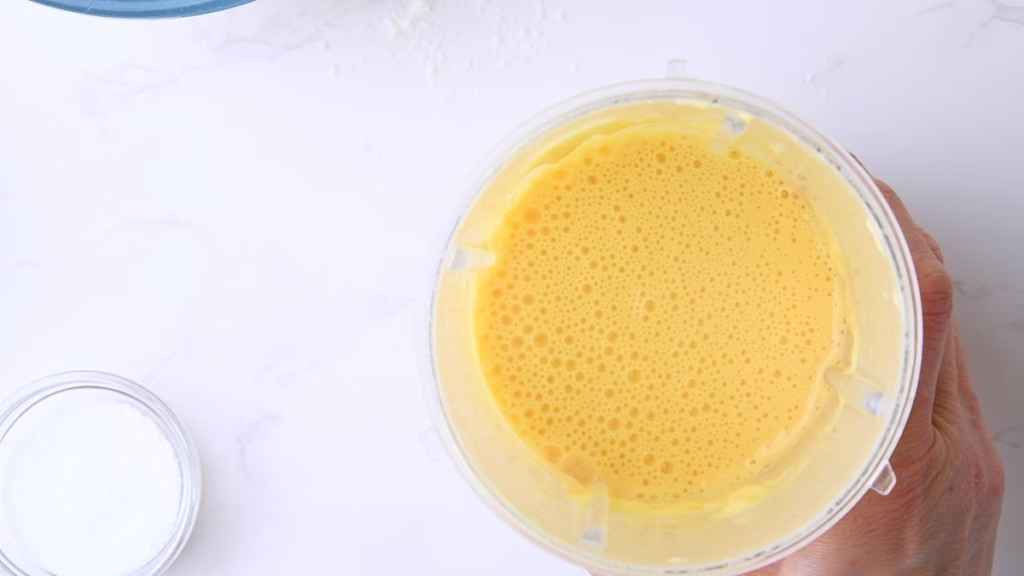
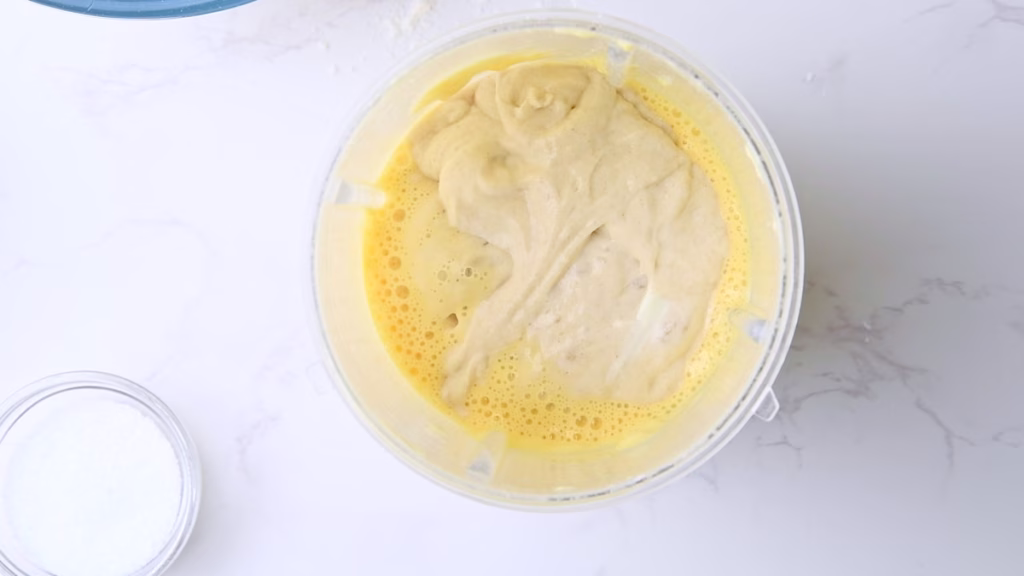
- For the smoothest result and easiest mixing add eggs, Greek yogurt, whey protein, oil and sugar to a blender. Blend until smooth.
- Stir in your sourdough starter. In theory you could blend that in too, but I felt my blender was already pretty full.
Mix The Dry Ingredients
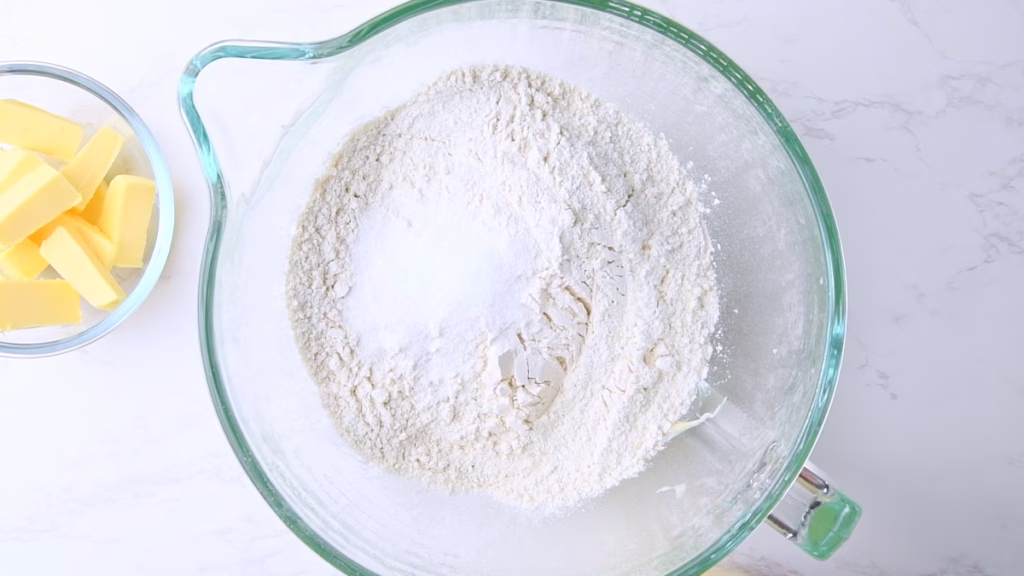
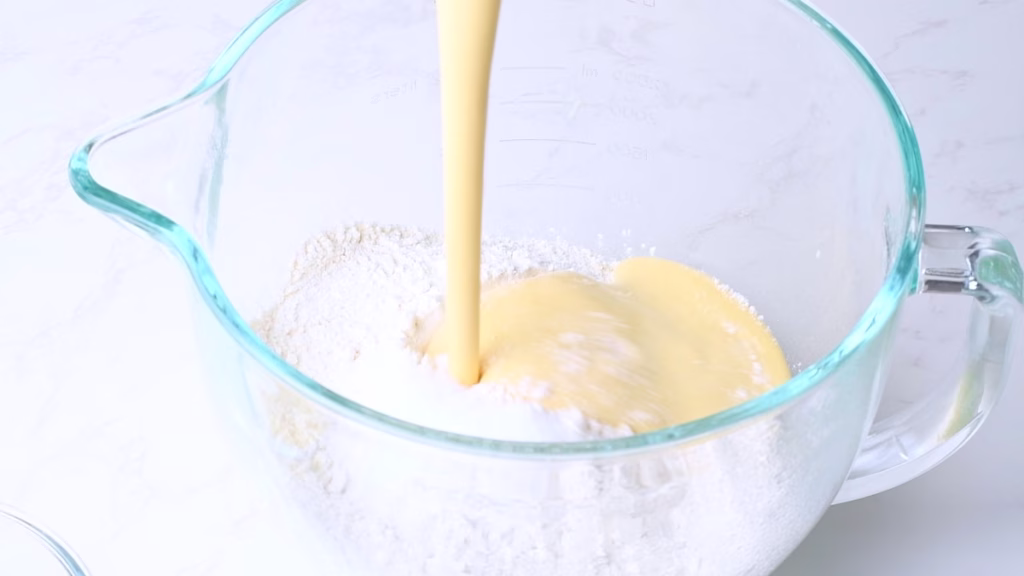
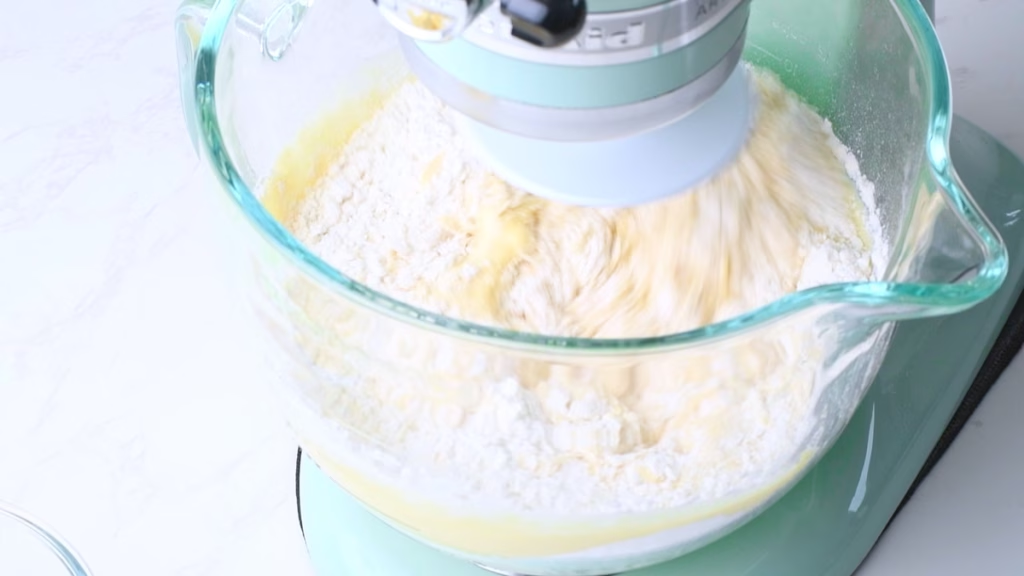
- Add the salt and flour to the bowl with the Tangzhong and stir the dry bits briefly.
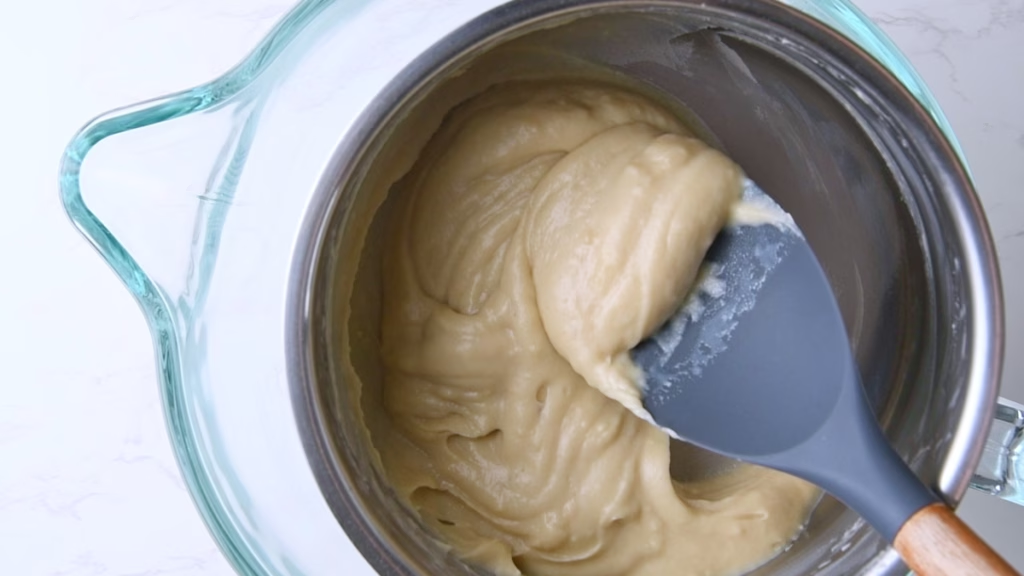
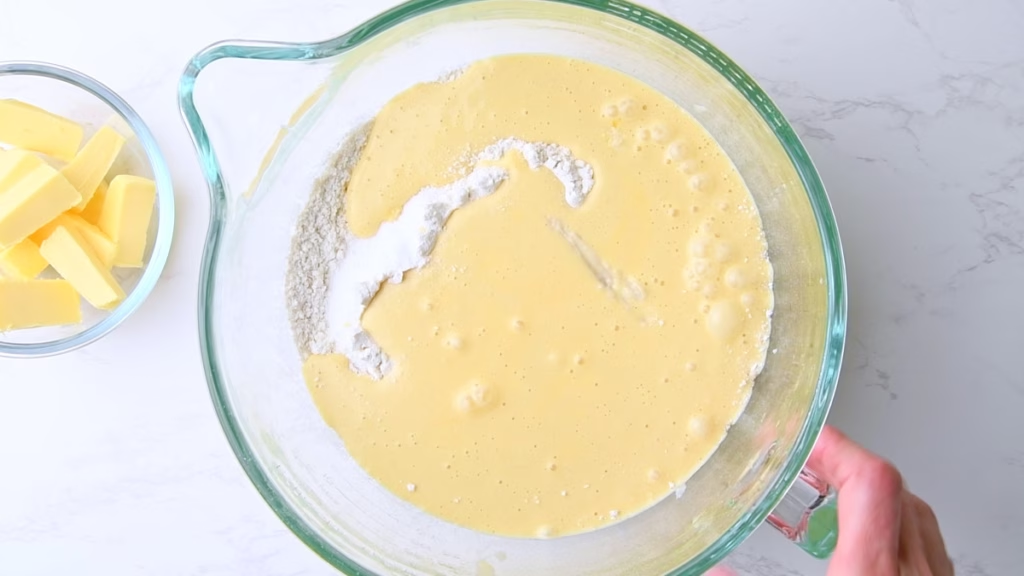
- Pour your protein blend into the mix and allow a stand mixer to knead on low speed the mix until you have a very wet and shaggy dough. Then continue to mix for at least 5 minutes to strengthen the gluten network.

Bulk Proof and Coil folds
- Starting after about thirty minutes to one hour (this is very flexible) do three sets of coil folds by using wet hands to push under the dough, pulling the whole dough up and letting it sink down folding over itself.
- Turn the bowl by 90 degrees and repeat. Do this 3-4 times or until the dough looks visibly smoother.
Cover again and repeat after about 30 minutes. Repeat 2 more times.
- Your dough should now look very smooth and be less sticky. If not, repeat the above once more.
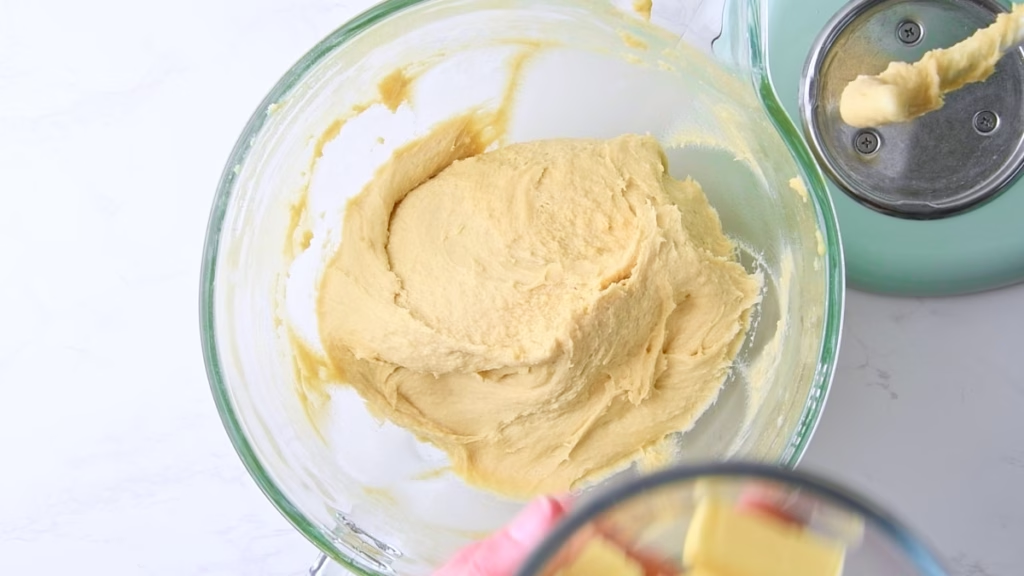
- Do this until your dough passes the “Windowpane Test”. For this test take a piece of dough and gently stretch it, until you can see light shining through it. If the dough rips before that is the case, it needs a little more TLC.
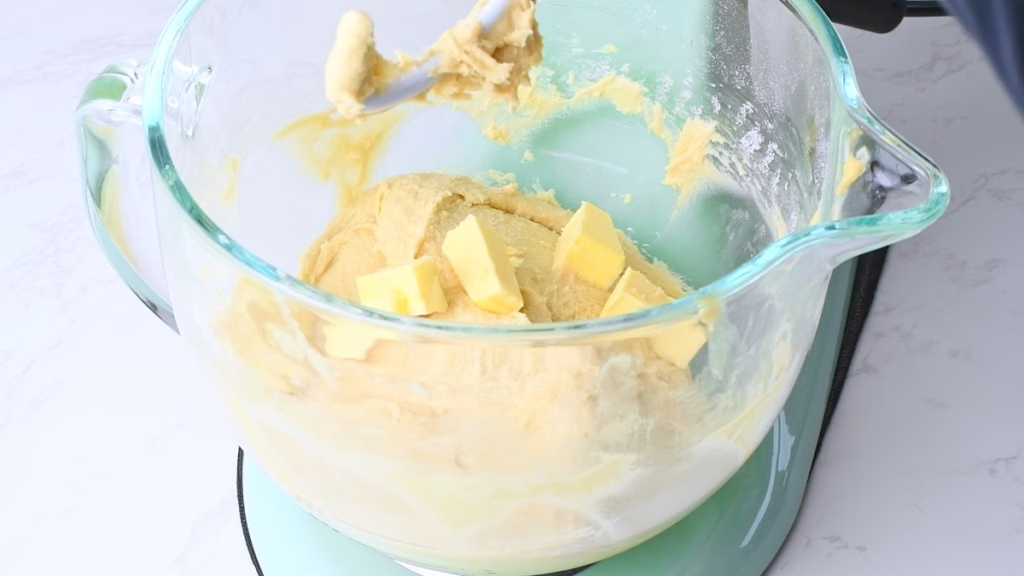
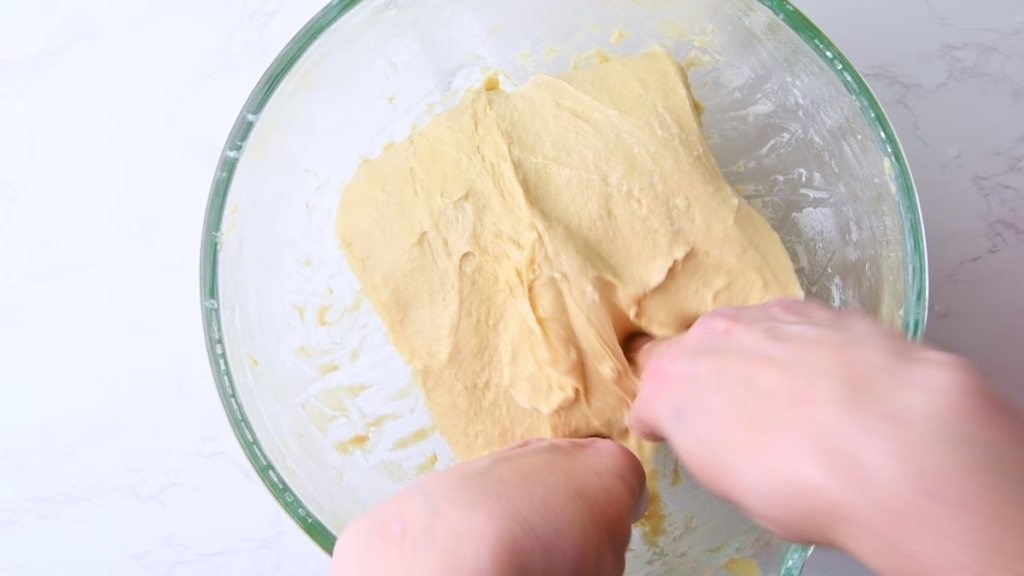
Add The Butter
- Back to your stand mixer.
- Add the cold butter pieces in 2 batches and continue to knead on low speed until the butter is fully incorporated before adding the second batch.
- Scrape down a sides of the bowl a few times, to make sure everything is well mixed and there is no Tangzhong left at the bottom of the bowl.
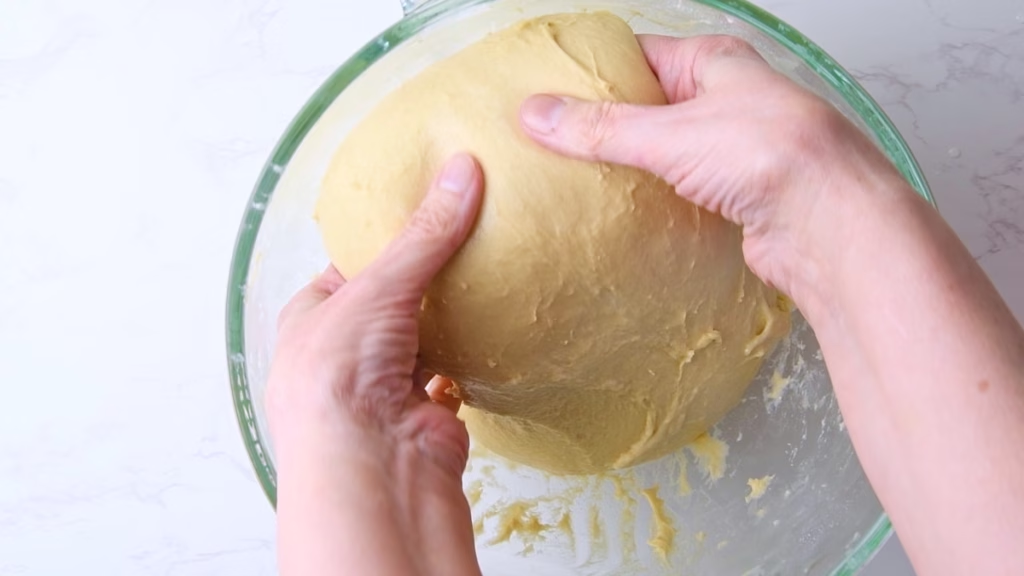
- Once you have a very smooth dough that is pretty soft and sticky, but will still stretch happily, proceed to the bulk ferment, allowing it to rise outside the fridge for about 4-6 hours or until doubled in size and very puffy.
- I often do this overnight beside an open window (while it’s under 50°F/10°C outside) overnight. If it’s warmer, better keep an eye on it to avoid overproofing.
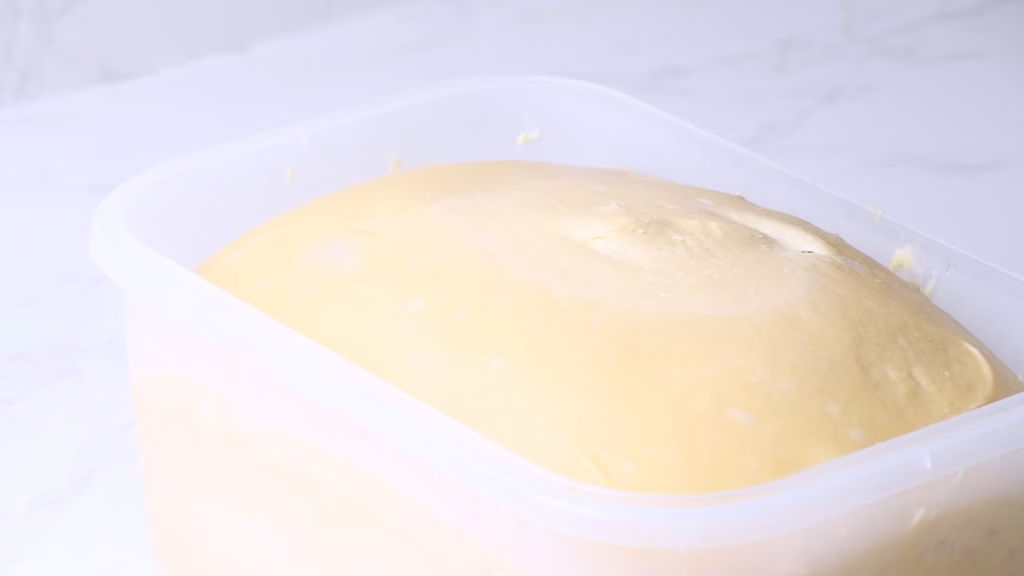
Put into rectangular or square container (optional)
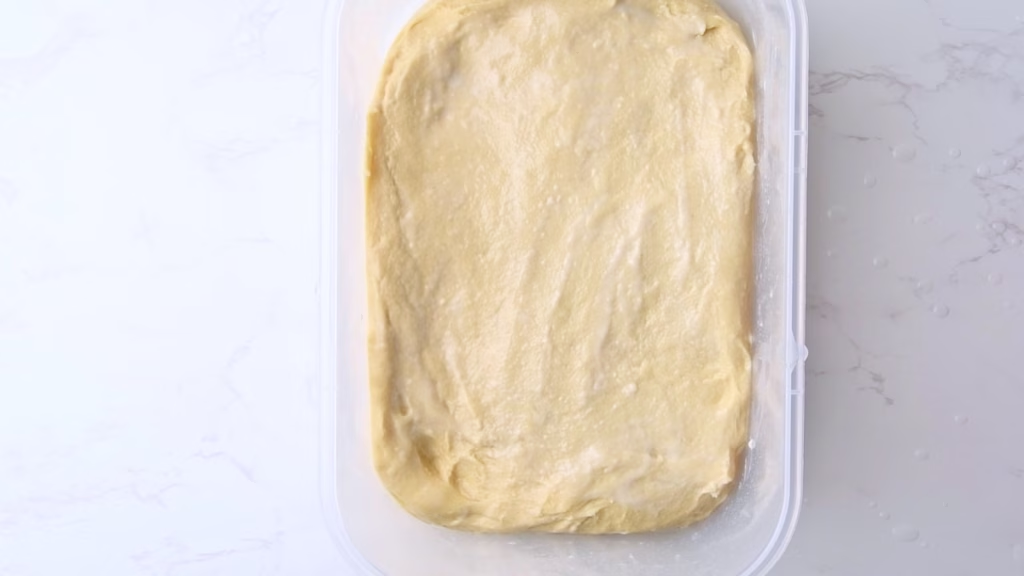
- I put my dough into an oiled rectangular box that has a lid, as I find it much easier to portion a dough from that shape than a round one. But that is purely personal preference. It also fits better into my always overfilled fridge than a huge stand mixer bowl!
- Pat it out with your hands a bit, pushing it into the corners.
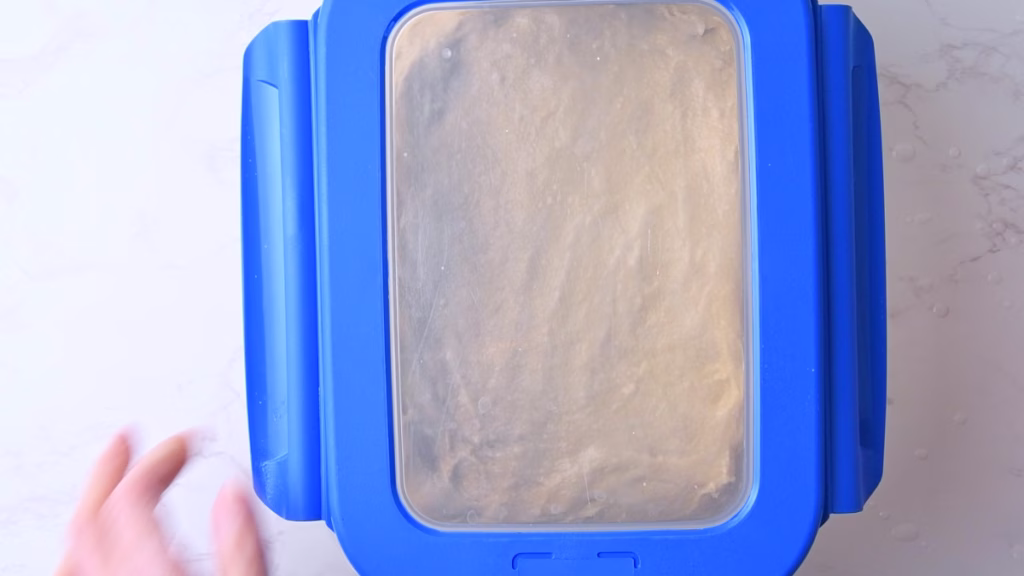
- Cover loosely (don’t close a lid that has clips fully, or it might crack when the dough proofs) and allow to bulk ferment.
- I usually let it sit on my counter for a few hours (6-8 hours for this enriched dough.) until visibly risen and then move it to the fridge.
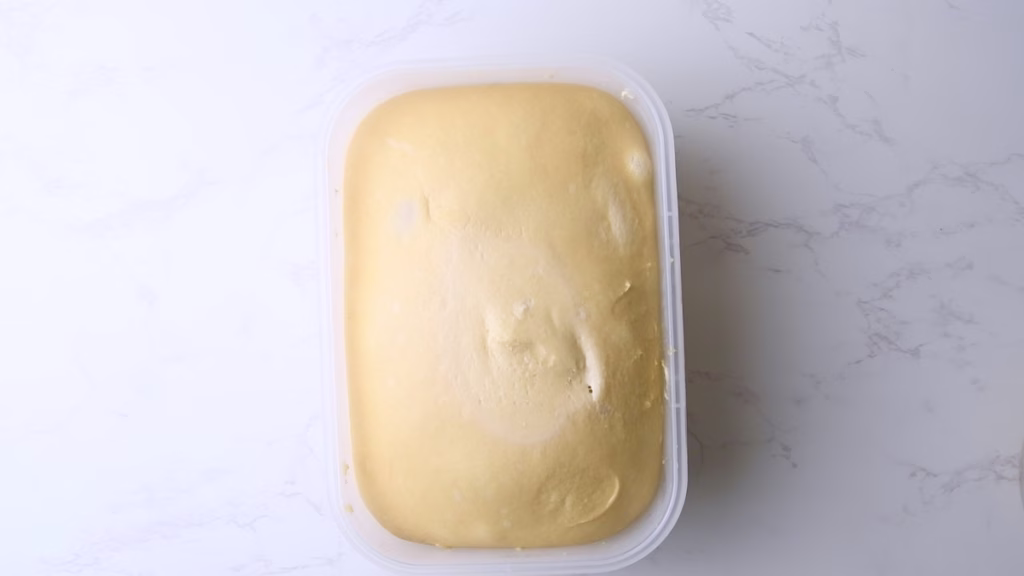
- For this super buttery dough at least 4 hours fridge time is mandatory to firm up the butter, so you can shape it easily. Otherwise it will be way too soft.
- But depending on your schedule you could also put it into the fridge to cold ferment for up to 3 days of fridge time total. Shape and finish the rise when you have about 8 hours until baking.
- This is my dough after the bulk ferment and a night in the fridge:
Tips for Busy Schedules
- Personally I wildly switch up the time of bulk fermentation, cold ferment and rise after shaping. The important part is that your dough gets time to rise once before shaping, so it’s already light and fluffy when you start and then again until visibly risen and puffy after shaping. It doesn’t matter if that happens in the fridge or on your counter and the time needed will vary depending on the temperature it sits at.
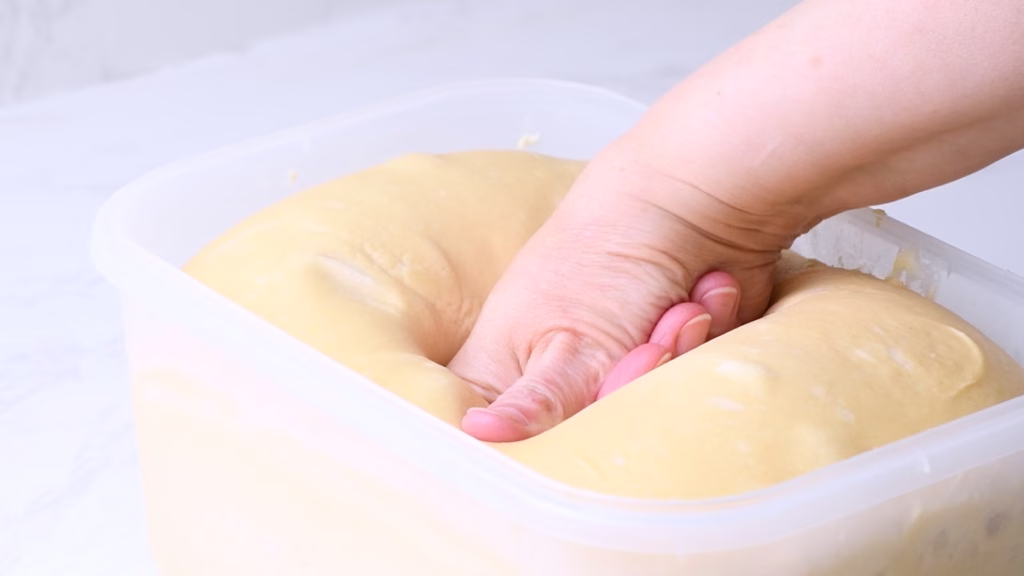
- To check if your dough is ready gently poke it with an oiled finger (this dough sticks!). It should leave a dent, feeling noticeably airy, that springs back slowly.
- If you have a hard time denting it at all, it needs more time.
- If the dent stays and doesn’t bounce back slowly, it might have gone a little too long (though you can still bake it).
- It’s much harder to overproof sourdough than to underproof it.
- Patience and cold fermentation always pay out in flavor and gut friendliness.
Day 3 – Shaping and Baking Your Sourdough Protein Brioche
Prepare Your Loaf Pans

- Grease your two loaf pans with a little butter. This will help your baking parchment stick in it and make placing the dough so much easier than wrestling loosely lying parchment!
- I found the best loaf pan for the perfect rise is a 1lb version. Mine is from Nordic Ware.
- Cut a piece of baking parchment as wide as your pan is long.
- Place inside the buttered loaf pan and fold the overhanging sides. This will give you an easy way to lift out your sourdough protein brioche later.
- If you like your crust slightly crisp and gold, lightly butter the parchment too.
Shaping Your Brioche
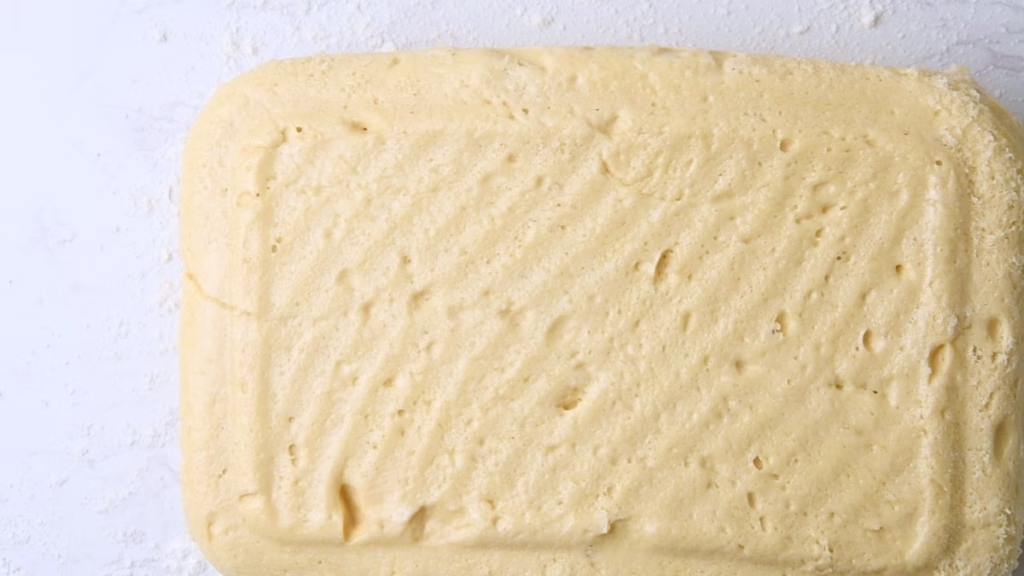
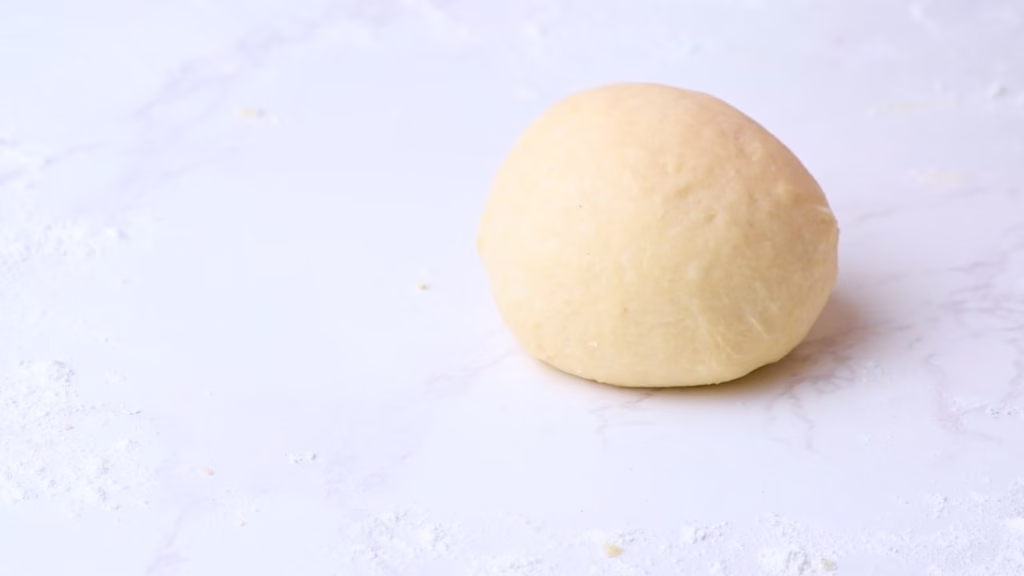
- Take your now cold and firm dough out of the fridge and tip it onto a lightly floured work surface.
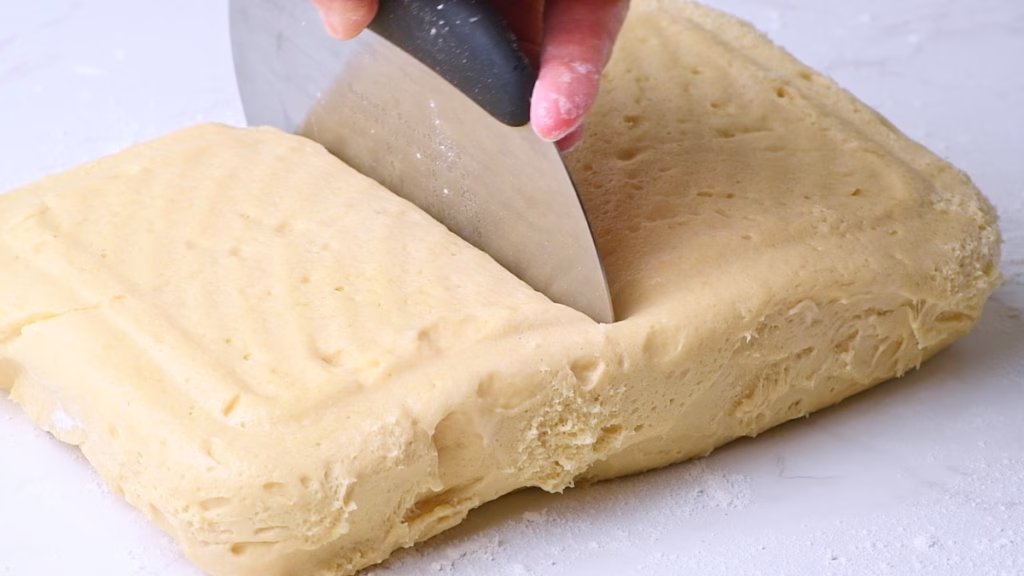
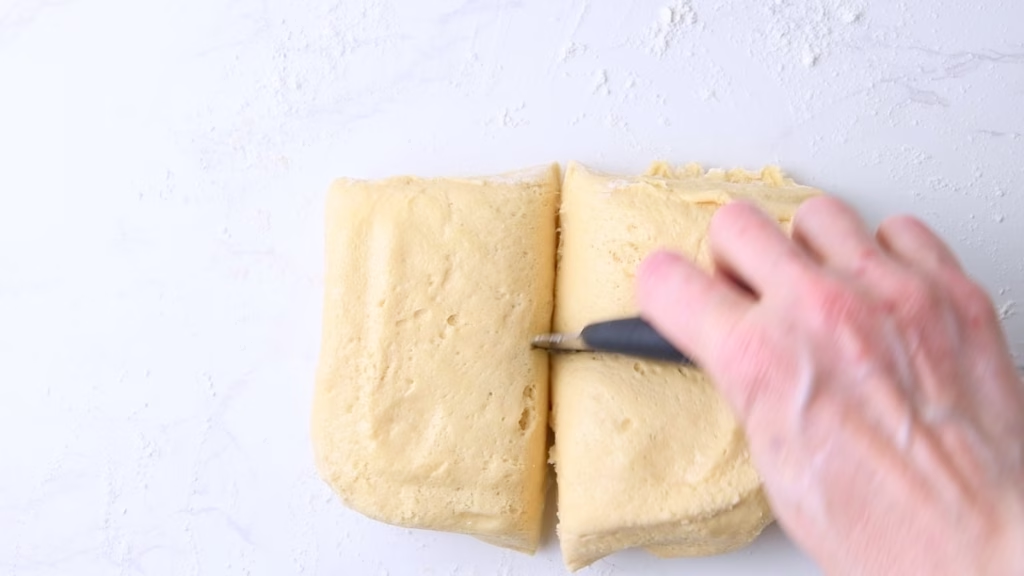
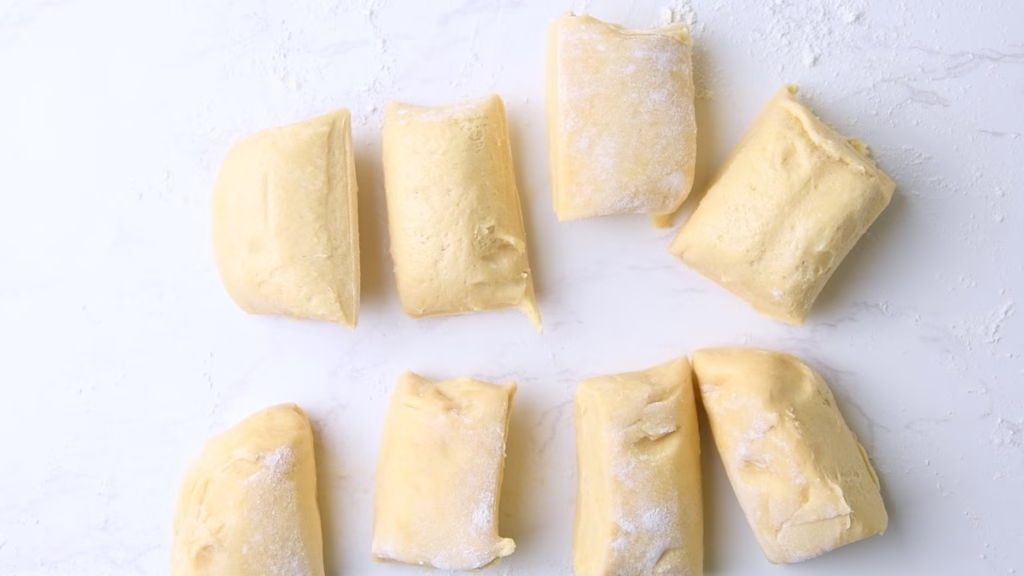
- Cut into 16 equal pieces. I like using my dough scraper for this, but a knife works too.
- I used food scales to get them (near) perfectly even, but you can absolutely eyeball it.

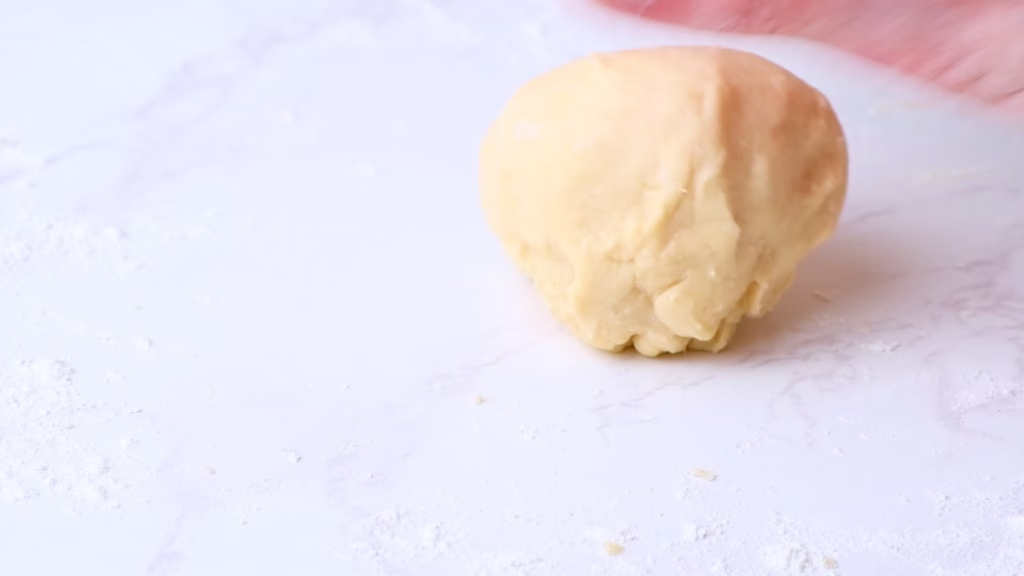
- Now locate the smoother side of each piece (the one that was on top and hit the floured surface usually) and turn that down, so you have the sticky side up. Pat it out lightly using your hand, then grab the four corners, pulling them up and squishing them together in a sort of garlic bulb/dumpling shape.
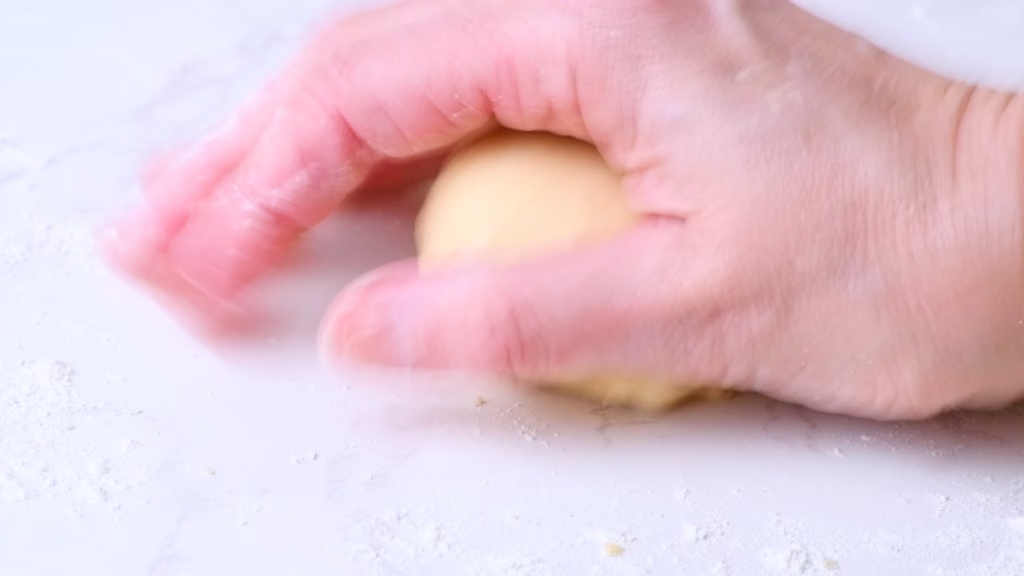
- Flip over, so the sticky ends are now on your work surface.
- Cup your hand over it, barely touching the surface and start moving it in rapid small circles around the bun, until it has enough surface tension to be smooth and “stand up” a little bit.
- This works best if there is no flour on that part of the surface, so the dough can hold onto it a little. There will be little bits of dough sticking to the worktop. That’s fine.
- If it’s unworkable or spreads too much it’s likely too warm.
- Though if even cooling it fully overnight didn’t fix it, you can add a little more flour at this point.
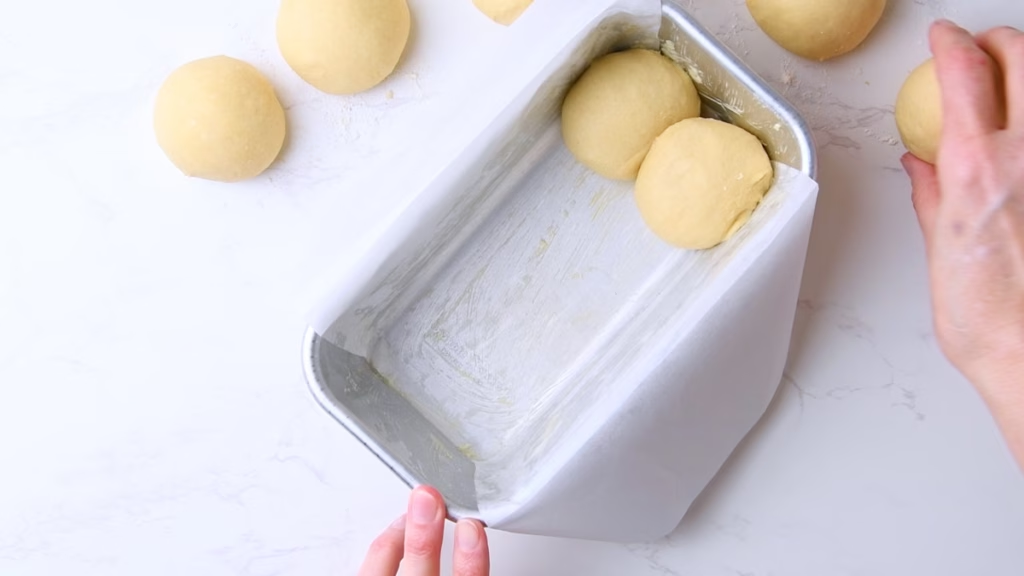
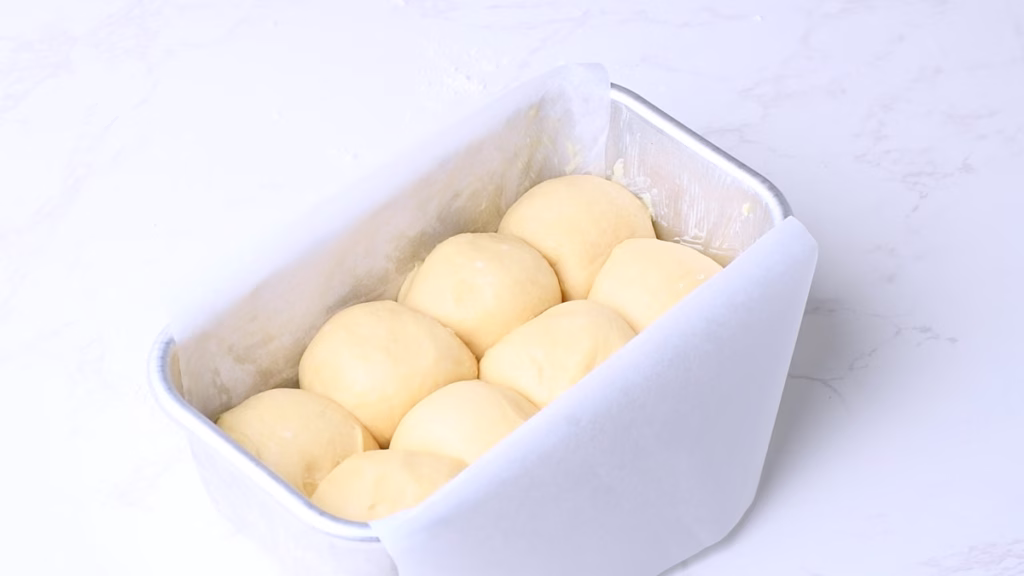
- Now place 8 dough balls in each loaf pan. They should look pretty closely squished together, so they rise up, giving you a super high and puffy end result.
Final Rise
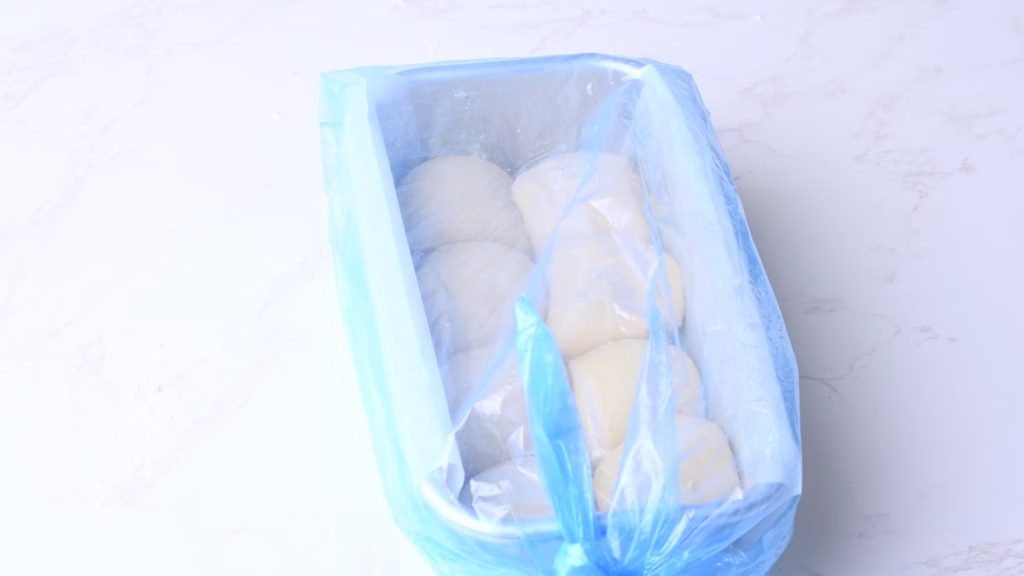
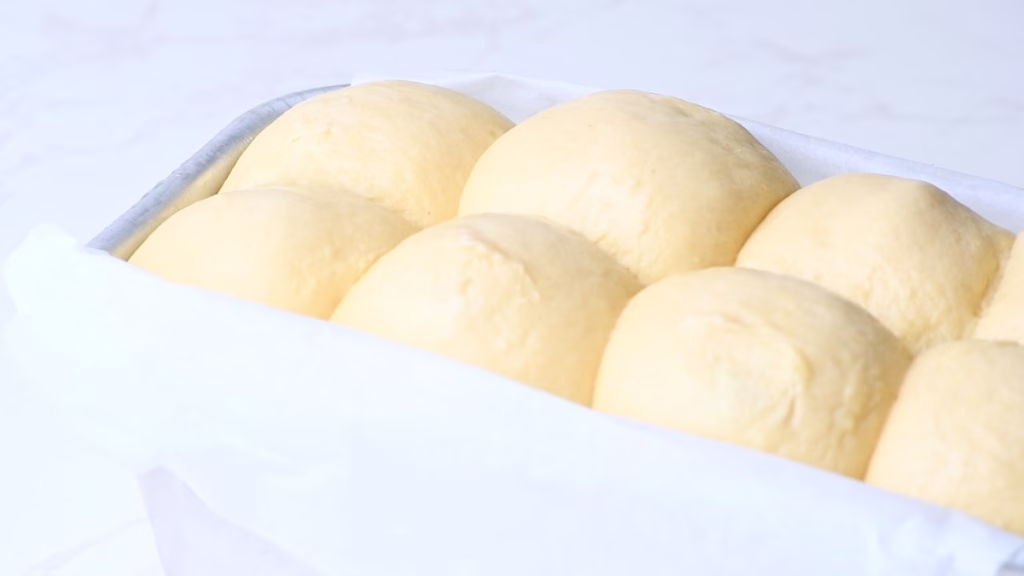
- Tuck the loaf pans into plastic bags and close them with a knot or a clip. This will prevent the dough from drying out in the rather long rise it needs.
- Allow to rise for 6-8 hours at room temperature (my kitchen is about 70°F/21°C and it needed a full 8 hours) until it looks really puffy and risen.
- To check if your dough is ready gently poke it with an oiled finger (this dough sticks!). It should leave a dent, feeling noticeably airy, that springs back slowly.
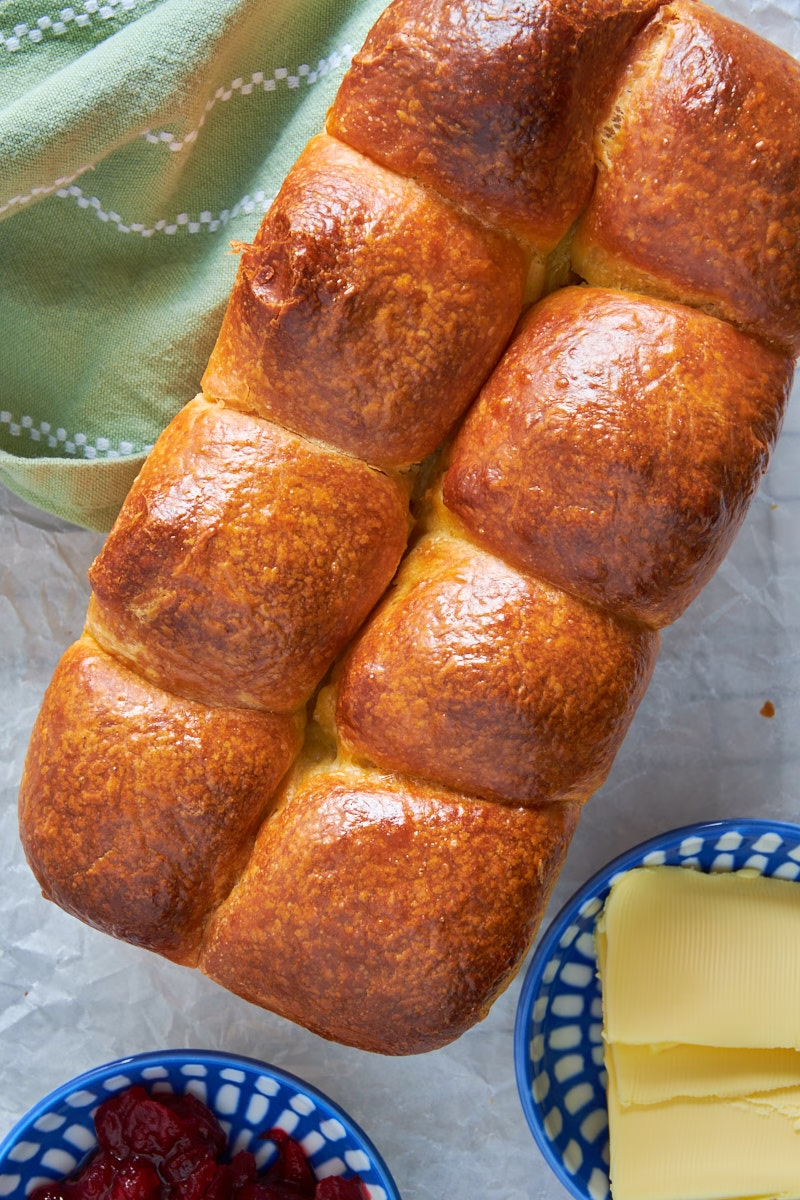
Bake Your Buttery Brioches
- Preheat your oven to 350°F / 175°C with an oven rack in the center.
- Crack an egg into a small bowl and whisk until smooth with a fork
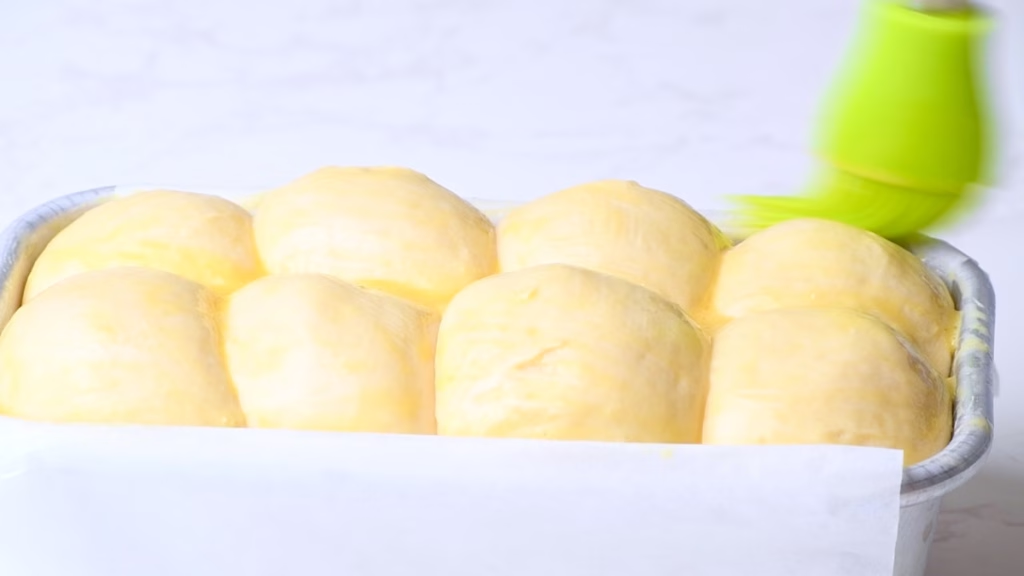
- Take the loaf pans out of their bags and brush the top of the brioches with the egg wash for that deeply golden, shiny top.
- Bake for 25-35 minutes or until golden and baked through
- I like to check the core temperature with an instant read thermometer. It should be 190°F/88°C to be fully baked.
- Note that bread with protein powder browns a little faster due to the added milk sugars. But that doesn’t mean it’s baked through. So if you are used to non-protein bread, be sure to leave it a little longer, as the enriched dough needs time to bake fully.
- If it gets dark too quickly, cover it loosely with some kitchen foil.
- If you have no thermometer, you could light the bread gently out of the pan and tap the bottom. It should sound hollow when baked through.
- Once it’s fully baked allow it to cool for about 10 minutes in the pan, then, using the parchment edges to lift it up, gently place it on a cooling rack to cool for another 20 minutes or so.
How To Serve
This Sourdough Protein Brioche is best when eaten still slightly warm.
I adore it with a little more butter and some jam on top. My personal favorite is homemade cranberry jam (some call it sauce, but really, I use it as jam!). Though honey is a close second!
On the next day the brioche slices wonderfully and toasts up to the most amazing golden brown you can imagine.
Oh and it makes the probably best French toast or bread and butter pudding!
Seriously, for this reason alone you’ll want two!
How To Store
The Brioche keeps beautifully soft and moist for up to 3 days in an airproof container at room temperature.
It freezes really well either as whole loaf or in slices separated with parchment, so you can grab one and toast fresh whenever you like.
FAQ
I specifically recommend unflavored whey protein concentrate for this base dough. Whey concentrate contains a small amount of fats and lactose that help keep the brioche soft. If you switch to whey isolate, the dough will likely be much “thirstier” and tougher. If you want to use a flavored powder (like vanilla), be careful—the added sweeteners can change the dough structure significantly, often making it much softer or even “batter-like.”
I had an attempt with vanilla whey concentrate from exactly the same brand and type and it never became even workable, despite throwing more than double the protein into it.
Enriched sourdough is naturally tackier than standard bread dough because of the butter, eggs, and yogurt. This is completely normal! Resist the urge to keep adding flour. Instead, rely on cold fermentation. Once the butter in the dough chills in the fridge, it becomes much easier to handle and shape without sticking to everything. Or rather: Less sticking.
You can, though you’ll lose some of the flavor and the protein-breaking benefits of the long fermentation. To adapt this, add 2 ¼ teaspoons of instant dry yeast and increase the flour by ¼ cup (30g) and the milk by ¼ cup (60ml) to account for the missing starter volume. Your rising times will be significantly shorter—usually 1–2 hours instead of 6–8.
You don’t have to, but I highly recommend it. Protein powder can sometimes clump when mixed directly into flour. Blending the whey with the liquid ingredients (eggs, yogurt, oil) ensures a perfectly smooth, silkier dough and guarantees you won’t find any dry protein pockets in your finished brioche.
It is possible, but be prepared for a workout! Because we are working in a lot of butter, the dough starts off very sticky. It takes a significant amount of slapping and folding to develop the gluten. If you are doing it by hand, I recommend a 30-minute “autolyse” (letting the flour and liquids sit) before adding the salt and butter to give the gluten a head start.
Bread made with protein powder and dairy (yogurt/milk) undergoes the Maillard reaction much faster than water-based breads. This means it might look fully “done” on the outside while the middle is still underbaked. If it’s getting dark too quickly, simply “tent” the loaf with a piece of aluminum foil for the last 10–15 minutes of baking.
Other recipes you might enjoy

Looking for more breakfast ideas with sourdough and protein? Here are 13 of them!

While I mentioned burger buns above that will have protein, here is an all-time reader favorite without protein (and what I still believe to be the very best burger bun out there!)

Also using brioche dough, albeit a slightly different one, my cinnamon rolls will certainly make everyone happy who tries them!

The Everything Protein Sourdough: One Enriched Dough, Many Ways
- Total Time: 3 days
- Yield: 21 slices 1x
Description
If you always wanted super versatile dough recipe that can be used for anything from Brioche over Burger Buns all the way to festive afternoon tea bakes, and is made with sourdough and protein, this is it!
I wanted to see if I could take the versatile “all-purpose” enriched dough concept popularized by Claire Saffitz and adapt it for a high-protein sourdough version that doesn’t compromise on texture. After several rounds of testing—and a few lessons learned along the way—I’ve landed on a base recipe that hits that buttery, pillowy brioche mark while packing 10g of protein into every slice.
Ingredients
Sourdough Starter (Levain)
- 1 tbsp (15 g) sourdough starter
- 90 g all-purpose flour
- 5 tbsp (70ml) water
Tangzhong
- Just under 1 cup/200 ml whole milk (I used Oatly Barista)
- 6 tablespoons/50 grams bread flour
Enriched Protein Dough
- 5 large eggs, chilled
- 3 scoops / 90g whey protein concentrate, unflavored (I firmly recommend using unflavored in this recipe, as flavored versions reacted dramatically different in my testing)
- 1/2 cup -1 tbsp /100g Greek yogurt (Full fat)
- 2 tablespoons vegetable or olive oil
- 1/4 cup/60 grams granulated sugar
- 3/4 cup/150g sourdough starter, active (You’ll have a little more than you need. Use that as base for your next bake)
- 1 cup/ 240g (All of the) tangzhong
- 2 1/2 cups/400g all-purpose flour, plus more for work surface
- 2 cups+2 tablespoons/350g bread flour
- 12 grams kosher salt (3 teaspoons Diamond Crystal)
- 2 sticks/220 grams unsalted butter, cut into ½-inch pieces, chilled, plus more, at room temperature, for pans
For Brushing
- 1 egg
Instructions
Day 1 – Evening
Feed Your Starter
- Mix your water and flour with a tablespoon of your existing starter until you have a very firm but “stir-able” dough. It should become relatively hard to stir towards the end of mixing. This is to give you a really strong starter that will stay active for hours. So you don’t have to schedule your day around your sourdough’s activity and there is less “free” water for the dough in the starter.
Make the Tangzhong
- In a saucepan whisk together your flour and milk for the Tangzhong. Set to medium heat and keep whisking. The mix will first look very liquid and then form up all of a sudden. Do not take your eyes off it and keep whisking until you have a paste the consistency of creamy potato mash.
- A whisk should leave a visible trace that doesn’t fill in. In doubt cook 20 seconds longer rather than shorter.
- Take off the heat and transfer immediately to your stand mixer bowl.
- Once cooled a little, you’ll be able to touch it without anything sticking to your fingers. That’s how you know you have the right consistency.
- Cover and allow to cool overnight while your sourdough is becoming nice and active.
Mixing The All-Purpose Enriched Dough
Blend Liquids and Protein
- For the smoothest result and easiest mixing add Eggs, Greek yogurt, whey protein, Oil and Sugar to a blender. Blend until smooth.
- Stir in your sourdough starter. In theory you could blend that in too, but I felt my blender was already pretty full
Mix The Dry and Wet Ingredients
- Add the salt and flour to the bowl with the Tangzhong and stir the dry bits briefly.
- Pour your protein blend into the mix and allow a stand mixer to knead on low speed the mix until you have a very wet and shaggy dough. Then continue to mix for at least 5 minutes to strengthen the gluten network.
- Cover the dough and allow to stand for about 30 minutes, so the flour can fully hydrate.
Coil folds
- Starting after about 30 minutes to one hour (this is very flexible) do 3 sets of coil folds by using damp hands to push under the dough, pulling the whole dough up and letting it sink down folding over itself.
- Turn the bowl by 90 degrees and repeat. Do this 3-4 times or until the dough looks visibly smoother.
- Cover again and repeat after about 30 minutes. Repeat 2 more times.
- Your dough should now look very smooth and be less sticky. If not, repeat the above once more
- Do this until your dough passes the “Windowpane Test”. For this test take a piece of dough and gently stretch it, until you can see light shining through it. If the dough rips before that is the case, it needs a little more TLC.
Mixing in The Butter
- Back to your stand mixer.
- Add the cold butter pieces in 2 batches and knead on low speed until the butter is fully incorporated before adding the second batch.
- Once you have a very smooth dough that is pretty soft and sticky, but will still stretch happily, proceed to the bulk ferment, allowing it to rise outside the fridge for about 4-6 hours or until doubled in size and very puffy.
- I often do this overnight beside an open window (while it’s under 50°F/10°C outside) overnight. If it’s warmer, better keep an eye on it to avoid overproofing.
Put into rectangular or square container (optional)
- I put my dough into an oiled rectangular box that has a lid, as I find it much easier to portion a dough from that shape than a round one. But that is purely personal preference.
- Pat it out with your hands a bit, pushing it into the corners.
- Cover and allow to bulk ferment.
- I usually let it sit on my counter for a few hours (6-8 hours for this enriched dough.) until visibly risen and then move it to the fridge.
- For this super buttery dough fridge time is mandatory to firm up the butter, so you can shape it easily. Otherwise it will be way too soft.
- But depending on your schedule you could also put it into the fridge to cold ferment for up to 3 days of fridge time total. Shape and finish the rise when you have about 8 hours until baking.
Prepare Your Loaf Pans
- Grease your two loaf pans with a little butter. This will help your baking parchment stick in it and make placing the dough so much easier than wrestling loosely lying parchment!
- Cut a piece of baking parchment as wide as your pan is long.
- Place inside the buttered loaf pan and fold the overhanging sides. This will give you an easy way to lift out your sourdough protein brioche later.
- If you like your crust slightly crisp and gold, lightly butter the parchment too.
Shaping Your Brioche
- Take your now cold and firm dough out of the fridge and tip it onto a lightly floured work surface.
- Cut into 16 equal pieces.
- I used food scales to get them (near) perfectly even, but you can absolutely eyeball it.
- Now locate the smoother side of each piece (the one that was on top and hit the floured surface usually) and turn that down, so you have the sticky side up. Pat it out lightly using your hand, then grab the four corners, pulling them up and squishing them together in a sort of garlic bulb/dumpling shape.
- Flip over, so the sticky ends are now on your work surface.
- Cup your hand over it, barely touching the surface and start moving it in rapid small circles around the bun, until it has enough surface tension to be smooth and “stand up” a little bit.
- This works best if there is no flour on that part of the surface, so the dough can hold onto it a little. There will be little bits of dough sticking to the worktop. That’s fine.
- If it’s unworkable or spreads too much it’s likely too warm.
- Though if even cooling it fully overnight didn’t fix it, you can add a little more flour at this point.
- Now place 8 dough balls in each loaf pan. They should look pretty closely squished together, so they rise up, giving you a super high and puffy end result.
Final Rise
- Tuck the loaf pans into plastic bags and close them with a knot or a clip. This will prevent the dough from drying out in the rather long rise it needs.
- Allow to rise for 6-8 hours at room temperature (my kitchen is about 70°F/21°C and it needed a full 8 hours) until it looks really puffy and risen.
- To check if your dough is ready gently poke it with an oiled finger (this dough sticks!). It should leave a dent, feeling noticeably airy, that springs back slowly.
Bake Your Brioches
- Preheat your oven to 350°F / 175°C with an oven rack in the center.
- Crack an egg into a small bowl and whisk until smooth with a fork
- Take the loaf pans out of their bags and brush the top of the brioches with the egg wash for that deeply golden, shiny top.
- Bake for 25-35 minutes or until golden and baked through
- I like to check the core temperature with an instant read thermometer. It should be 190°F/88°C to be fully baked.
- Note that bread with protein powder browns a little faster due to the added milk sugars. But that doesn’t mean it’s baked through. So if you are used to non-protein bread, be sure to leave it a little longer, as the enriched dough needs time to bake fully.
- If you have no thermometer, you could light the bread gently out of the pan and tap the bottom. It should sound hollow when baked through.
- Once it’s fully baked allow it to cool for about 10 minutes in the pan, then, using the parchment edges to lift it up, gently place it on a cooling rack to cool for another 20 minutes or so.
Notes
How To Serve
- This Sourdough Protein Brioche is best when eaten still slightly warm.
- I adore it with a little more butter and some jam on top. My personal favorite is homemade cranberry jam (some call it sauce, but really, I use it as jam!). Though honey is a close second!
- On the next day the brioche slices wonderfully and toasts up to the most amazing golden brown you can imagine.
- Oh and it makes the probably best French toast or bread and butter pudding!
- Seriously, for this reason alone you’ll want two!
Tips for Busy Schedules
- Personally I wildly switch up the time of bulk fermentation, cold ferment and rise after shaping. The important part is that your dough gets time to rise once before shaping, so it’s already light and fluffy when you start and then again until visibly risen and puffy after shaping. It doesn’t matter if that happens in the fridge or on your counter and the time needed will vary depending on the temperature it sits at.
- To check if your dough is ready gently poke it with an oiled finger (this dough sticks!). It should leave a dent, feeling noticeably airy, that springs back slowly.
- If you have a hard time denting it at all, it needs more time.
- If the dent stays and doesn’t bounce back slowly, it might have gone a little too long (though you can still bake it).
- It’s much harder to overproof sourdough than to underproof it.
- Patience and cold fermentation always pay out in flavor and gut friendliness.
How To Store
- The Brioche keeps beautifully soft and moist for up to 3 days in an airproof container at room temperature.
- It freezes really well either as whole loaf or in slices separated with parchment, so you can grab one and toast fresh whenever you like.
- Prep Time: 1 hour
- Fermentation/Proofing: 30 hours
- Cook Time: 30 minutes
- Category: Bread, Protein Sourdough Recipes
- Method: Baking
- Cuisine: French


Made this everything protein sourdough and it turned out so good! Soft, filling, and super versatile—you can use the same dough in so many ways. Definitely a keeper for my baking rotation.
Oh good, so happy it worked well for you and you enjoyed it!
Thanks so much for taking the time to comment. 🙂
I love that one dough can do so many things! Thanks for the in-depth explanation!
It is really handy, isn’t it?
So happy you found it helpful and thanks for letting me know. 🙂
This brioche-type bread is so delicious and perfect, I tried it two times already and it turned out to be perfect.
Oh good, so happy to hear that! Thanks for letting me know. 🙂
This sounds like such a smart twist on an enriched dough, soft, buttery, and high in protein. I definitely want to try this and see how that sourdough texture turns out.
Thanks, it really is lovely. I’d love to hear how it came out for you.
Tried this high-protein, sourdough-enriched dough, and it is very impressive. It turned out very soft, buttery, and pillowy. I used it for burger buns, and they stayed fresh and soft for days. I love how versatile this base dough is, can’t wait to try making it again for sweet and savory bakes!
Excellent! So happy it worked well for you. There is yet another sweet recipe coming this Sunday for it. 🙂