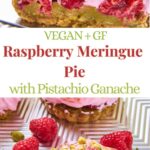
Vegan Raspberry Meringue Pistachio Pies
These Vegan Raspberry Meringue Pistachio Pies are a summer dream of a tartlet. They look utterly stunning and taste even better. A crunchy and gluten free pistachio crust encases a creamy pistachio-white chocolate ganache, which gets topped with sharp raspberries to offset the sweetness. All of that deliciousness is then proudly crowned by a dreamy, fluffy, pink vegan raspberry meringue, making this an absolute showstopper. And that the meringue is made of Aquafaba? No one will even guess it!

This post may contain referral links for products I love. For The Pleasure Of Eating earns a small commission on these links at no cost to you, and the links will always be marked with an asterisk* or highlighted in pink.
Why You Will Love This
Summary
A summery pie that is gluten free, topped with a stable vegan raspberry meringue using boiled down aquafaba and xanthan gum, and filled with a pistachio-white chocolate ganache that can be made vegan with 2 easy swaps.
Read on if you’d like to learn why you will love it, how to make it and all the tips I learned while developing this recipe.
The Combination of Pistachio, white chocolate, and Raspberry
Pistachio and raspberry is always a winner, add white chocolate (vegan if you like) to both and you have a dream of a cake. Or rather pie in this case. While the combination is a classic, a recent S’mores pie with a very similar combination of textures had me craving this perfect mix of crunchy crust, creamy filling and fluffy topping. I just could not find a recipe anywhere for my particular idea for a summery-light pie.
Then I stumbled over this dream of a Tart with Strawberry-Rhubarb flavour and knew, with a few modifications I was onto a winner.
A Pink Cloud of Egg-free Raspberry Meringue
The first thing you’ll notice about these cute mini pies is the mountain of pink vegan raspberry meringue.
Freeze dried raspberries give it the stunning colour and a fresh raspberry tang, which works amazingly well against the creamy ganache and crunchy crust. No artificial colour added!
The best thing: All you need is aquafaba, the water from a can of unsalted chickpeas.
Take a look at my Stable Vegan Meringue post, which goes into detail on how I created it, what I tested and why this one is stable for a few days.
You can use it in a millions ways and I’m sure you’ll love it even as a non-vegan, considering that it’s cheaper, better for the environment and safe to eat for everyone.
Gluten Free Pistachio Crust
Using my all-time favourite wholesome almond pie crust and adapting it with pistachios to match the filling, means this is a naturally gluten free pie, that tastes both wholesome and utterly more-ish. If you don’t have enough pistachios, you could use almonds or any other nuts here.
It feels a little similar, if heartier, to graham cracker crust, but is infinitely healthier due to containing oats, buckwheat (or whole spelt) flour, maple syrup and olive oil. No butter or refined sugar needed.
Can be made vegan with 2 easy swaps
For the ganache I replaced the classic cream with Oat cream for lactose free enjoyment and added white chocolate to it. I used standard white chocolate, as small traces of lactose don’t bother my tummy. But if you are very sensitive or vegan, vegan white chocolate will work fine. You can even make your own!
There is butter in the ganache for an extra creamy mouthfeel, which can easily be replaced with vegan butter, resulting in a completely vegan pie.
Talking about ganache: The base recipe for it is still my super quick Pistachio Cream, which you could use for Dubai chocolate or as irresistible cookie filling among a million other things. The addition of oat cream makes it a little lighter and works better when using it as filling.
You could even whip this ganache and top a layer cake with it. Which is something I might make into a future recipe.
Can be made ahead
While most vegan meringues should be eaten on the same day, as they tend to weep rather quickly, I modified my meringue with 2 small steps to ensure that it remains stable for at least 3 days.
I’m sure these dreamy pieces of deliciousness will be all inhaled by then.
The crust can even be made 2 days ahead, as it keeps it’s crunch for quite a while, making it stable enough to carry the ganache filling.
Ingredient Notes
Crust

- Pistachios – These are added to match the filling, but if you don’t have any, simply replace with the same amount of toasted almonds.
- Oats – They help bind the crust by being ground into flour in the food processor. Or you can just buy oat flour.
- Buckwheat flour – Makes this crust gluten free (make sure to use GF oats of you have a sensitivity to gluten). It gives a lot of stability, but can, if you don’t mind the gluten, be replaced with any other flour like whole meal or spelt or even all purpose.
- Maple Syrup – Holds the crust together and adds a lovely caramel flavor. You can use honey instead.
- Olive Oil – I feel the fruitiness of olive oil works incredible here, but you can use coconut, avocado or grapeseed oil instead.
- Vanilla and almond extract – Vanilla belongs into any pie crust. The almond extract is optional, but will have its lovely warm scent wafting through your house while baking and support the flavors of the ganache in the very best way.
Pistachio Ganache

- Pistachio Butter – I’m using Koro Pistachio Butter here. (Neither affiliated nor sponsored. Unfortunately.) I found it to be the creamiest one tried and tastes so good that I keep getting 2 lb buckets of it, so I always have it around for my Pistachio Cream. And while it won’t be pistachio ganache without…well…pistachio, you could also make an almond ganache by using the same amount of toasted almond butter.
- Oat Cream – Because I’m quite sensitive to cream due to the high amount of lactose it contains, I’m adding Oatly whippable Cream to my ganache. You can use standard cream. Or even full fat coconut milk from the can. Just make sure to not use light, or your ganache might not set properly.
- Butter – The Irish butter is of course fantastic, so that’s what I’m using. But vegan butter works just as well. Be sure to use a block, not the spreadable version, as we need it’s firmness.
- White Chocolate – I was debating back and forth with myself about the chocolate, but then…these tartlets are really a treat, so in it went, creating the perfect indulgent and creamy base for the airy meringue. Use vegan white chocolate to make a vegan version.
- Matcha Powder – This is entirely optional and doesn’t do much in terms of flavor, as I only used a small amount to emphasize the green of the pistachio filling. Mind you, it won’t go bright green, as the pistachio butter is usually made from roasted pistachios with the skin on, so it’s a bit muted in colour already.
- Fresh Raspberries – I love the addition of fresh fruit to any pie, so in this case I opted for raspberries. They serve two purposes here: By being gently pressed into the cooling ganache, they “anchor” the meringue that gets piled on top of them in place, preventing it from slipping off the pies.
And their sharpness adds a lovely fresh contrast to the dessert, preventing it from being cloyingly sweet. Just be mindful to use really fresh ones, as they tend to go soft within 2-3 days.
Vegan Raspberry Meringue

Note:
There is a small bowl with powdered sugar in the picture on the left that I didn’t label as I didn’t use it in the final version. I didn’t like the texture it added. So simply granulated sugar is all you need.
- Aquafaba – As with any vegan meringue, aquafaba, the water from two cans of unsalted chickpeas is the secret to success. I know it sounds weird, especially when you get a whiff of that briny smell.
But I promise that absolutely no one will taste the difference between a vegan and an egg white meringue. The main flavourings are sugar, vanilla (which has it taste simply like marshmallow fluff) and in this case, raspberries.
Benefits of Vegan Meringue:
It’s cheaper (you’d just throw aquafaba out usually, meaning you’ll reduce food waste by putting it to good use!), better for the environment and most certainly better for the welfare of chickens, considering no eggs are used.
What’s more: It’s perfectly safe to eat even for the immunocompromised, even after a few days in the fridge.
- Freeze dried raspberries – To keep the meringue nice and firm while introducing both colour and a surprisingly intense fruity flavor, I’m using freeze dried raspberries* ground into a fine powder. You can often find them in whole food shops or online.
Tip:
When working with any freeze dried fruit make sure to keep them in an airtight container and any equipment (like a grinder or a sieve) you use to handle them absolutely bone dry or they will transform into a sticky mess. Grind them right on the day you use them, otherwise you might have a block instead of powder.
Oh and…don’t sneeze!
- Xanthan Gum – This is one of the two secrets to get the vegan meringue to remain stable even on day 2 and 3. You can find it often in whole food shops, as it’s used a lot in gluten free baking, acting as stabiliser. It’s made by feeding bacteria with glucose, fermenting it, resulting in this fabulously useful ingredient, which for example adds the lovely creamy mouthfeel to many ice creams without needing to add egg.
- Sugar – I’m using simple granulated sugar here. Caster sugar works equally well. Just don’t use icing sugar, as it usually contains some amount of anti-caking agent (like cornflour), which can add a bit of a floury mouthfeel to the meringue.
- Cream of tartar – An acidic ingredient to add stability to any kind of meringue (also used in many baked goods). You could replace it with 1 tbsp fresh lemon juice.
How to Make this
The day before (or a few hours before)
Cook down the water from 1 can of chickpeas to ½ a cup. That’s about half of its original volume, doubling the protein and bringing it to a similar texture as egg white.
This is the first step in ensuring a stable vegan meringue.
Store in a lidded jar in the fridge to cool. You can even do this a few days in advance. It’ll keep for at least a week.
The important part is, that it’s cold before whipping.
Mini Pistachio Pie Crusts


- Preheat oven to 350°F /175°C. Lightly grease 6 mini tart tins with a little olive oil or butter.
- Toast pistachios on a baking sheet for 5 minutes, until fragrant. Cool slightly.
- Start by adding the oats and salt to your food processor and grinding them into a fine flour
- Pulse pistachios in a food processor until coarsely ground (a mix of fine and coarse pieces).
- Add buckwheat flour, almond and vanilla essence, pulse briefly to mix.
- Spoon in olive oil (or coconut oil) and maple syrup. Pulse to form a sticky dough
- Press the dough into the bottom of your mini tart tins, creating an even layer, pushing it a bit up on the sides. Prick with a fork to prevent bubbles.
- Bake for 14–18 minutes, until golden brown. Cool completely in the tins.
- Put them onto a sheet pan that fits into your fridge
Pistachio White Chocolate Ganache


- Break the white chocolate into pieces in a heat proof bowl.
- In a small pot over medium heat, gently warm oat cream and butter until the butter is melted and the cream is steaming but not boiling.
- Pour the butter and cream mix over the white chocolate
- Add the pistachio butter and, if using the matcha powder.
- Let it stand for a 1-2 minutes, so the chocolate can melt, then whisk until you have a creamy ganache


- Divide the ganache between the tarte shells. I used a large cookie scoop for this.
- Put the sheet pan with the ganache filled pies into the fridge to firm up for about 30min. You can speed it up by putting them into the freezer for about 15 minutes.

- Take the mini pies out, top with the raspberries, pushing them very gently into the still soft ganache and put back in the fridge to cool completely.
Make the Meringue
De-grease your Equipment
Clean all the equipment (bowl, whisk, spatula) that you’ll be using to make your meringue with hot soapy water, then wipe with a paper towel with a bit of vinegar or lemon juice, to ensure it’s absolutely grease free.
If there is one thing that kills meringue reliably, it’s fat.
You will need a stand mixer or hand mixer to whip up aquafaba meringue, as it takes a fair bit longer than egg white meringue.
Though if you ever do try by hand, I’d love to hear how long it took. (And if you were able to use your arm for the following days!)
Grind Freeze dried Raspberries
- In a spice grinder or the small bowl of your food processor blitz the freeze dried raspberries into a fine powder
- Place a small sieve over a jar or bowl and, using a teaspoon, sift the raspberry powder, leaving the seeds and any bigger pieces behind. This means you’ll have a very smooth meringue without any chewy bits.


- Mix the xanthan gum with the sugar. This ensures even distribution.
Whisk Meringe to soft peaks
- Add the cold boiled down aquafaba to your clean bowl together with the cream of tartar and salt


- Start whisking, slowly turning up the speed until you have soft peaks. This will take longer than for egg whites. Be patient. It will work.
- At the soft peak stage, turn the speed of your mixer down to slow, to avoid sugar clouds, and slowly stream in your sugar towards the sided of the bowl, in order to not have it fly around, but rather land in the meringue to be mixed in.
- Once all the sugar is added, do the same with the vanilla essence
Add Freeze Dried Raspberries


- Add the raspberry powder last, careful not to create a huge pink cloud by hitting the whisk accidentally. Towards the sides of the meringue is a good idea here too.
- Keep whisking until you have stiff glossy peaks.
- You can try the knife test at this point. Cutting the meringue should leave a visible cut.
Equipment I used
 Buy Now →
  Buy Now →
  Buy Now →
  Buy Now →
  Buy Now →
  Buy Now →
  Buy Now →
 Tip:
If you’d like to know why I chose my particular equipment, how I make my cooking more efficient and what I use as a women with chronic pain to still enjoy baking as much as I do, check out my Page on How to Make Life in the Kitchen Easier!
Assemble
- Take your mini tartlets out of the fridge and, gently pushing up the loose bottom of each, remove them from their baking tins onto a sheet pan.


- Divide the raspberry meringue over the top. This works great with a big cookie scoop or 2 tablespoons.
- Using a spoon, push it down a bit and around the raspberries, to cover them and keep it secured in place. Create a few dimples and swirls with your spoon.


- Now you can either use a kitchen torch to caramelize the tops or leave them as they are.
- Top each with one raspberry and a few pieces of chopped pistachios

Serve without telling anyone what the meringue is made of. Watch them groan with enjoyment (don’t forget to have one yourself, you deserve it!) and THEN tell them the secret of the meringue.

How To Store
These little Pistachio Raspberry Pies are best stored in the fridge in a lidded container. Ideally without anything touching the meringue, to keep it in shape. A cake carrier* has proven to be a great investment for me, as I often store pies or cakes in my fridge or take them to gatherings. This will keep them safe. To stop them from sliding around, I put some paper towels at the bottom.
They will keep for about 3 days easily, depending on the freshness of your raspberries. Strangely enough, for once, its not the meringue limiting the days, but the fresh fruit.
I took the pictures below on day 2, to show how the meringue held up. Turns out: just as perfect as day 1.


You could, in theory, get around that limitation of the fresh raspberries by making a raspberry coulis, then briefly boil it with a bit of cornstarch and sugar. But I found that to be not a great anchor for the meringue, so you might have the sliding issue again. Plus, it’s a bit more work than just distributing fresh raspberries.
FAQ
You absolutely can!
If you don’t have or want to use aquafaba, use 4 egg whites and leave out the xanthan gum to get a classic meringue. The rest of the ingredients remains the same.
The most common issue here is grease somewhere on the equipment. I once killed mine with a tiny spec of pistachio butter on my spatula.
Start fresh (thankfully draining and boiling down a can of chickpeas doesn’t take much time or money) and quickly cool down the reduced aquafaba in the freezer for about 15-20 minutes before4 whipping again in a squeaky clean bowl.
Watch The Video on how to make these:
Other recipes you might enjoy

A very different kind of summer cake in form of classic Plum Streusel Cake the German way.

Sourdough Donuts with a plum curd filling which you could use in this Pie too.

A different kind of meringue in form of Pavlovas with brown sugar, topped with seasonal strawberries and protein pistachio mousse.
Now I’d love to hear from you in the comments!
Have you tried this? Did you enjoy it?
What other recipes would you like to see?
And if you enjoyed this recipe, please consider rating, sharing, or leaving a comment – your feedback truly helps my blog grow!

Vegan Raspberry Meringue Pistachio Pies
- Total Time: 1 hour 45 minutes
- Yield: 6 mini pies 1x
- Diet: Vegetarian
Description
A summer dream of a tartlet, these Vegan Raspberry Meringue Pistachio Pies look utterly stunning and taste even better. A crunchy and gluten free pistachio crust encases a creamy pistachio-white chocolate ganache, which gets topped with sharp raspberries to offset the sweetness. All of that deliciousness is then proudly crowned by a dreamy, fluffy, pink vegan raspberry meringue, making this an absolute showstopper. And that the meringue is made of Aquafaba? No one will even guess it!
Ingredients
Crust
- 2/3 cup pistachios (plus extra, chopped, for decorating)
- 1/4 cup oats
- 2/3 cup buckwheat flour
- 1 tsp vanilla extract
- 1 tsp pistachio or almond extract
- 1/4 tsp salt
- 3 tbsp maple syrup
- 3 tbsp extra virgin olive oil or coconut oil
Pistachio White Chocolate Ganache
- 1/4 cup pistachio butter
- 1/2 cup oat cream (coconut cream, or vegan whipping cream)
- 1/2 stick butter (63g (you can use vegan butter))
- 5 oz white chocolate (150g. Broken into pieces. You can use vegan white chocolate.)
- 1/4 tsp matcha powder (optional, for color)
Raspberry filling
- 250 g fresh raspberries (reserve a few for garnish)
Raspberry Meringue
- 1/2 cup aquafaba (boiled down from 1 cup, chilled)
- 1/8 tsp xanthan gum
- 1/8 tsp kosher salt
- 1/2 tsp cream of tartar or 1 tbsp lemon juice
- 1 cup sugar
- 40 g freeze-dried raspberries (blitzed into powder and sieved)
- 1 tsp vanilla extract
Instructions
Prep Ahead:
- The day before or a few hours before, boil the aquafaba (liquid from canned chickpeas) down to half (1 cup to 1/2 cup). Cool completely in the fridge in a sealed jar. This helps stabilize the meringue.
Make the Mini Pistachio Pie Crusts
- Preheat oven to 350°F / 175°C. Grease 6 mini tart tins.
- Toast pistachios on a baking sheet for 5 minutes until fragrant. Let cool.
- In a food processor, grind oats and salt into a fine flour.
- Add toasted pistachios and pulse until coarsely ground.
- Add buckwheat flour, vanilla, and almond extract. Pulse to combine.
- Add maple syrup and oil. Pulse until a sticky dough forms.
- Press dough into tart tins, pushing up the sides. Prick the bottoms with a fork.
- Bake for 12–16 minutes until golden. Cool completely in tins. Place on a tray that fits your fridge.
Make the Pistachio White Chocolate Ganache
- Place chopped white chocolate in a heatproof bowl.
- In a small pot, heat cream and butter until melted and steaming (not boiling).
- Pour over white chocolate. Add pistachio butter and matcha if using.
- Let sit 1–2 minutes, then whisk until smooth.
- Divide ganache into cooled tart crusts. A cookie scoop works well.
- Chill in fridge for 30 minutes or 15 minutes in freezer until set but soft.
- Press fresh raspberries gently into the ganache and chill again until firm.
Prepare the Raspberry Meringue
- Ensure all equipment is grease-free (clean with hot soapy water and wipe down with vinegar or lemon juice).
- Blitz freeze-dried raspberries into powder and sieve to remove seeds.
- Mix xanthan gum with sugar.
- In a stand mixer or using a hand mixer, add chilled aquafaba, cream of tartar or lemon juice, and salt.
- Beat until soft peaks form (this takes longer than egg whites).
- Slowly stream in the sugar-xanthan gum mix while whisking on low speed.
- Add vanilla extract and raspberry powder, mixing gently.
- Whip until glossy, stiff peaks form. You should be able to slice through it with a knife.
Assemble the Pies
- Carefully remove tarts from their tins once firm.
- Scoop or pipe raspberry meringue on top, swirling to form soft peaks.
- Optional: Lightly torch the tops for a toasted finish.
- Garnish with a fresh raspberry and chopped pistachios.
Notes
Store covered in the fridge for up to 3 days.
You can make 1 large pie instead if you like. The instructions remain the same, except from using one large tarte tin instead. It will need to bake for up to 18 minutes.
Note: The baking time will depend on your oven. Turn the tray once if your bakes unevenly.
- Prep Time: 1 hour
- Cook Time: 15 minutes
- Category: Cake, Dessert
- Method: Bake
- Cuisine: American, French, Fusion
Nutrition
- Calories: 609
- Sugar: 58
- Sodium: 179
- Fat: 32
- Saturated Fat: 12
- Carbohydrates: 77
- Fiber: 6
- Protein: 9
- Cholesterol: 28


These vegan raspberry meringue pistachio pies turned out incredible! The fluffy meringue with the tart raspberry filling and crunchy pistachios is pure perfection. Such a gorgeous dessert that happens to be plant-based.
Oh yay, happy to hear!
I love meringue, never made it the vegetarian way, but we loved it from the first bite. Pistachio, white chocolate and raspberries were such a great combination. So good!
Thank you. Happy you got to try something new and loved it!
I’ve made vegan meringue before but never pink! And love the combo of raspberry and pistachio was the bomb.
Thanks so much! Was my first time too in pink and now I want to try all the colours. 🙂
This pie was an absolute dream! Gorgeous and tasted incredible!!
Aww thank you. So happy you enjoyed it. 🙂