Lemony Sourdough Protein Shortbread Cookies
Sourdough Discard and Protein make everything better. Even the buttery, crumbly and rich indulgence of classic shortbread! This recipe takes traditional shortbread, adds the tenderizing quality of sourdough discard, and incorporates vanilla whey protein for a delicious cookie. Enhanced with intense lemon zest, this dough is versatile—it’s perfect for stable cut-outs that hold their shape and on top you get 3 fun and easy Icing Options!

This post may contain referral links for products I love.
For The Pleasure Of Eating earns a small commission on these links at no cost to you.
- Why You’ll Love This
- The Ingredients
- Substitutions
- Equipment Used
- How to Make this
- How To Store
- FAQ
- Other Recipes You Might Enjoy
Why You’ll Love This
TL;DR
- Intense, Bright Lemon Flavor balanced by the subtle tang of sourdough.
- High in Protein but still boasts the tender, buttery shortbread texture.
- Perfect for Decorating: Stays flat and keeps sharp edges
- Versatile: Choose to roll out and decorate, or simply slice and bake!
- Three Easy Finishes: From elegantly marbled royal icing to fun, sparkling sour patch candy sugar.
Bright And Lemony Shortbread Cookies – With Benefits
I don’t know about you, but my all-time favorite cut-out cookies were from a bright and lemony shortbread recipe I found many years ago in a magazine. I’ve long since lost the recipe, but always remembered them very fondly, wondering how on earth I had made them.
So this year I decided to give a remake a go. It wouldn’t be me though, if I didn’t try to sneak in a bit of protein, would it?
And while these cookies are not your typical “High Protein” cookie that puts the protein at the center of everything, pulling every trick to raise it, they do have about double the protein of a classic shortbread cookie, which I feel is pretty good.
I mean look, when I have shortbread, I want the buttery-sugary melt in your mouth indulgence they are known for. But I also want to eat more protein. Without going Keto or full health food with almond flour and the like. Does that make sense to anyone apart from me? I sure hope so, otherwise I’ll be talking to myself here!
Why Sourdough Discard Makes the Best Protein Cookies
While protein powder on its own, when added to baked goods, can be very drying and occasionally lead to toughness, the tenderizing and moisture holding properties of sourdough (discard in this case) balance this effect beautifully. For protein shortbread in particular, because it consists of very few ingredients, there isn’t much to hide. This means every ingredient needs to be functional.
Adding whey protein to such a carefully composed and traditional recipe would have a rather dramatic effect on the consistency, if it weren’t balanced and I found that sourdough is just what you need to get that tender and crumbly consistency you crave.
Amazing Tang, Thanks To The Combination of Lemon Zest and Sourdough
And if the above didn’t convince you: The tang of sourdough discard supports the bright citrus shortbread flavor beautifully, adding gentle layers of tang to the intense lemon zest punch.
The Secret to Tender, Crumbly Shortbread
Or rather Secrets. Multiple.
The first and most obvious, known from many classic shortbread recipes is the cornstarch. It coats the flour, inhibiting gluten formation, leading to the classic crumbly texture.
I have to mention: These cookies land between a classic shortbread and a sugar cookie texture, combining the best of both worlds.
Sourdough with its already developed gluten and tenderizing effect does impact the structure here. But for what I’m planning with them, that’s a good thing!
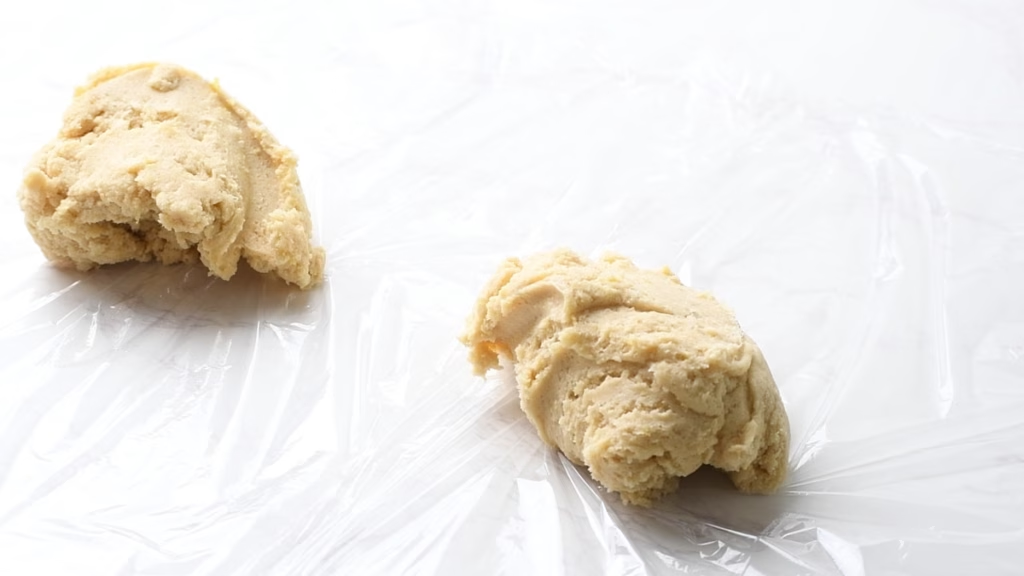
The second secret is the method. Instead of beating butter and sugar until fluffy, which would lead to incorporating air into the dough and a rise during baking, which I do not want in cut out cookies, we just about incorporate the sugar into the butter, then super quickly mix in the rest of the ingredients and, gently patting it into a cohesive dough, pack it in clingfilm for some quality fridge time.
This again inhibits gluten formation by keeping any handling to a minimum.
Lastly, maybe you’ll notice the absence of any chemical leavener like baking powder or soda. This is very much by design. I want no fluffiness in these, but a flat surface that is very easy to decorate and won’t spread in the oven.
Thanks to the unfed sourdough not being very active and then the gluten effectively stopped by adding all that butter, this works marvellously well.
Roll Out Or Slice And Bake, your Choice
In my trials with different doughs and protein powders I found this one being incredibly easy to work with. It makes a lovely roll out cookie once it has warmed ever so slightly, doesn’t stick and keeps it’s shape, sharp edges and all amazingly even during baking.
That makes it of course a prime candidate for those of you that love decorating sugar cookies but prefer some flavor in their dough and a great cookie for anytime you need a pretty and delicious gift for Christmas, Halloween, birthdays or any occasion that deserves cookies. Which, frankly, is all occasions, isn’t it? We deserve cookies in our daily life, full stop.
Which brings me to the slice and bake: Not everyone wants to go through the whole rolling out and cutting out process, let alone hours of decorating. But having an easy shortbread recipe on hand that you can simply slice and bake, especially with added protein? Yes please!
This one can do both. Plus you can feel good about eating it due to the added protein and fermented goodness from the sourdough discard.
Three Easy Icing Options
I admit I went a bit overboard with these. I mean, being a food blogger has “Obsessive personality” probably at the top of the job description, but even for that measure I went a bit crazy this time. I literally made about 10 batches of sugar and shortbread cookies within the last two weeks. First to test if I can even make a really good shortbread cookie recipe with both protein powder and sourdough discard, then to see which protein powder works best and after that I went entirely wild with the icings.
So here are my results. I just could not decide on only one to save my life, meaning you get three to pick from.
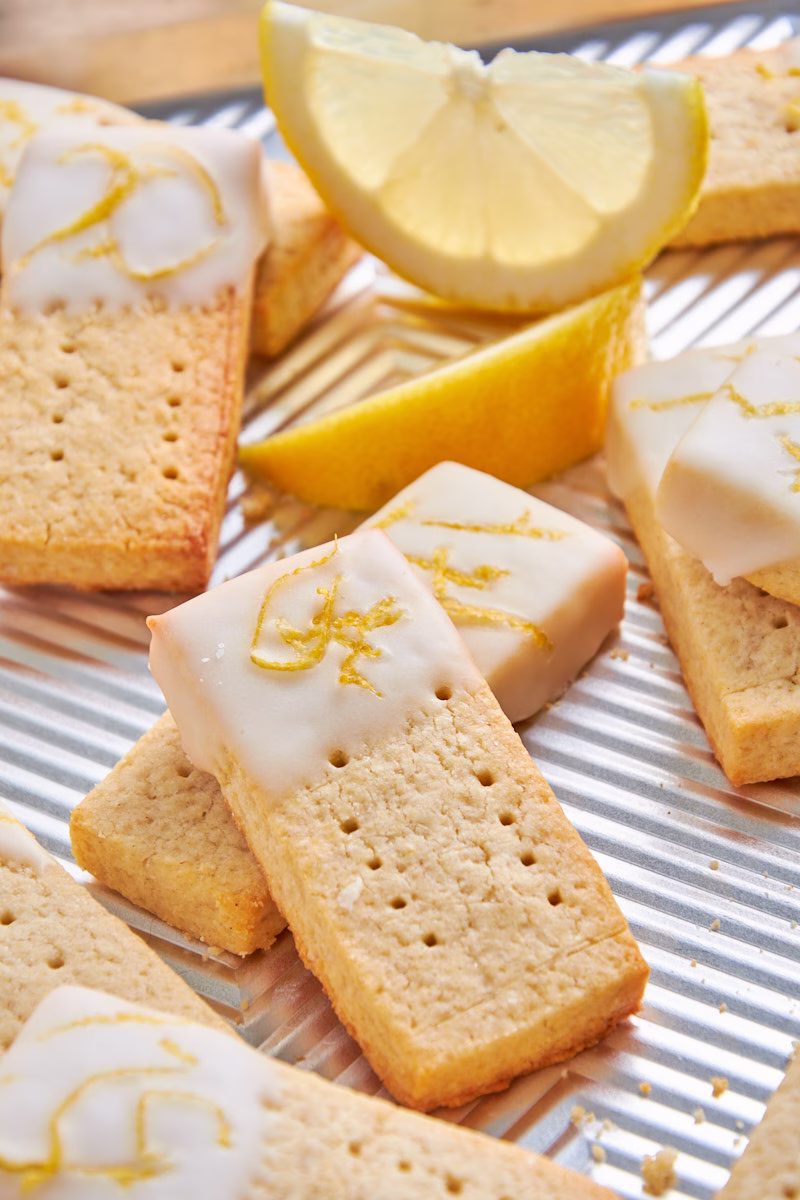
Simple Zesty Lemon Frosting
See, in my childhood in Germany, all we ever used frosting wise was icing sugar mixed with lemon juice. And, don’t get me wrong, flavor wise that is still my all-time favorite. Which is why I dipped one batch of cookies into just that, looking close to Scottish Walkers Shortbread, but Iced, as an elegant, understated everyday version you can make all year round for teatime with friends.
Marbled Royal Icing – Stunning and Crazy Easy!
Currently it’s close to Christmas season, so I figured I get ahead and give you some pretty and fun icing ideas. She said…having never in her life decorated a cookie with royal icing.
When reading about the egg white option thinking “Not safe!” my mind instantly went to aquafaba, which I had used successfully in my vegan meringue. This does sound counterintuitive for a far from vegan cookie with all that butter but think about it: It’s super cheap (just the liquid from a can of chickpeas you’d otherwise discard), it’s safe to eat for everyone as it contains no eggs, and it’s very easily accessible. And it really tastes like classic icing. I promise no one will ever notice you used aquafaba!
Turns out it works beautifully too and is great for decorating.
Decorating can’t be that hard I thought, made a batch of it and went to pipe it onto my cut out cookies. Let’s just say I’m a little artistically challenged when it comes to draping sugary soft stuff over cookies in any precise manner. Plus, I have never worked with food colors before.
Needless to say, the results were most certainly not blog worthy!
So what does one do, to get cookie box worthy icing, without spending hours of increasing frustration?
The Decoration For The Impatient
Browsing Pinterest I spotted these super pretty marbled cookies. They looked like hours of work went into them, yet the method was so silly easy, I figured I got to try it.
Which gave me one of those moments of surprise and joy while decorating. And not just after being done!
Dunking them into the colorful icing bowl and pulling out one magical and unique piece after the other, then seeing the utter beauty of them lined up on trays is just pure pre-Christmas happiness!
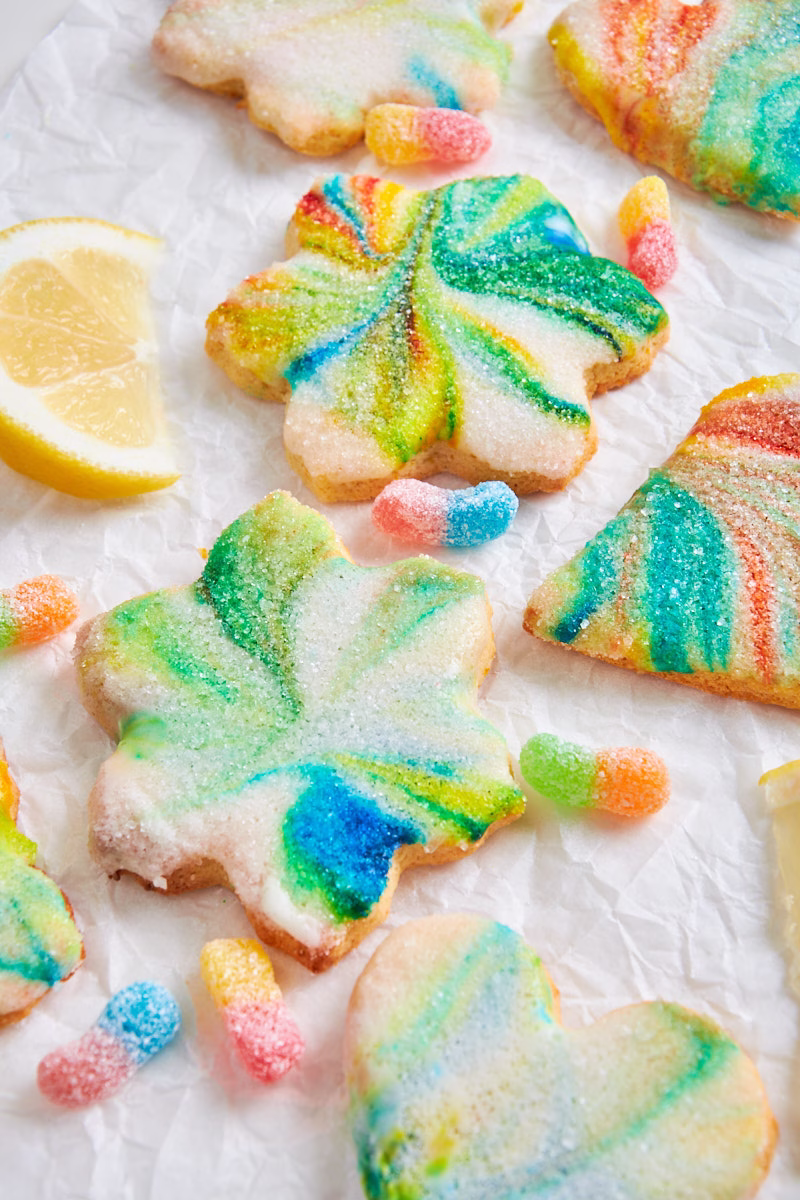
The Wildcard – A Sparkling Citrus Sugar Finish

The idea for this icing came about while nibbling on some sour leftover Halloween candy. One of my guilty pleasures. I just adore that mouth puckering, nose tingling sensation!
If you are similar, you’ll love it!
Use either the lemon frosting or the marbled royal icing above, then take it over the top by dipping the freshly frosted shortbread into a mix of sugar and citric acid. You can if you like, add food colouring into your sugar mix (gel works best), resulting in sparkling sugar cookie, making them look even more festive. Or use the marbled base for rainbow colors, then a neutral sugar coating. Both are super easy!
And the flavor? The do taste like sour candy! But with cookies (which might be controversial, but oh so fun!). Even better because they have all those supporting layers of tang and zest to them. I’m literally obsessed and think they are my most fun cut out cookie yet!
Anyway, I rambled on a bit here, because I’m just so happy with how these turned out. Do make them! And I’d love to see your creations. Tag me on Instagram with your best cookie decorating pictures!
Differences in Protein Powder When Used In Cookies
After my experiments with different protein powders in bread, I decided to do a similar test using it in cookies. Here is what I tested and my finds.
I made two different doughs:
A brown butter dough that has no egg in it. Very close to classic shortbread.
And a fairly typical cookie dough with egg and added lemon zest. Both were made with sourdough discard, for the tenderizing and moisture holding abilities, plus the lovely tang and with protein powder.
Two Different Protein Powders
I made half of each batch with unflavored whey concentrate and the other half with unflavored casein. Unflavored, because I only had unflavored casein and wanted to keep it comparable in flavor.
I suspected the casein would work a little better in cookies, as it has more of a drying effect, which could be beneficial in a dough you want to have a slightly crumbly, sandy texture (in all the right ways).
The Outcome
Turns out, the differences are very small, and you can use both with excellent results. Which is good news, as it means you can use whichever of the two you have at home.
- On the very left you see the brown butter dough with casein protein powder.
- Right beside it brown butter with whey concentrate.
- The lemon dough, which has added egg, with casein.
- And lastly, on the far right, the lemon dough with whey concentrate.
- Casein leads indeed to a slightly more crumbly, sandy texture. So if you are a fan of classic shortbread, this is the closest you will get.
- It also browns ever so slightly slower.
- Whey has better flavor and keeps moister, which is perfect for the soft sugar cookie fans among you.
- Unflavored isn’t ideal. Both powders (casein more than whey) added a slight bit of weird chemical flavor to the cookies that I wasn’t a fan of. It was entirely neutralised by frosting though. In my final batch(es) that I made for this post I used vanilla whey concentrate and the results were gorgeous.
- There are small differences in browning and smoothness, but you’ll have a hard time telling which cookie is made with which powder, unless you label them as I did for this trial.
- All of them held their shape fabulously and where easy to work with.
From a Great Reader Question:
I recently got the very valid question on the use of whey isolate in another recipe.
I have to advise against it in baking, as it can be very drying since it contains neither fat nor lactose, but just 90% protein.
While whey concentrate does have a tiny bit of fat and lactose, leading to the super creamy shakes and in baking to the lovely added browning.
Ingredient Notes
The dough I finally settled on was one without egg and, weirdly enough, without browned butter, but instead with cornstarch, to give the typical shortbread texture. I’ve made about 8 batches of it in my testing of all the icings and it came out perfect every single time.
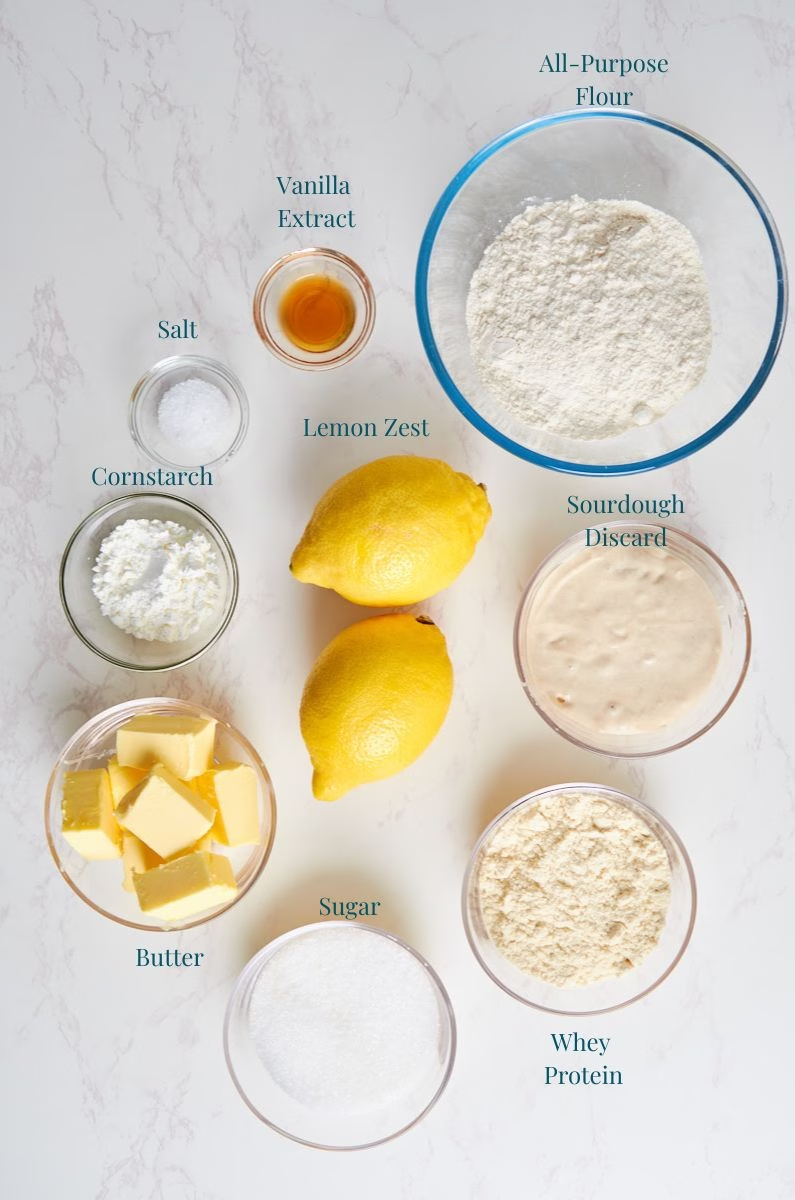
The Dough
- Butter – With it being at the core of shortbread cookies, Irish butter is particularly good, as it has a high fat content and incredible flavor (use the best you can find!).
- Sugar – Granulated white sugar is what I’m using, as it keeps cookies crisp. For once I would not substitute with brown sugar, as it would introduce more chewiness, which we don’t want here.
- Lemon Zest – Use fresh, untreated lemons. Wash thoroughly. I’m adding the zest of 2 whole lemons, as I love the flavor to really come through. Use just one if you like it less intense. Keep them to juice later if you like, for the frosting. (See Icing options)
- Sourdough Discard – I’m assuming you have some sourdough starter or discard at home. If not, here is a guide on how to make your very own sourdough starter easily. It takes a few days, so start ahead of time. The recipe works for both rye and white flour. For this recipe white works best.
I used about 2-3 days not fed discard. Active will work too of course. Anything older might get a bit intense in the tang, so you’ll want to add a tablespoon more sugar to balance it. - Flour – All-purpose is best for this recipe, as it contains less gluten than bread flour, keeping the shortbread nice and crumbly.
Note:
Cups, due to the possibility of compacting the flour while dragging the container through it, can give you wildly different results. Use a tablespoon to gently fill the cup with flour, then drag the back of a knife over it to level. This should give you the closest to the standard 120g per cup of flour.
Alternatively, if you have kitchen scales, assume 120g flour per cup and weigh it out.
In many of my recipes I will give gram measurements for this reason, but you can always switch to the american measurements in the recipe card.
- Cornstarch – This is the secret to the typical shortbread texture, coating the flour and stopping gluten formation. It makes all the difference, balancing the gluten that has already formed in the sourdough discard.
- Protein Powder – I’m using Whey concentrate in vanilla flavor. For one because that’s what most of you will have at home if you add protein to your diet, it’s very easy to find in a supermarket these days (Gold Standard Whey will work, so does “MyProtein”, which is my personal favorite), but also because I found it works best for the consistency. Check the substitutions to see what else I tried.
- Salt – I always use kosher salt in both my baking and cooking. It balances the flavor in these cookies and slows down fermentation (we want that). If you are using any other salt, use half in volume. It will be the same in weight though.
Icings
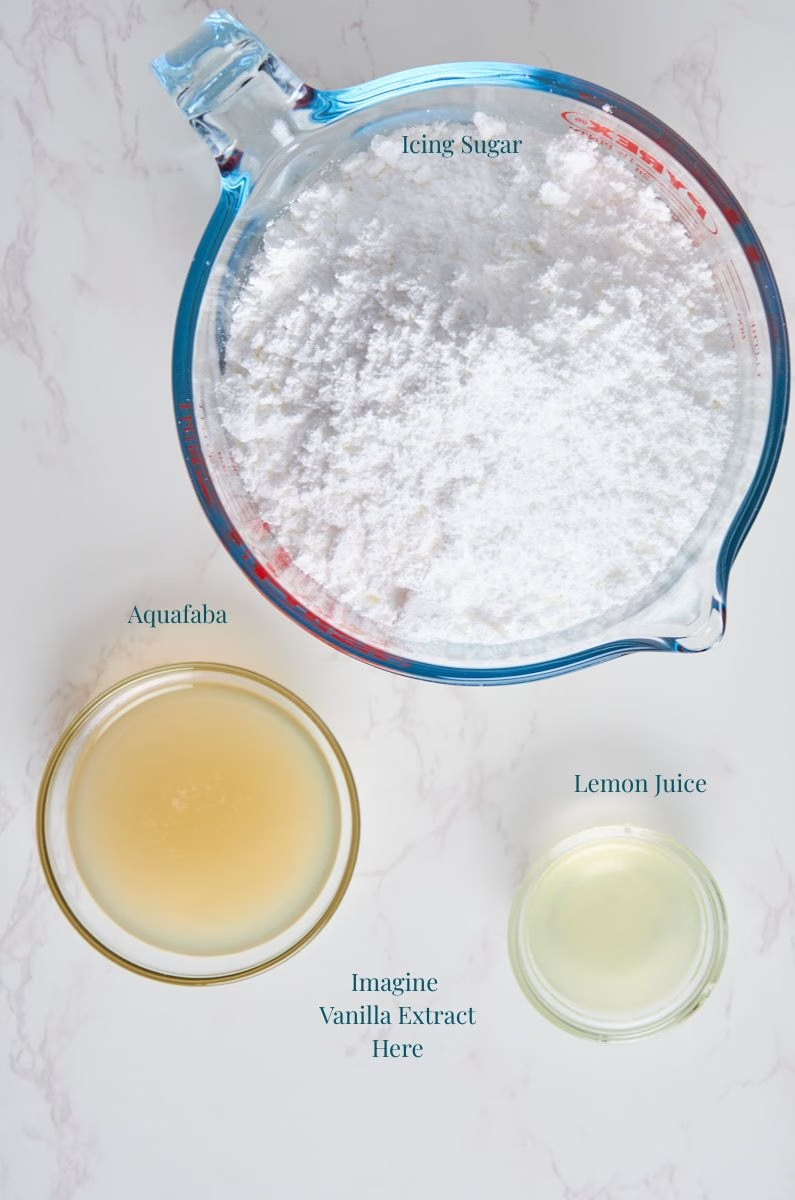
- Icing sugar – This is the base for both the zesty lemon frosting and the royal icing.
- Lemon Juice – Both the zesty lemon frosting and royal icing use it, but in wildly different amounts. Freshly squeezed is always best.
- Aquafaba – The liquid from a can of unsalted chickpeas is used instead of egg white or meringue powder for the royal icing. It works exactly like the other two, but is very safe as it contains no raw egg and much easier to get (and cheaper) than meringue powder, which many non-vegan versions use. Considering egg prices and the price of said powder, this is a huge advantage and I promise you won’t taste it.
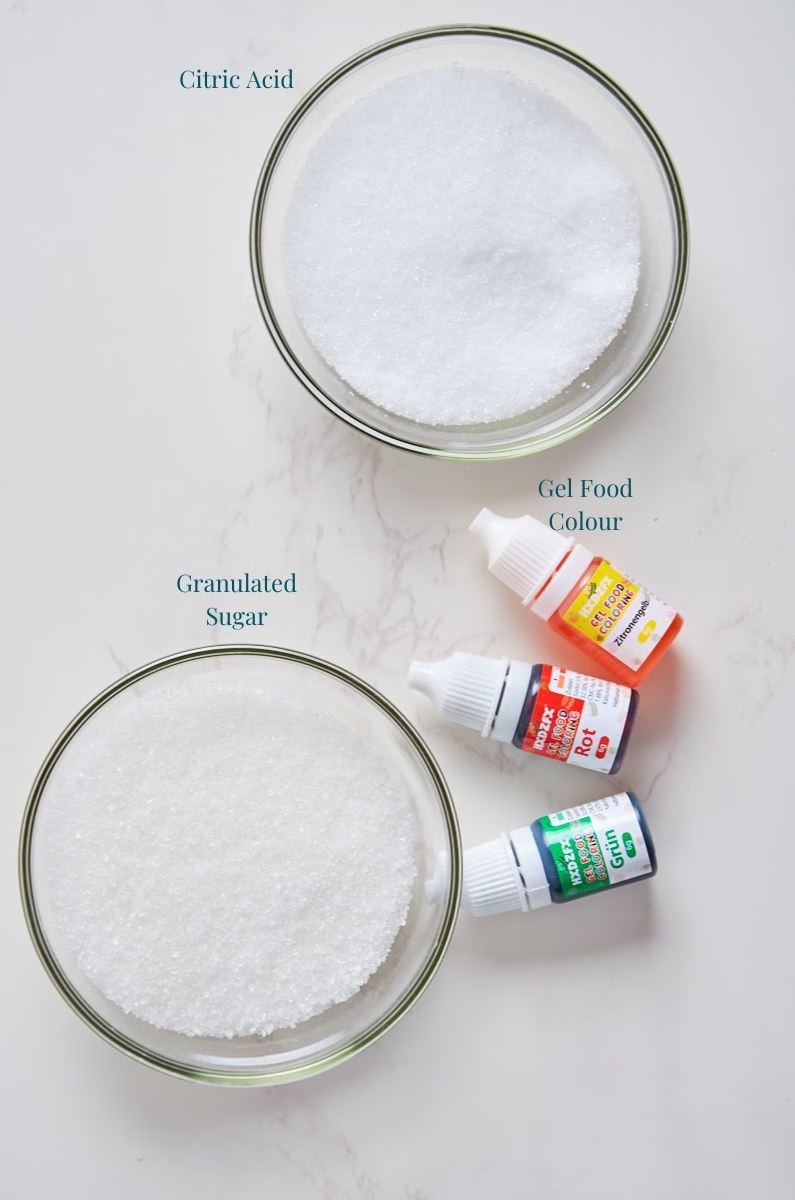
- Citric Acid – I got this to make the sparkly sour topping, remiscent of sour patch kids. It simply gets mixed with sugar and you can adjust the tartness to your liking. I found mine on Amazon. It’s fairly common and very safe to use.
- Gel Food Color – I got a pack with lots of different colors from Amazon and love the options. Gel works best, as you can use it for example to color sugar, which isn’t easy easy with the liquid versions. Plus a few drops go very far.
substitutions
The Dough
- Butter – If you would like to make this vegan, vegan butter should work. But different brands will lead to different consistencies. The one I get here is just useless for baking (I kept finding weird, plastic like pieces in it!), so I haven’t tried this myself. I’d love to hear from you if you do.
- Sugar – Caster sugar will be fine. I would not use any kind of brown sugar, unless you prefer chewie cookies, as it contains molasses. I’d say xylitol will work nicely, if you are diabetic, as it doesn’t caramelise, so you get the very classic pale shortbread look.
- Lemon zest – You can use any citrus fruit zest here (orange works particularly well. Especially if you then dip the shortbread into dark chocolate!). So will skipping the lemon and including a bit of almond extract, to switch the flavor around.
- Vanilla Extract – You could use almond (though the combo with lemon is a bit questionable) or leave it out. If you use vanilla protein powder you already have a good bit of added vanilla flavor.
- Sourdough Discard – If you don’t have sourdough discard, add ¼ cup of flour and ¼ cup of water or milk (plant milk is fine) instead.
- Flour – If you are aiming for gluten free, some GF flour mixes will work. I read that King Arthurs brand should be usable 1:1. Though I can’t confirm as we don’t get that here. Let me know if you try and how they came out.
- Protein Powder – Casein will work very nicely. Especially if you have one with vanilla flavor. It is a little more drying, which isn’t ideal for bread, but fabulous if you want crumbly cookies. I’ll add a few pictures of my test runs with whey vs casein. There was no change to the recipe needed, much to my surprise and very little difference in consistency and flavor.
- What I would say: Maybe don’t use unflavored. I found it adds a slightly weird aftertaste. Though with frosting that’s very easily masked.
- For the vegan versions – This is slightly trickier. At least for me. I have yet to find a common pea protein I enjoy. The one, and so far only, vegan protein powder I absolutely adored was the spent barley-rice powder from MyProtein (neither sponsored nor affiliated).
I used it in both my easy protein bread and my sourdough protein granola. Since the one I have is caramel flavored and barley adds incredible malty flavor, it was absolutely amazing in the granola. So if you can get your hands on it (and don’t mind the caramel addition), it would be a great powder to use in these cookies. You might need a spoonful or two more flour, as barley protein absorbs a lot less moisture.
The ICINGs
- Aquafaba – If you really don’t want to use aquafaba, you can absolutely use the same amount of egg white. Use it in the same way as described.
- Lemon Juice – For the royal icing, as it uses very little, you could substitute with white vinegar or 1/2 tsp cream of tartar. For the Zesty Lemon Frosting Orange juice works lovely as substitution and it’ll give you a sweeter flavor.
Or, if you are lucky enough and it’s blood orange season, try the one I used in this Pistachio Blood Orange Cake. It’s gorgeously pink entirely without using food colouring. - Citric Acid – Malic acid, Fumaric Acid and Tartaric acid are some other acidic powders often used in sour candy, balancing the acidity and providing different levels of it. I chose citric acid here, as it’s easiest to find. If you have any of the others at home, feel free to experiment.
- Food Colors – If you’d prefer to use natural colors, you could experiment with bright green matcha powder or bright blue spirulina powder in addition to the blood orange suggested above. I’m just not sure how their flavors will impact the icing, so proceed with care. A hint of beetroot juice may also work.
Equipment Used
- Stand Mixer – While you can absolutely make these Shortbread biscuits by hand, a stand mixer makes quick work of combining the dough. So would a food processor, which I have used in the past with great success.
- Sheet Pan – You’ll need about 2-3 to fit all of the cookies. But baking in batches is better for consistent results. So simply store the cut out shortbread on baking parchment while one portion is in the oven, then switch just the parchment with one quick slide. (Careful with the hot pan!)
- Rolling Pin – If you’d like to make roll out cookies of course.
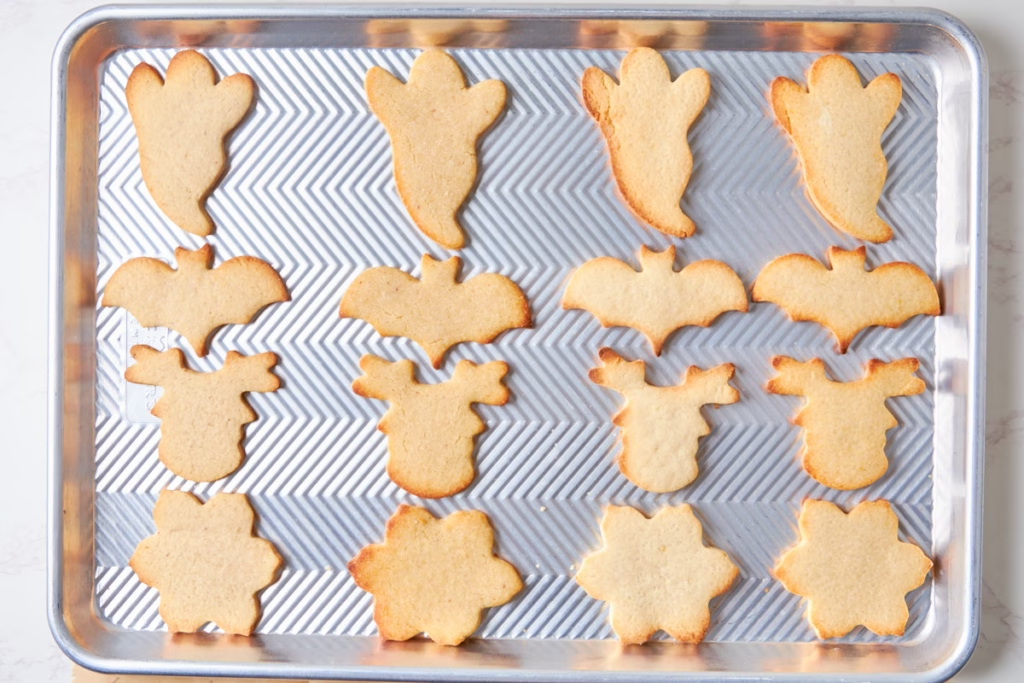
- Cookie Cutters – Same here. If you’d like cut-out cookies. I found most shapes work very well, but one reindeer with particularly fragile antlers stubbornly refused to keep said antlers.
- Digital Scales – For measuring, I highly recommend using digital scales as volumetric measurements can vary wildly in baking. Especially when it comes to flour and, even more so, sourdough starter.
 Buy Now →
  Buy Now →
  Buy Now →
  Buy Now →
 How to Make this
For cookies all ingredients should ideally be at room temperature. Don’t melt your butter, or you’ll get greasy cookies.
I will give the instructions using a stand mixer, but a hand mixer or simply a sturdy spoon and some elbow grease work just fine. There is no whipping until fluffy, so this is a quick one.
The Dough
Make Lemon Sugar
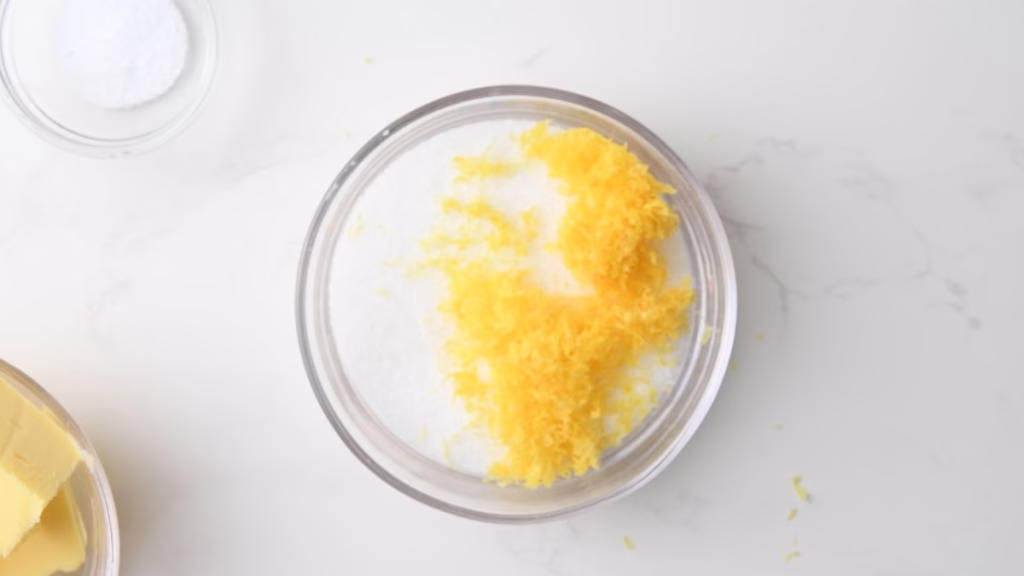
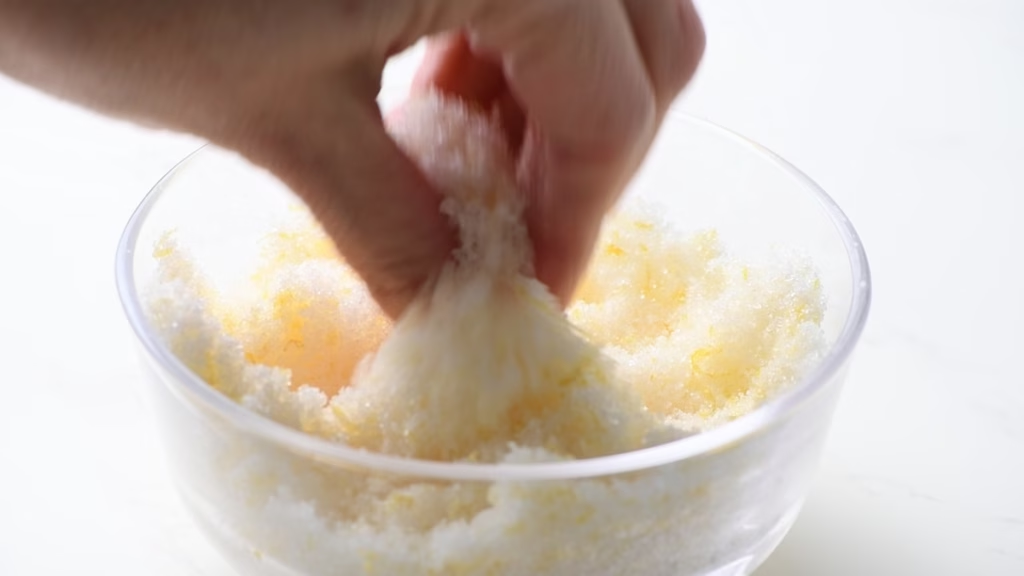
Start by zesting your lemon into the sugar. If your lemons are treated, wash them first and dry thoroughly so you don’t get any bitter or waxy flavor in your cookies.
Using your fingertips, rub the zest into the sugar until it turns a bright yellow and smells absolutely delicious. This will free the essential oils in the lemon zest and give the lemony shortbread its intense flavor.
Mix Butter and Sugar
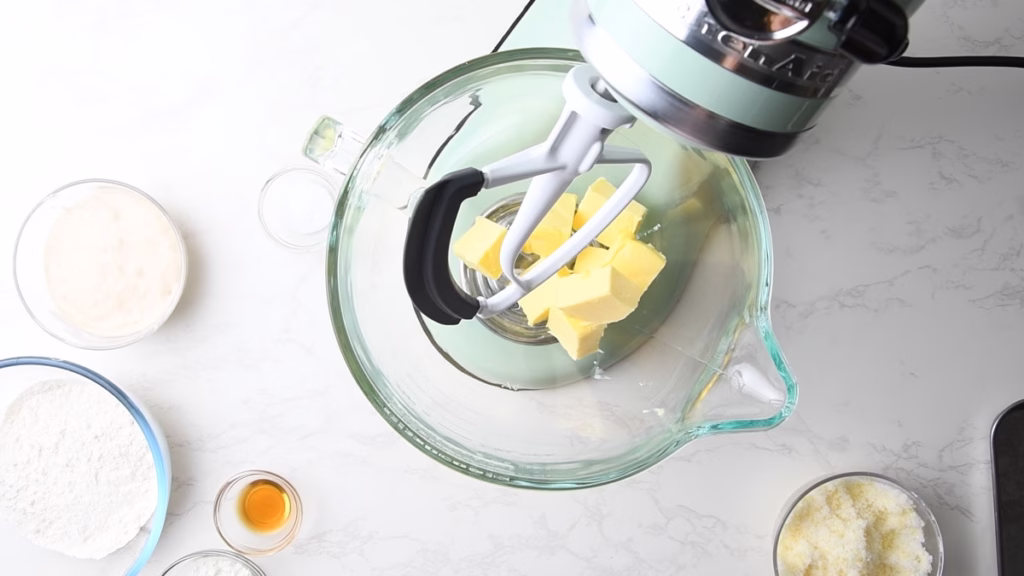
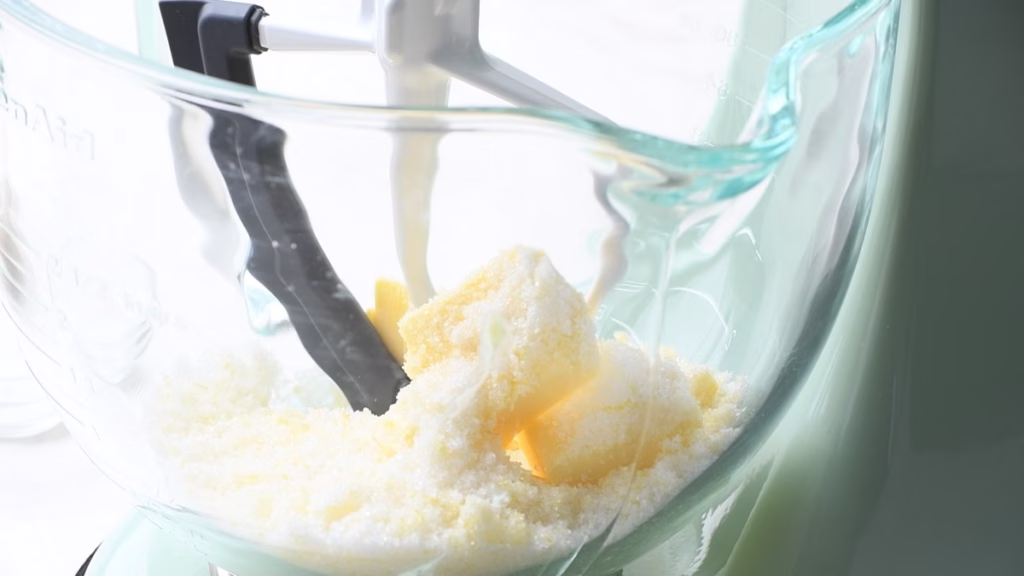
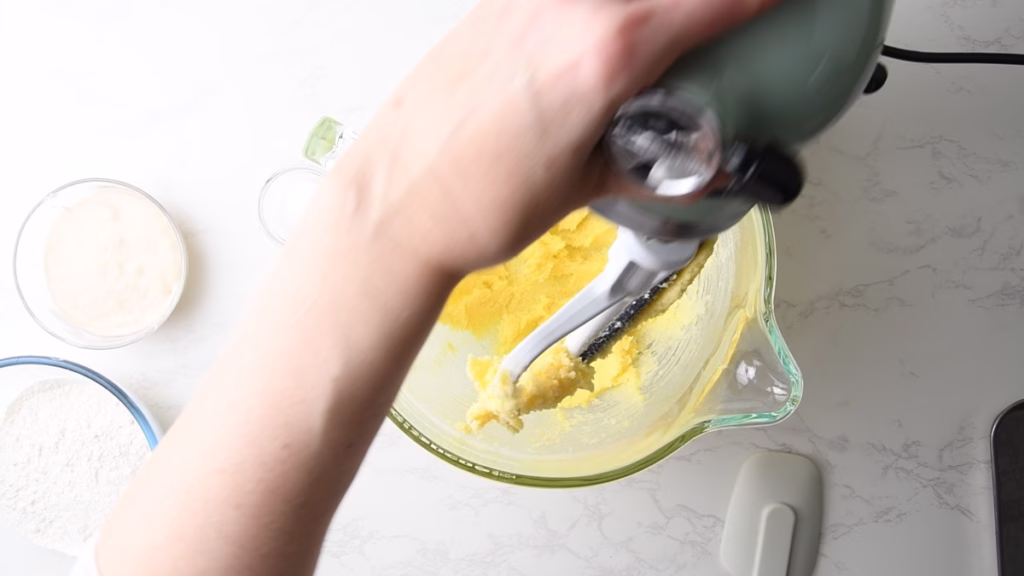
Now add the butter in large cubes and all that delicious lemon sugar to your stand mixer equipped with the paddle attachment.
Start mixing on low just until butter and sugar are combined and creamy. Don’t whip this until fluffy!
As opposed to sugar cookies, we don’t want the shortbread to rise (hence to baking powder or soda in the dough either) but rather stay crumbly and break with a gentle snap. Whipping would incorporate air into the dough, which would expand in the oven, leading to domed cookies, making it much harder to get an even icing coat.
Add Vanilla and Dry Ingredients
Now mix in the vanilla extract, protein powder and the sourdough discard. Mix on low until it looks just incorporated.
(You could also mix the protein powder with the flour first, as I did in the video. The results are the same)
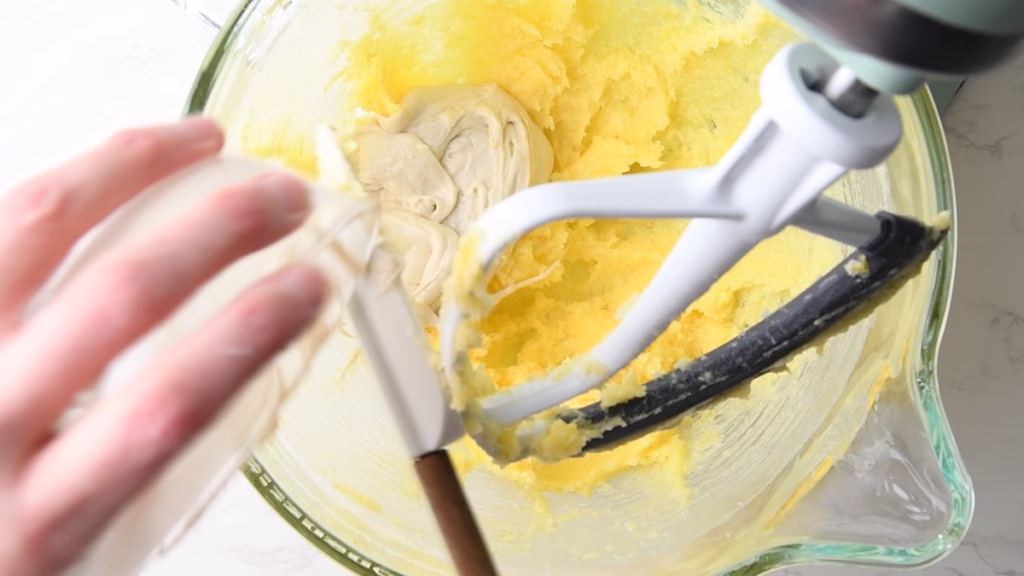
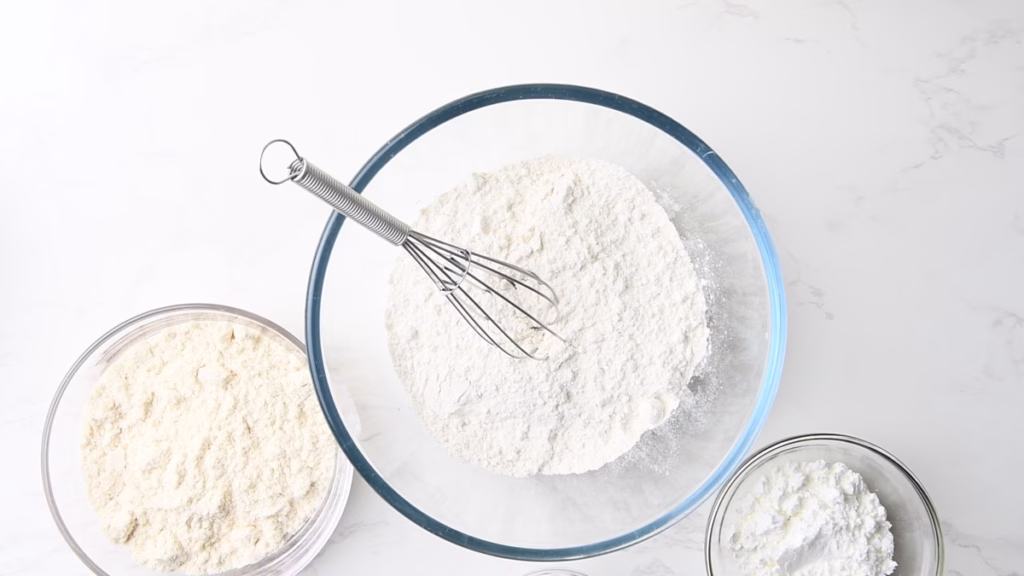
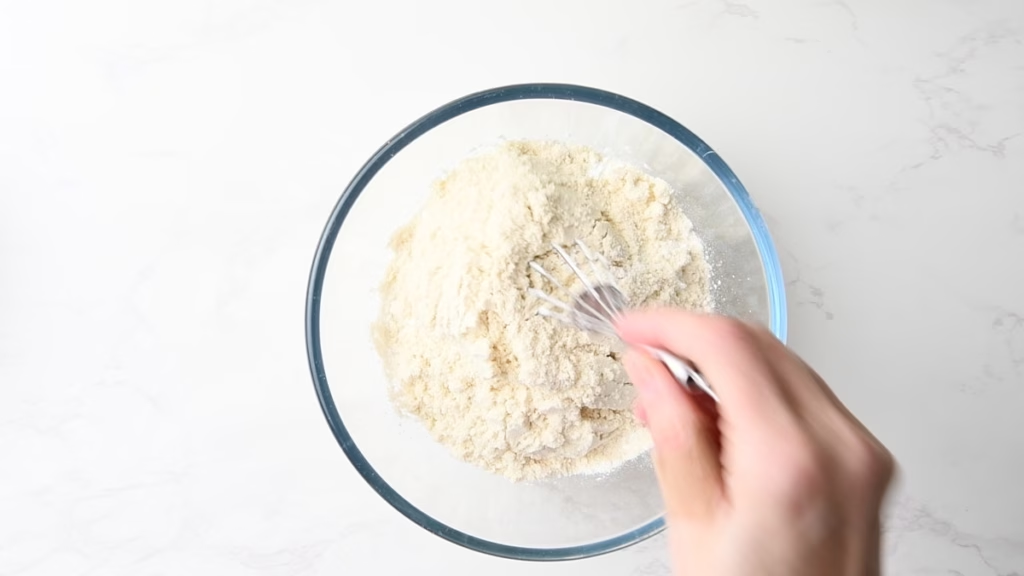
Now before adding them to the wet mix, briefly combine flour, cornstarch and salt in a bowl. This is to coat the flour with the cornstarch right away, stopping any unwanted gluten development and preserving the classic snap.
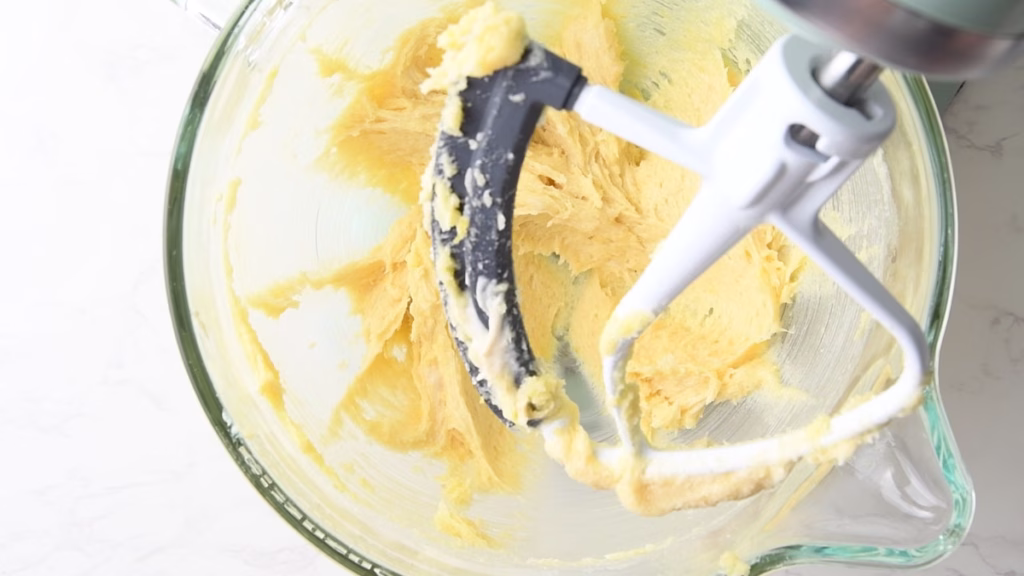
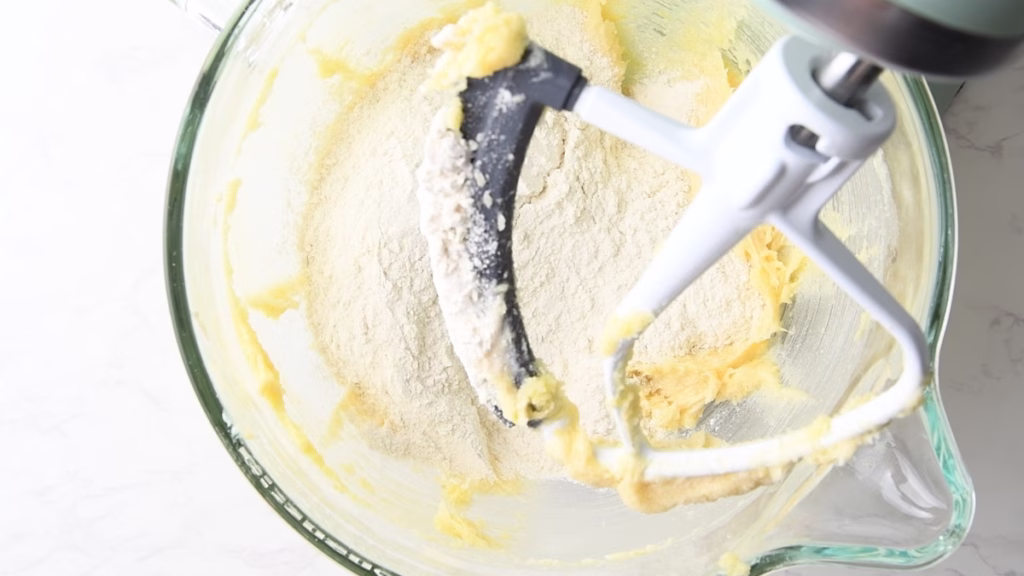
Add the whole mix to your butter-protein cream and gently combine on low speed until it just starts to come together. Do not mix any longer.
Roll Out The Dough
Here is the easy way:
Line your worktop with clingfilm. I found 2 overlapping layers of about 25in/50cm work very well.
Turn your still crumbly dough out onto the clingfilm. Add another overlapping layer of cling film on top.
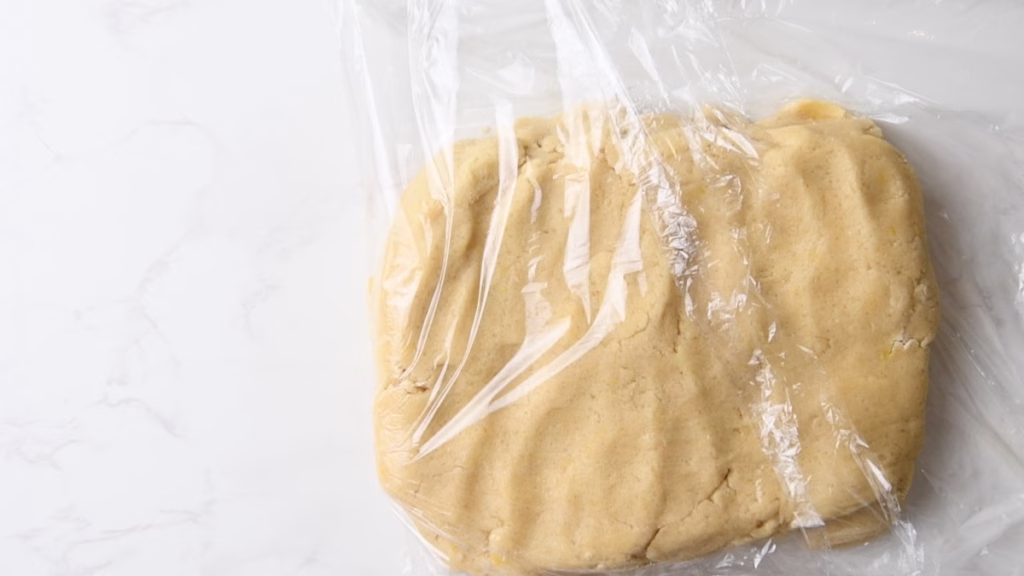
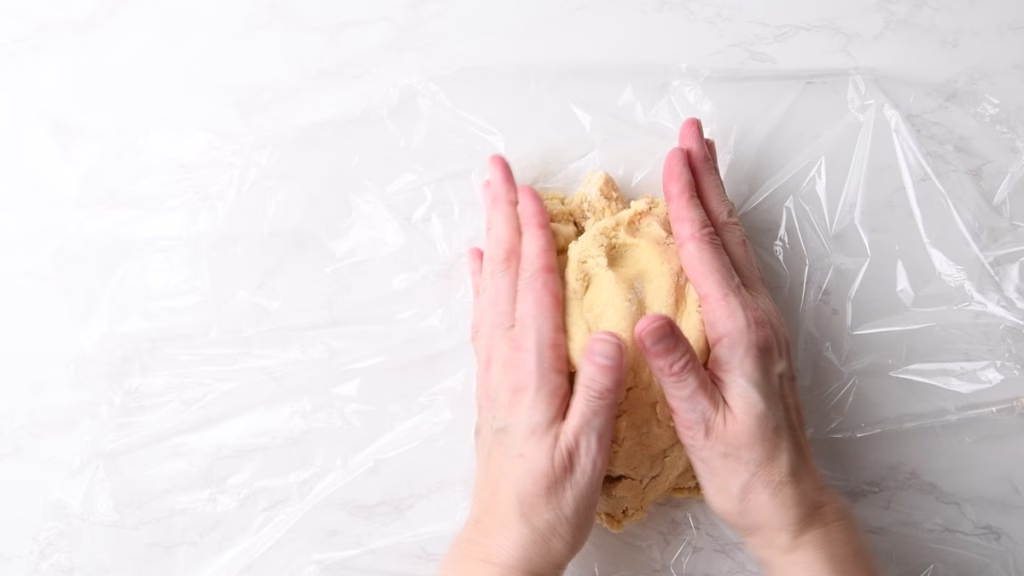
Using your hands, start pushing your dough together into a cohesive square (or round) shape.
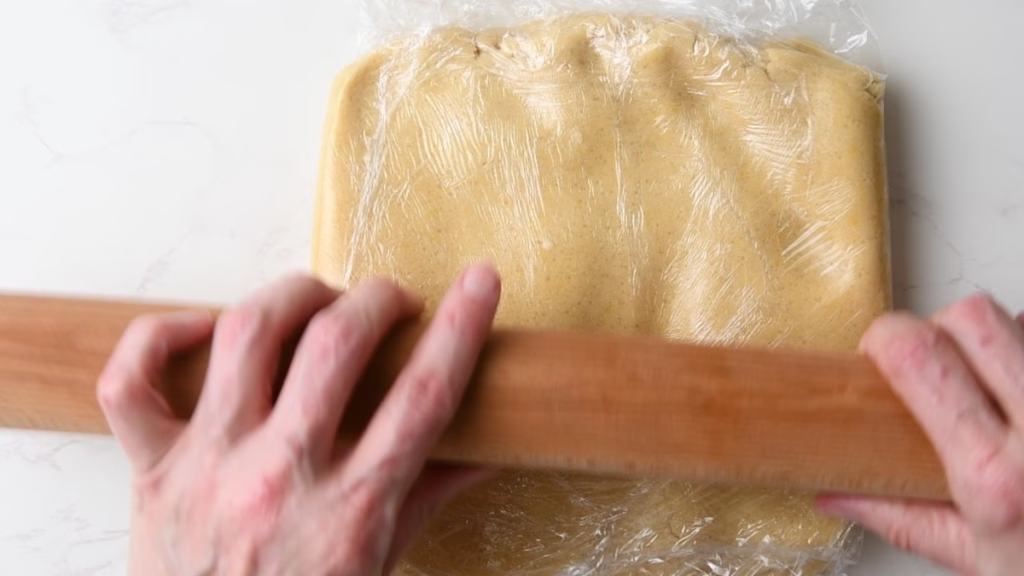
Now you can start rolling it out. Instead of lots of gentle strokes, try to apply relatively firm pressure with your rolling pin starting from the center, pushing the dough outward and away from you into all directions until you have one large disk.
For Cut Out Cookies:
Aim for a large disk that is about 0.2in/5mm thick. The shape doesn’t matter very much, but it should fit onto a sheet pan/board and in your fridge.
For The Classic Shortbread Shape:
- Roll out into a rectangle 8.2in/21cm wide and about 0.3 in/8mm thick for the classic rectangular version. The length will essentially define itself when you keep width and height of the dough to these measurements. (Now obviously you absolutely don’t have to be this correct, but that shape will give you 3 rows of cookies in about the typical Walkers Shortbread Fingers size.)
- You could also form a log and slice later, but because the dough is fairly soft at this point, it will flatten at the bottom. So I wasn’t a fan as it didn’t look neat.
Refrigerate
- Fold the cling film edges gently over the dough.
- Essentially, the less you handle this dough, the closer to classic shortbread texture it will be. Hence the firm but few strokes while rolling.
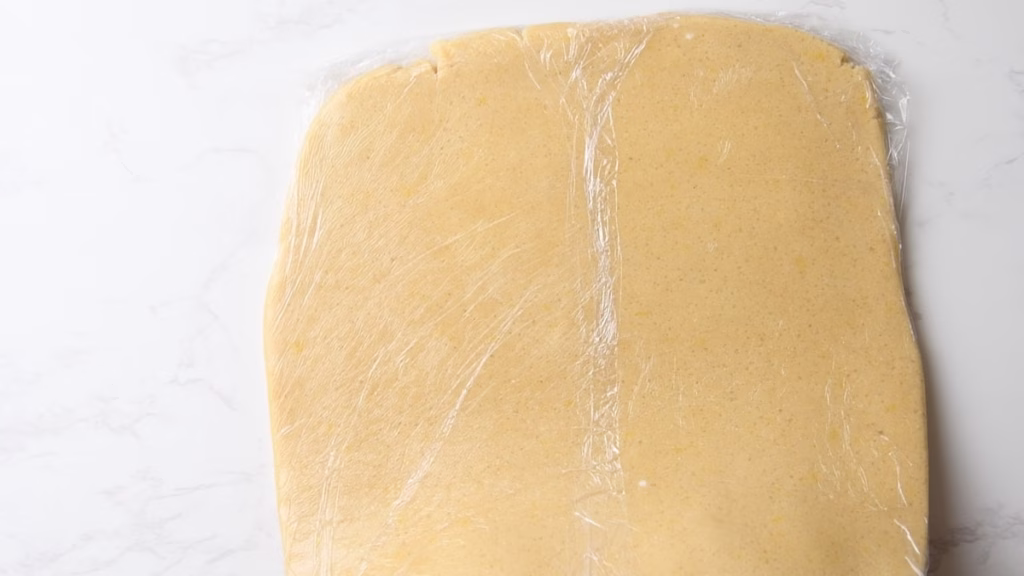
- Now I like to slide the large dough disk onto a slim chopping board or a sheet pan, to keep it nice and flat.
- Store in the fridge for at least 2-3 hour or up to 3 days. You want a firm and cold dough for the cutting out. The colder, the easier it is and the sharper your edges will remain when baking.
Shaping The Lemony Shortbread
- Once your dough is nice and firm, preheat your oven to 350°F/175°C.
- Line 2 sheet pans with baking parchment.
For this buttery type of cookie I would not use a Silpat, as the bottoms can get a bit greasy without the slight bit of absorption from the parchment. Get your cookie cutters or a large knife, depending on your method. - Lightly flour your worktop (I used a silicone mat) or even keep the dough for the first round of cut outs/ the slicing on the cling film to make them easier to pick up.
For The Rectangular Classic Shortbread Shape:
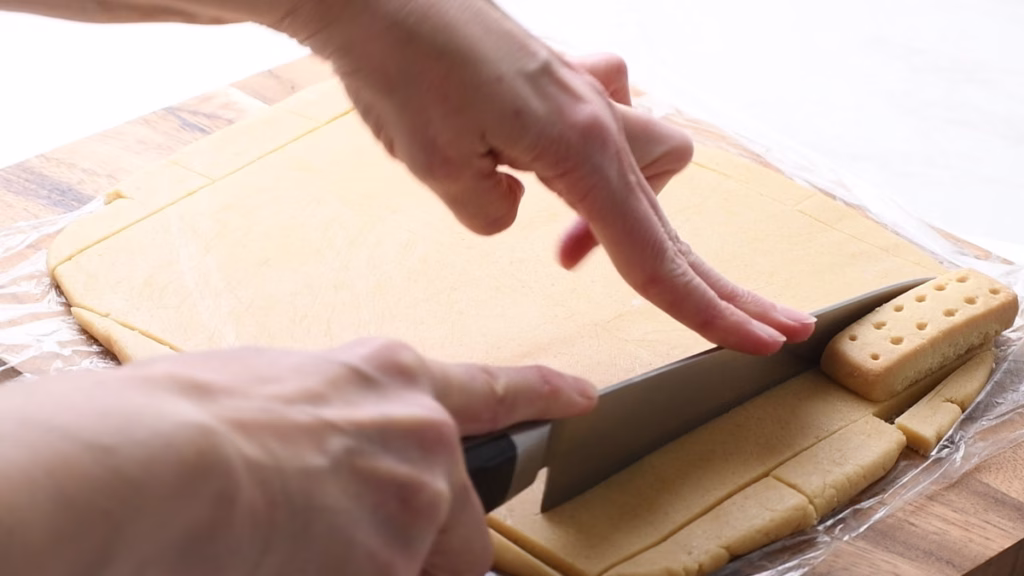
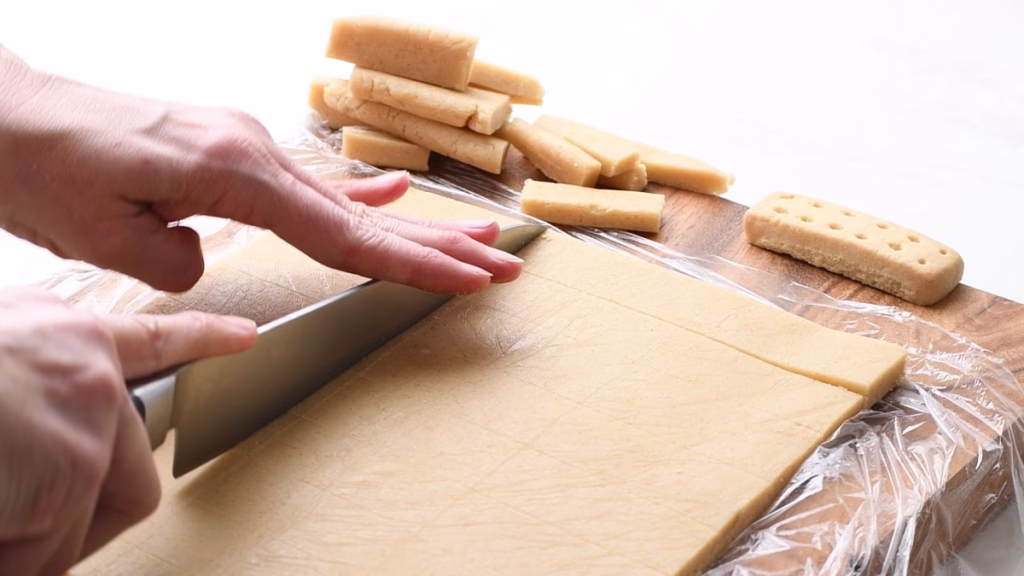
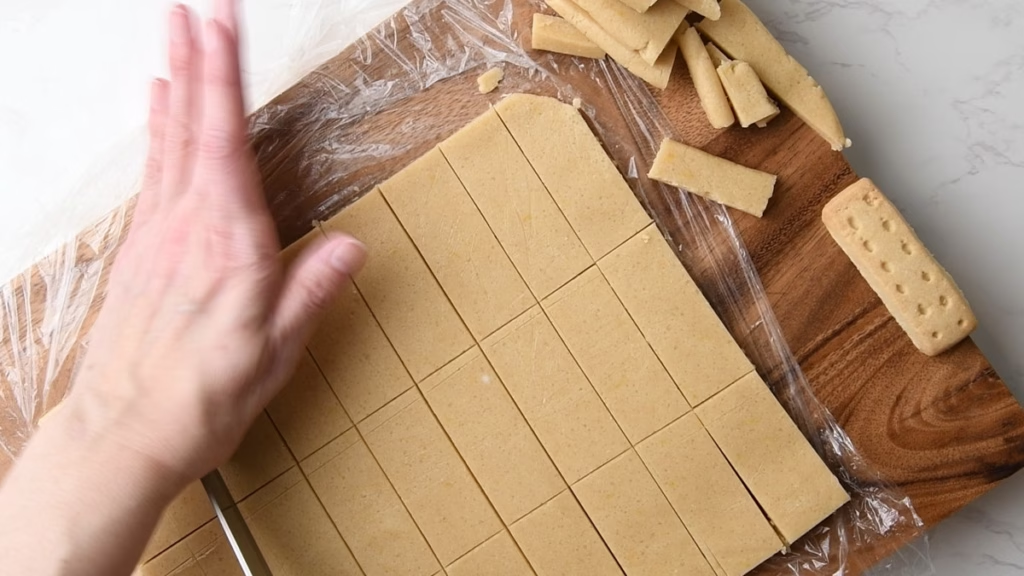

- I like to trim the corners of my dough a little bit (and munch the trimmings as bakers snack), to get nice, sharp edges.
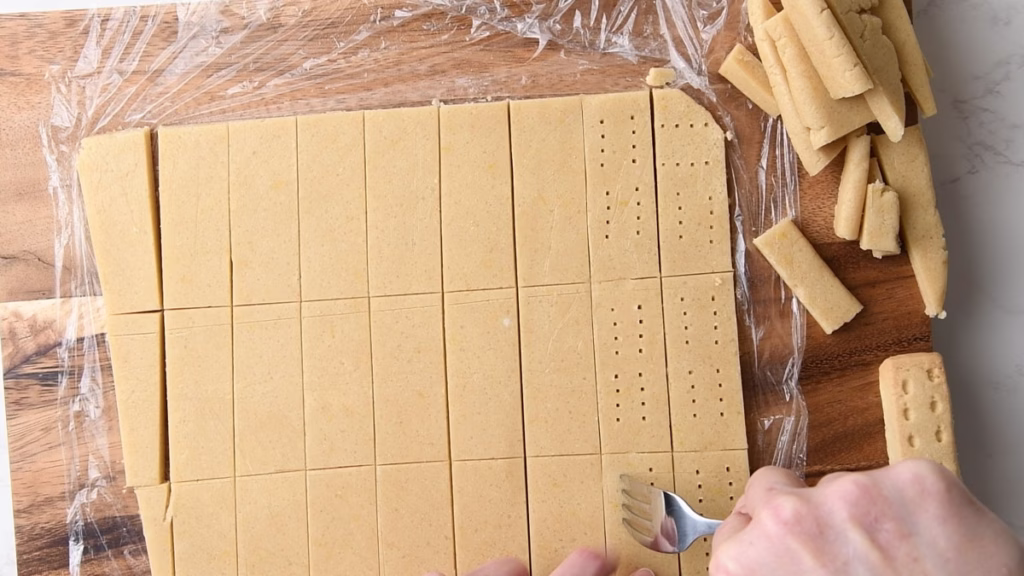
- Making some markings with your knife (I literally used a Walkers biscuit as my guideline, but a ruler or simply guesstimating is fine), divide the dough block into three lengthwise.
- Now cut cookies of about 1/2in/1cm width, until your dough is used up and transfer to your prepared sheet pan.
- These cookies don’t spread much, so leaving about 1in/2cm between them is plenty.
- Use a fork or skewer, to prick holes into them for the typical pattern. In theory this should prevent any unwanted rise. But I found that even the un-pricked roll out versions stayed nice and flat. So it’s purely optional.
The Cut Out Cookies
I’m fairly sure you know how to cut out cookies just fine, but here are a few tips to make your life easier:
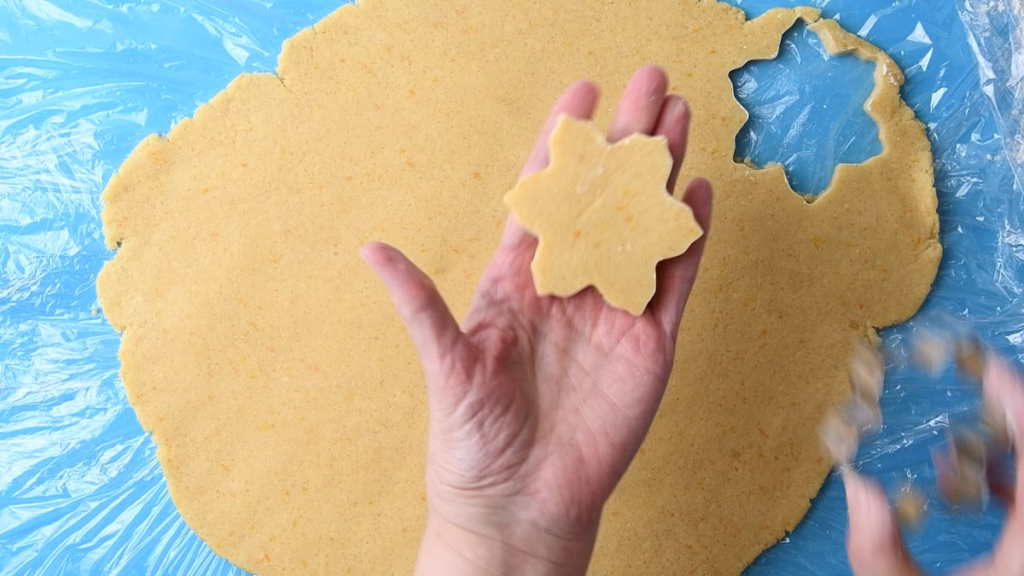
- Try and keep the shapes close together, using every corner of dough you can in the very first roll out. The less you work the dough, the better your texture will be. Crumbly is the aim here.
- Dip the sharp side of your cookie cutters into some flour, to prevent the dough from sticking in them. This is even more important for any fragile patterns that have, say antlers for Rudolf or very delicate star shapes.
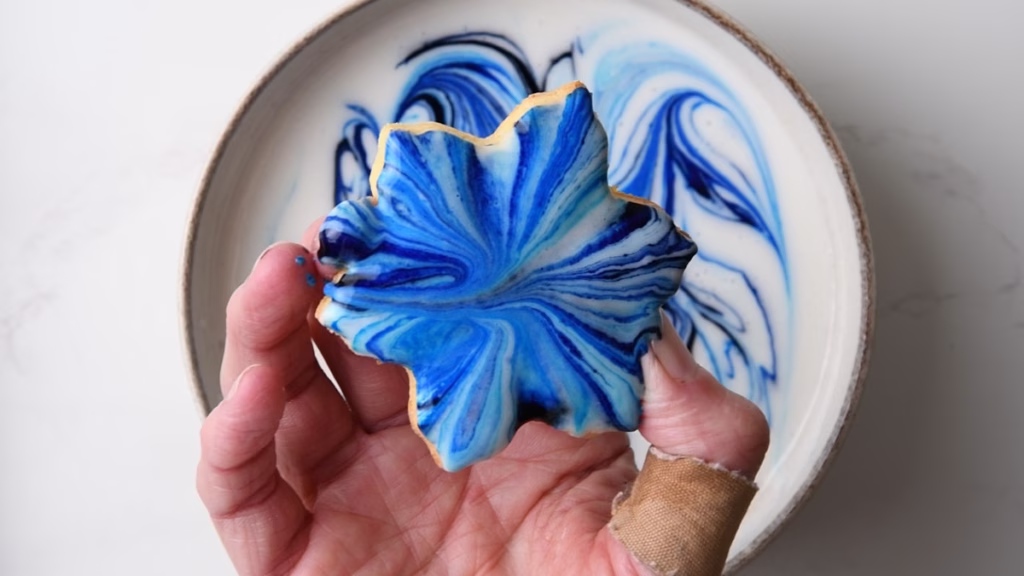
- If you want to use the marbled royal icing later, I found bigger shapes that have a defined center with corners (like a star) work best. I tried dipping some of the leftovers and other shapes, but none looked as impressively patterned as the stars. But then, it’s a matter of taste, so do what makes you happy.
- A palette knife is super helpful when the dough gets a little warmer during the cut out process, as it can easily loosen any stuck pieces and transfer them to the sheet pan.
- Re-roll leftover dough by pushing it back together until you have a relatively smooth ball and the rolling again on a lightly floured surface. But take care to work the dough as little as possible.
- If the dough gets too warm and sticky, put it back into the fridge until firm again.
- Also, if you dough got warm (often the case when baking with kids, as they just take a little longer with the process) re-chill before baking, so it doesn’t spread too much.
Bake Your Sourdough Discard Cookies
Adding ideally one sheet pan at a time to your oven for even heat, bake the cookies for about 10-14 minutes or until the edges are just starting to brown. They should still be very pale all over.
I always rotate my trays once after 5-6 minutes, as my oven bakes unevenly.
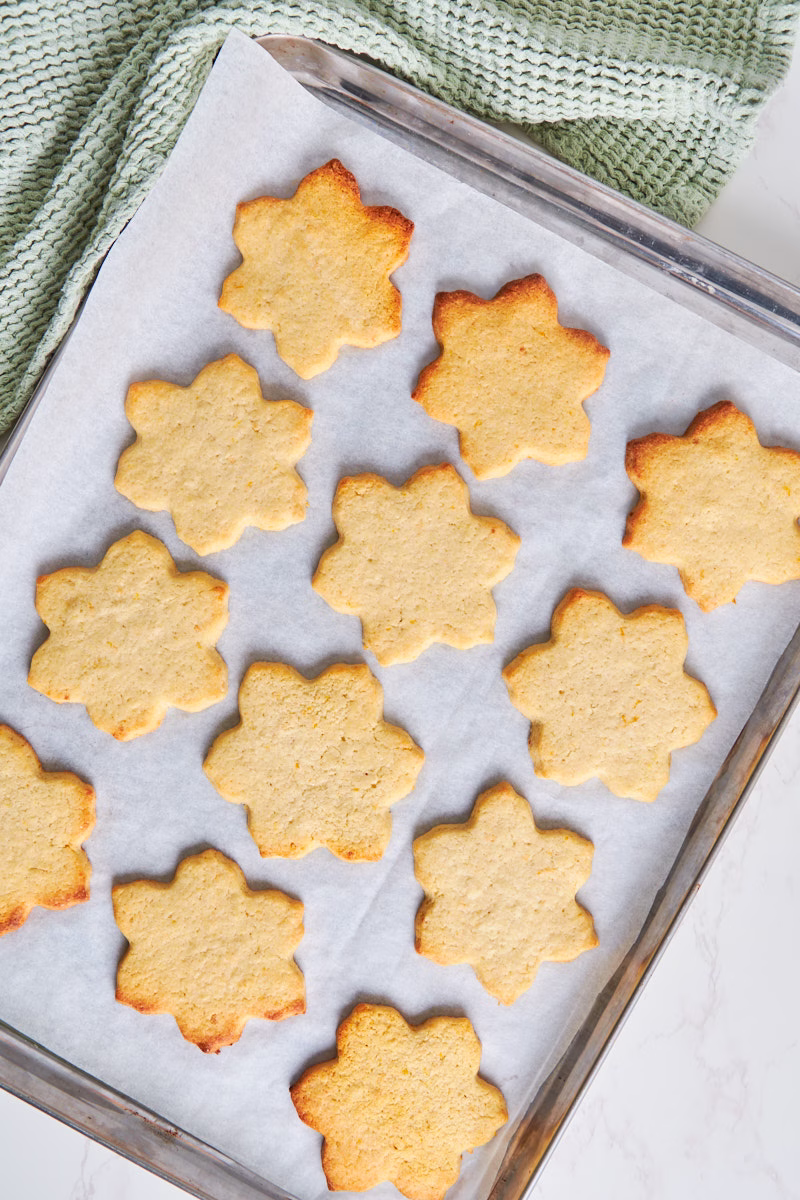
Remove from the oven and allow to cool on the pan for 10- 15 minutes, to let them finish baking and firm up a bit. You can now transfer them to a cooling rack to cool completely. I like to simply pull over the whole piece of parchment in one smooth motion, to disturb the still fragile cookies as little as possible.
Decorating Your Cookies
Now comes the fun part!
As you can see here, I’m a little artistically challenged (and not very patient) when it comes to cookie decorating.
Hence wanting better options. 🙂
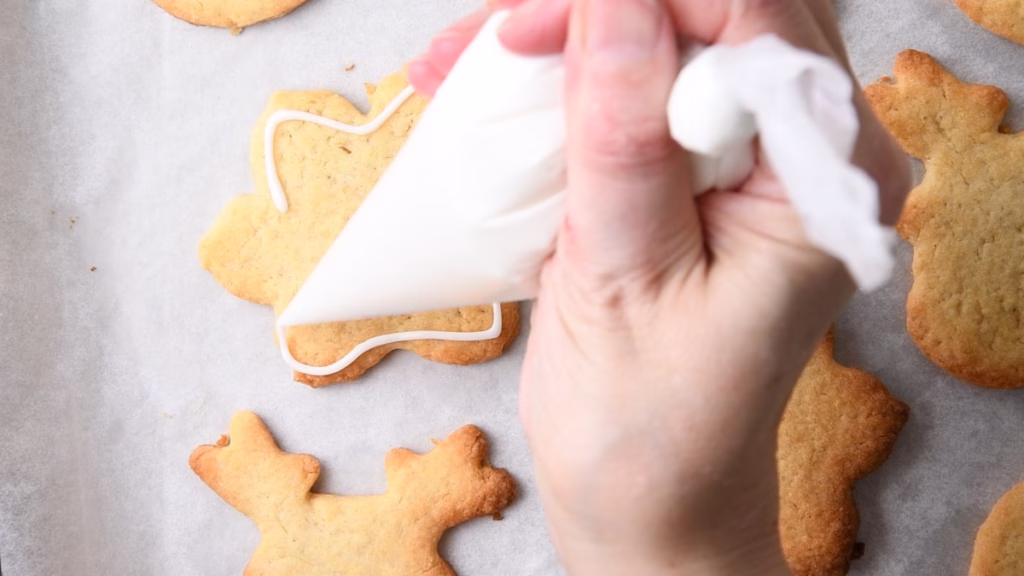

Prepare some sheet pans lined with baking parchment (for easy cleanup), then top with cooling racks, so any drips can run off the cookies instead of pooling around the bases.
Pick one of the icings below (or try all three, as I did).
Simple Zesty Lemon Frosting
The amount in the recipe makes enough to brush the whole batch of cookies with it if you want.
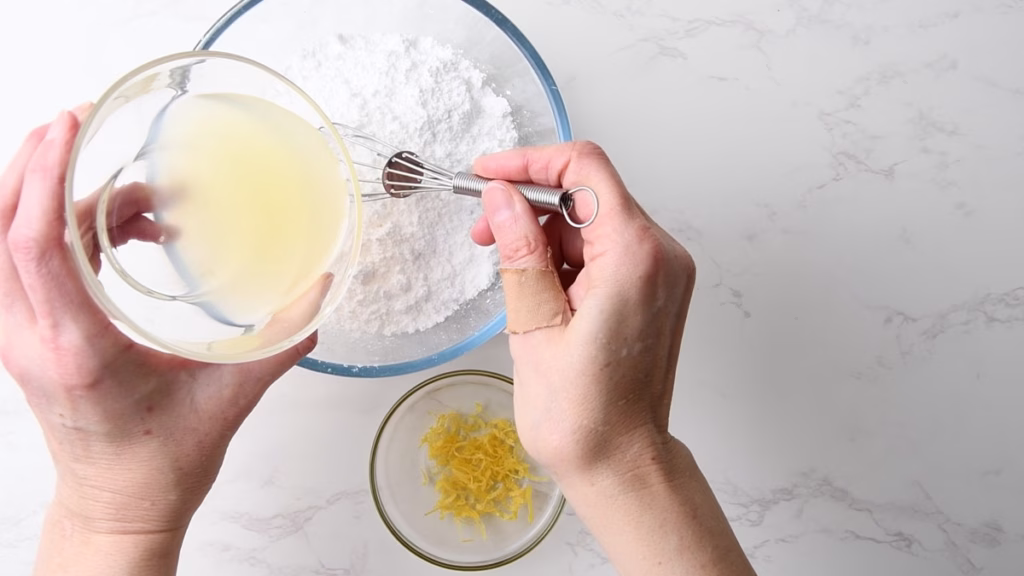
Mix the frosting by adding the lemon juice to the icing/confectioners sugar. Start with ¼, whisk it all in, the see if it needs more to get the right consistency. It should be drizzle-able, but not liquid. Think Royal icing consistency. Maybe a little softer. If you let it flow from your whisk, it forms visible streaks on itself that sink in after a few second it’s ready.
You can store this in an airtight container in the fridge for up to 3 days, if you want to get ahead. Simply stir and add a little more lemon juice if it feels too firm.
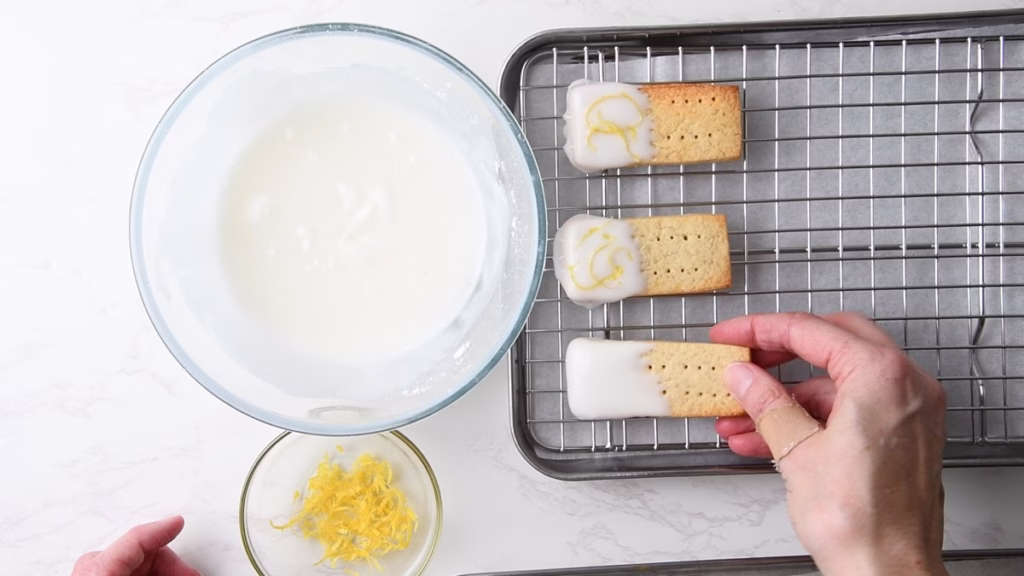
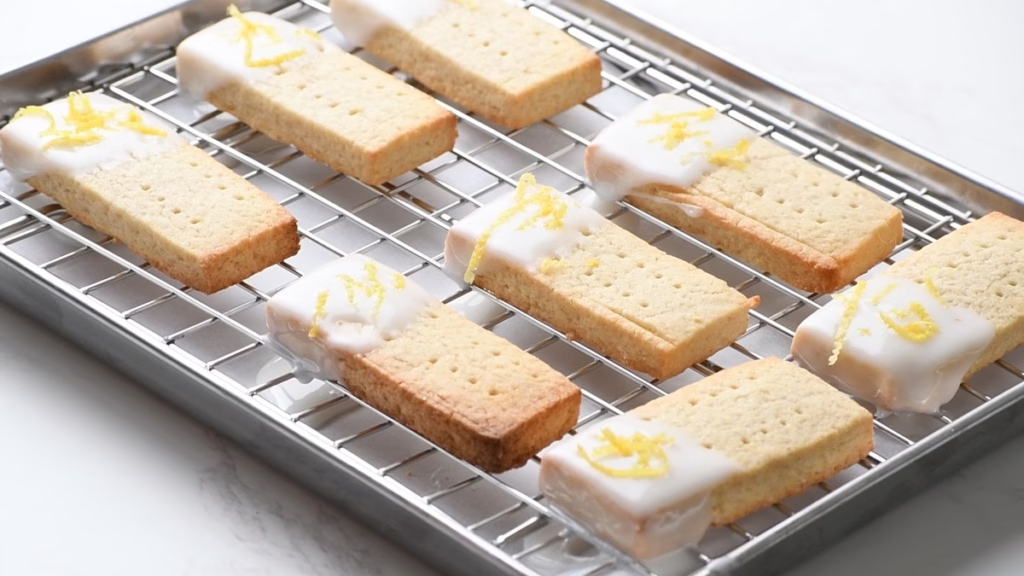
Now either brush your cookies with the frosting, using a pastry brush or simply dip one half into it as I did. Transfer to the cooling racks and finish all cookies.
Decorate with a little lemon zest if you like and allow to dry for about 12-24 hours, depending on how thick your frosting is. After that it will be hard enough to stack the cookies in an airtight tin.
Mix Marbled Royal Icing
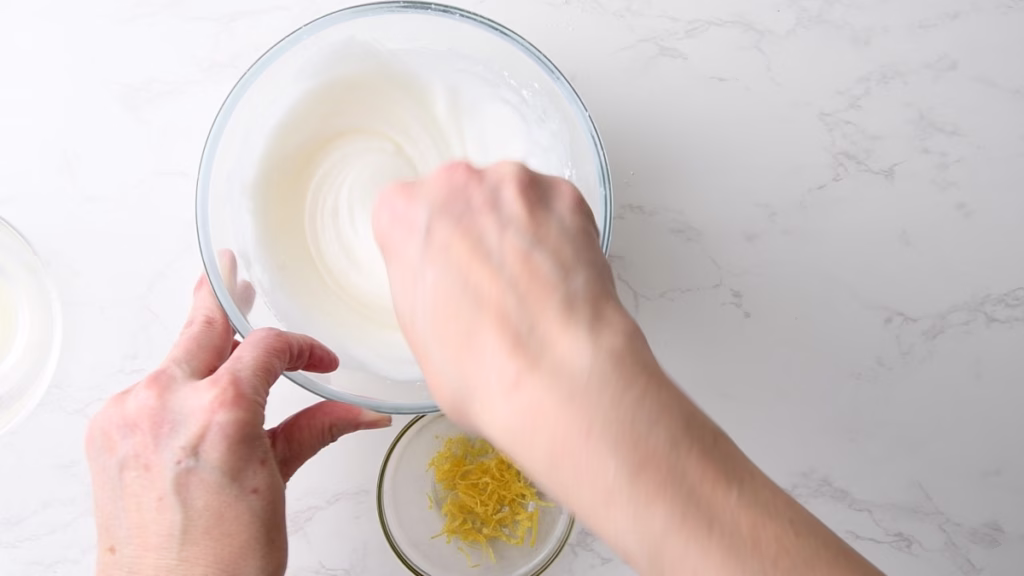
Using your stand mixer or a hand mixer with a whisk attachment, whip the aquafaba until foamy. I’m talking a little fluffy, but still liquid. Not meringue like foamy.
Add the lemon juice and vanilla, then mix in the icing sugar until smooth. Don’t whisk too long or you’ll have lots of bubbles on your cookies, that can disturb the smooth and shiny surface.
Assess the texture. It should have about flooding consistency, i.e. drizzle off your spatula and settle into itself within 2-3 seconds. Not too thin though, or it won’t hold the marble patterns.
If it’s too thin add a bit more icing sugar, too thick add more lemon juice. Some say to add more aquafaba, but I always feel lemon juice improves the flavor dramatically. Especially in these lemony cookies.
How To Apply Marbled Royal Icing
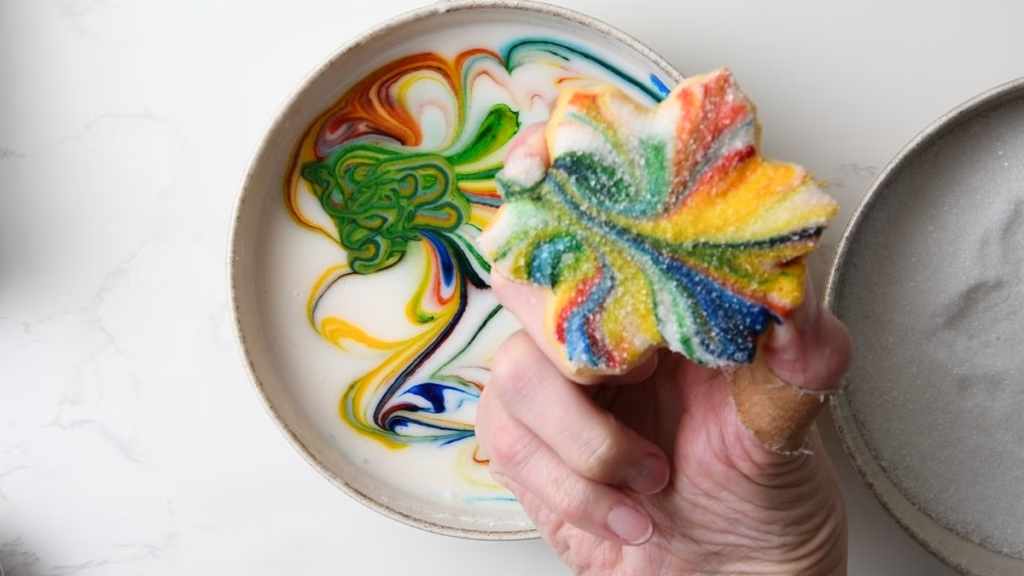
Pour the icing into a relatively low rimmed bowl (or deep plate), big enough to dip your cookies.
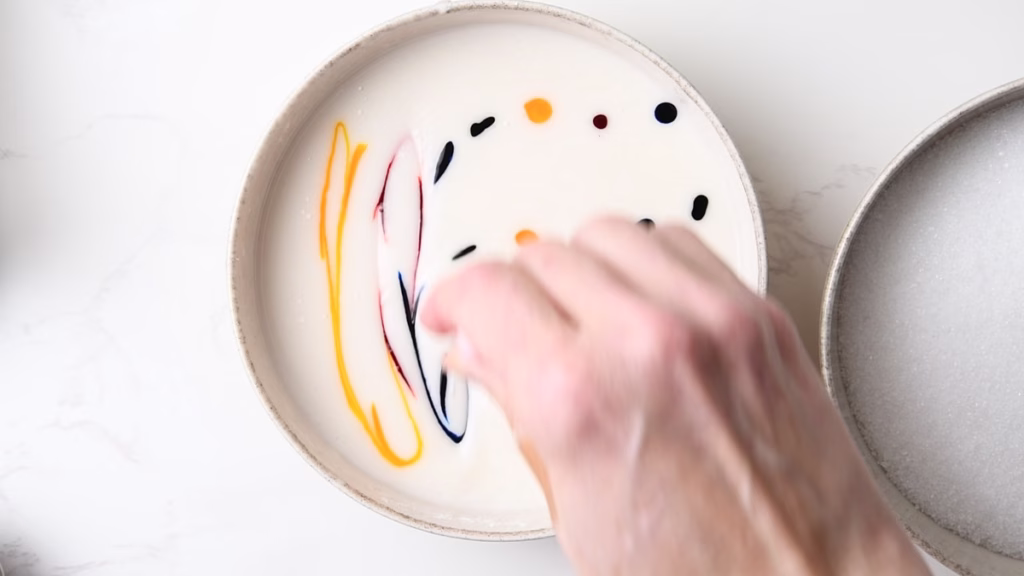
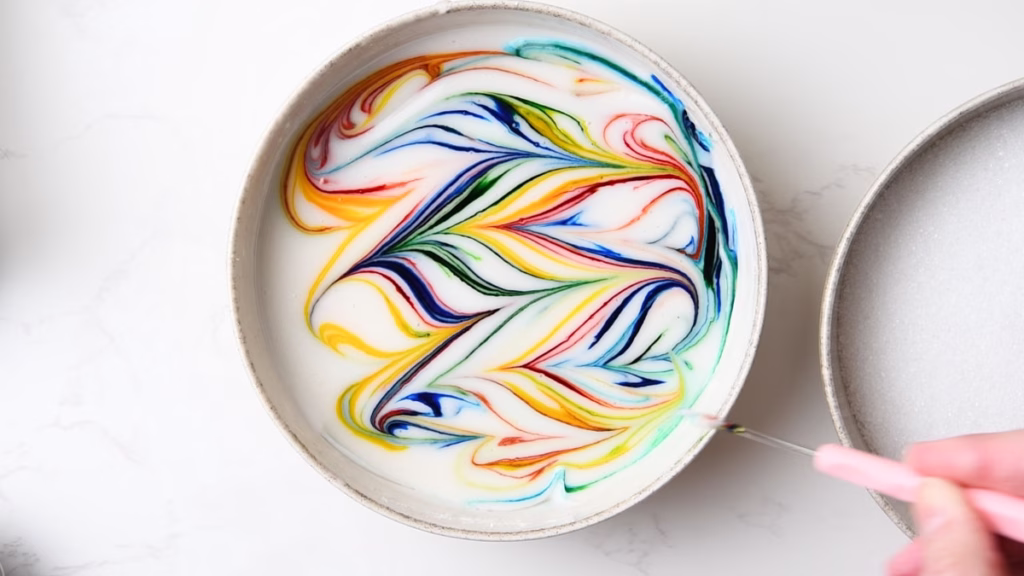
Mix the color in – Less is more
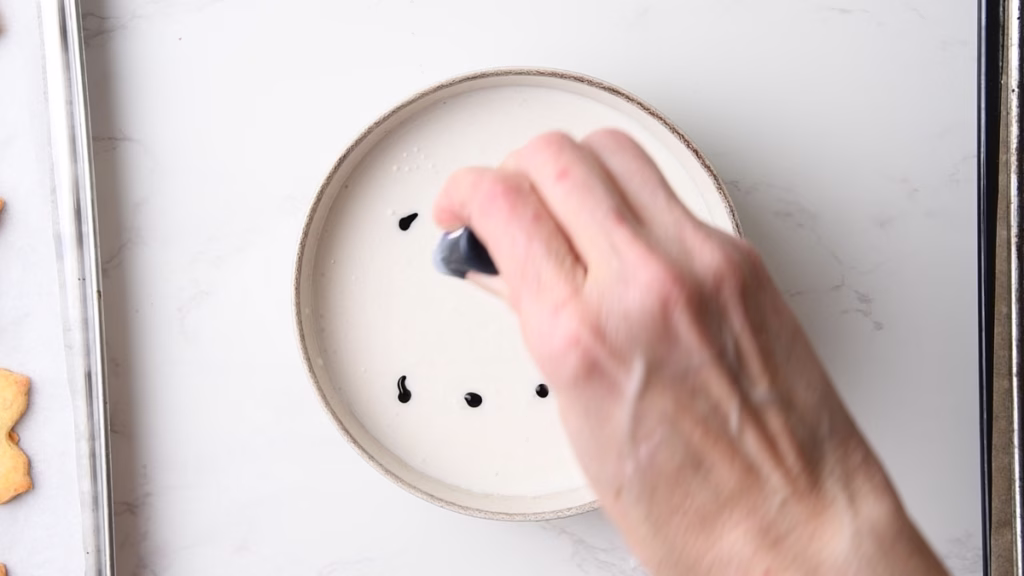
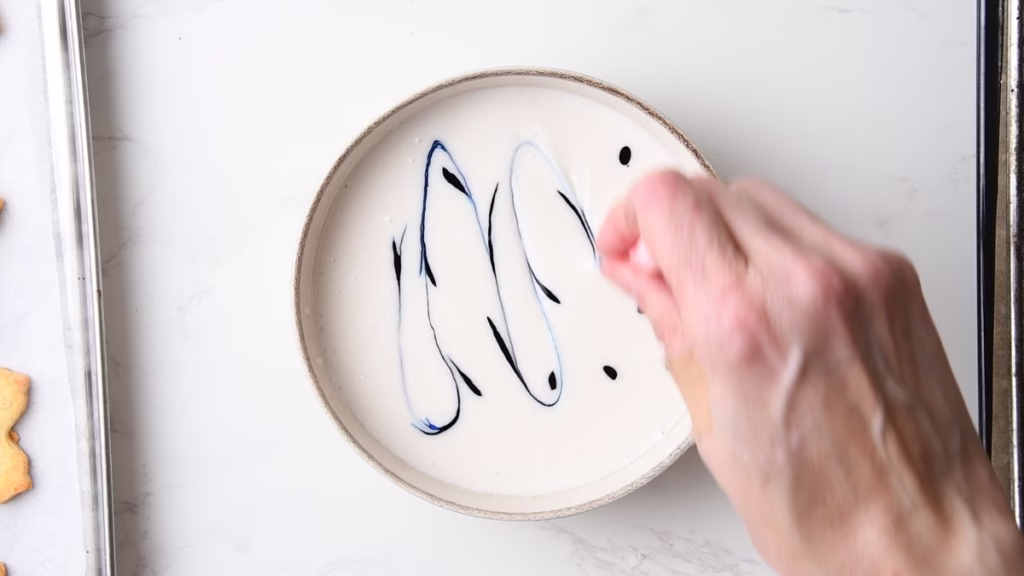
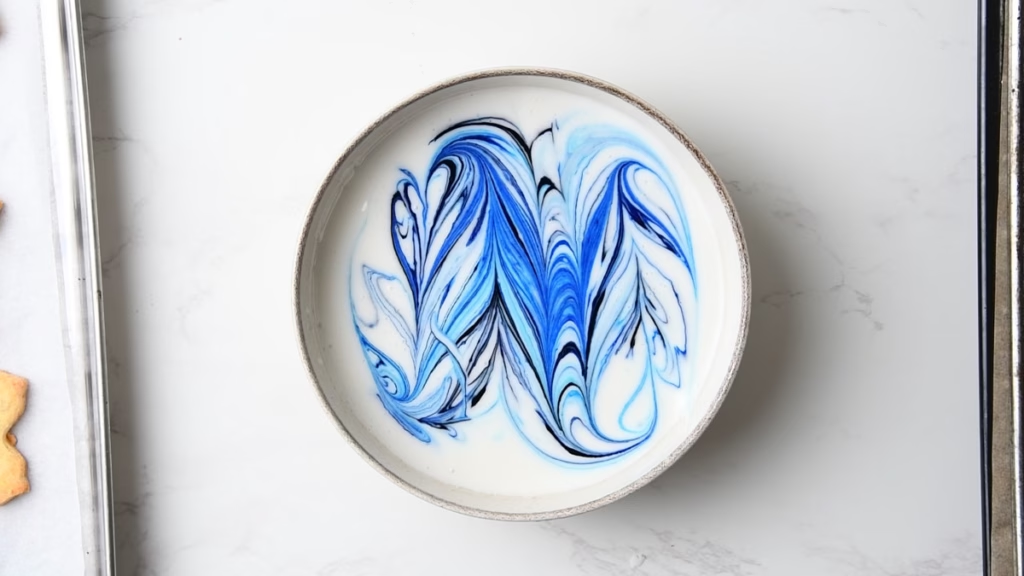
- Using 1-2 (or as many as you like. I made mine with navy blue and sky blue) different gel colours, apply about 4-8 drops of the gel colours across the icing surface. 4 gives you a very light color with lots of white, 8 gives you the deep and intense color you see on my cookies.
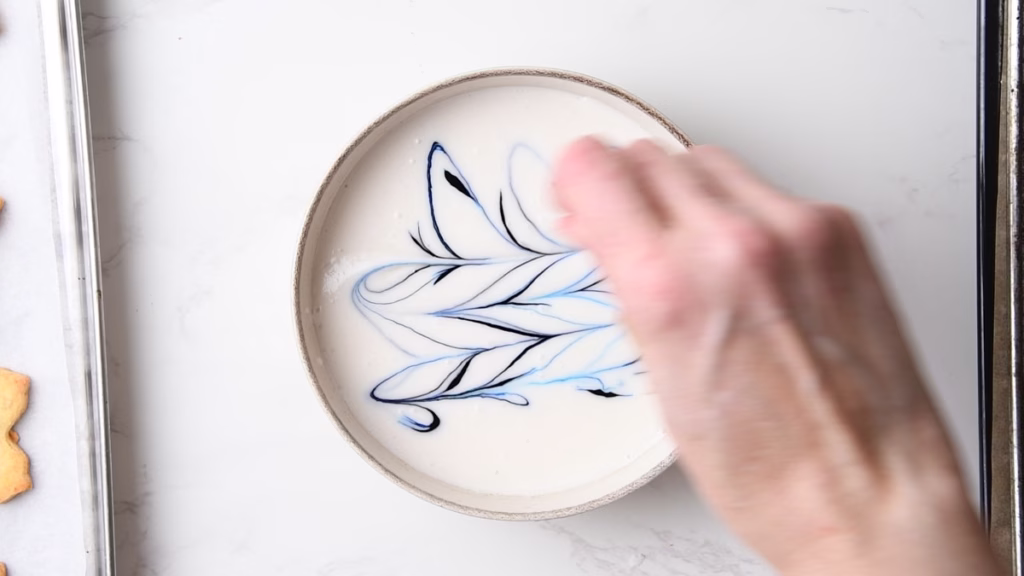
- Now use a skewer or toothpick to drag the drops across the surface. First vertical, then horizontal. Or leave it at one direction and try it out first. Don’t mix them in fully. You want a defined marble surface.
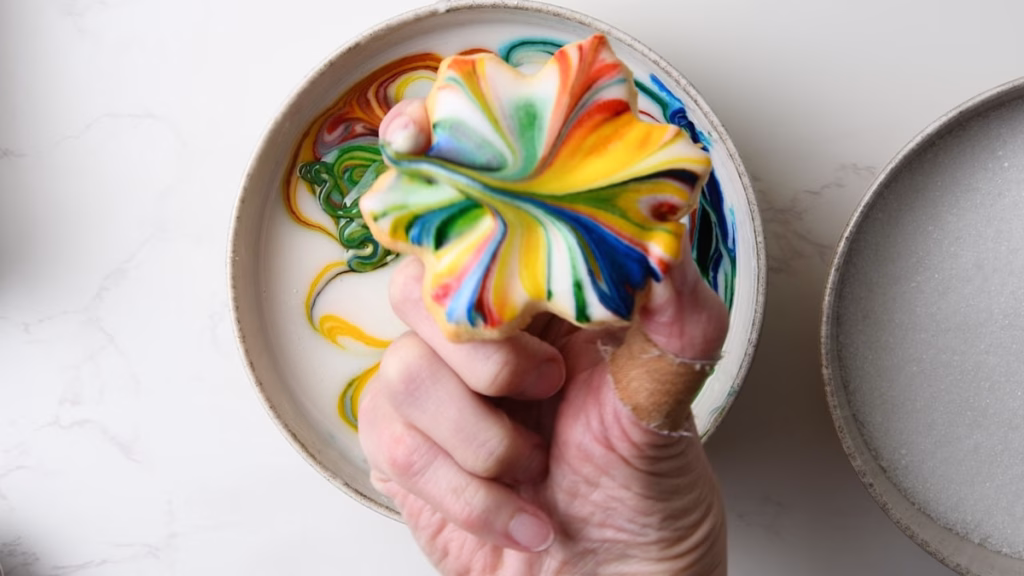
Dip Your Cookies
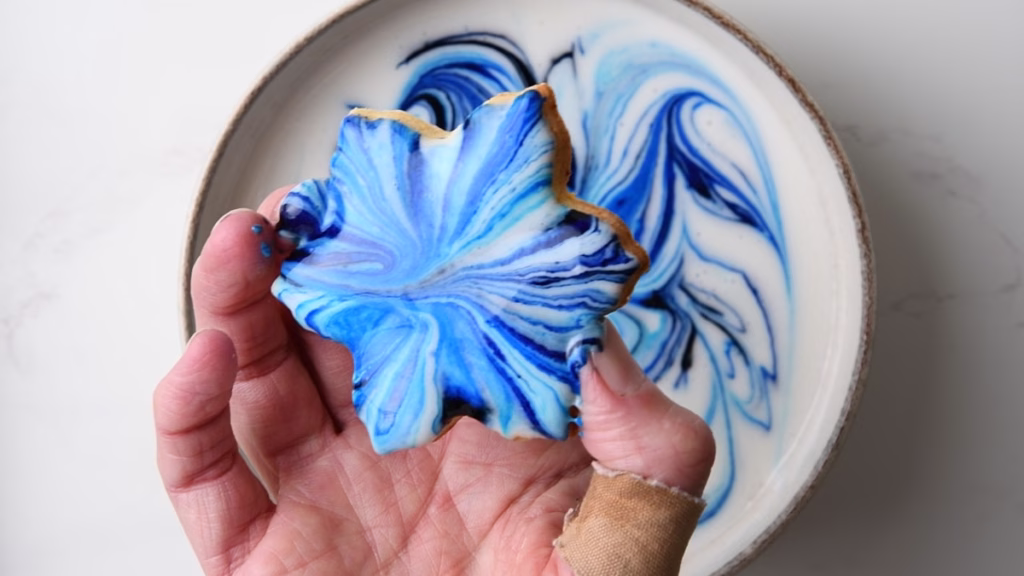
- Take a cookie and dip the top straight into the icing, then pull it up very straight, allowing the surplus to drizzle off, before turning the cookie over with one smooth motion and depositing it on the cooling rack, to allow any surplus icing to drain. Repeat with the remaining biscuits.

- You might have to experiment with this a little (which is no hardship, as the whole process is pure fun!), to see which turning angle works best for your particular cookie shape. I found angling my stars so the last drip sort of settles on one corner of the star worked best.
- One tip to keep relatively defined streaks: Move the cookie over to one side of the bowl while the surplus drizzles off, to stop your definition in the center from going all muddy.
- I got about 1/3 batch of cookies done, before the mix got very light in color. At that point simply add a few drops more colour and repeat until all cookies are coated.
Let them dry
- Royal icing needs about 24 hours to fully dry and harden. The cookies can then be stacked in an airtight container.

The Sparkling Sour Sugar Finish
You can use this finish on either of the above icings.
I used the royal icing for super bright rainbow colours.
One tip: don’t add green! If you have yellow and blue it will mix green itself anyway and adding green extra means you’ll have way too much of it after a few dips.
To mix the sour sugar topping, simply combine the sugar and citric acid. You can adjust the sourness to your taste. I like mine proper sour, so I used a 1:1 ration of sugar to citric acid. But feel free to use less if you prefer yours more subtle.
Now you can either dip a freshly iced cookie directly into the zesty-sour sugar mix or just sprinkle over a little for a tiny sparkle.
Of course, if you just want sparkle without the sour patch candy flavor, feel free to only use sugar.
The drying time depends on the icing you used.
Watch The Video
Coloured Zesty Sugar
Optional, you could also colour the sugar-citric acid mix by adding a few drop of gel colouring to it, then whisking well. How many you need depends on your colour and how intense you’d like it to be. I found about 10 drops on ½ cup of mix are plenty for really bright color. To achieve pastel colours, start with 2-3 drops. Those would be lovely for decorating Easter cookies.
After mixing, pour the coloured sugar onto a plate, flattening it a bit with the whisk or a fork and let it dry for a few hours. You can then store it in a sealed jar for at least a year and use whenever you need some bright sparkles on your food.
How To Store
The iced and dried Lemony Sourdough Protein Shortbread Cookies keep in an airtight container on the counter for about 5 days (I’m pretty sure my grandma kept them much longer, but I wouldn’t advise it because of the butter) and 10 days in the fridge.
You can freeze them for up to 3 months. For this I would pack them in boxes, layered with parchment paper, to keep them from sticking. Thaw in the container on the counter until they reach room temperature before eating.

Now I’d love to hear from you in the comments!
Have you tried this? Did you enjoy it?
What other recipes would you like to see?
And if you enjoyed this recipe, please consider rating, sharing, or leaving a comment – your feedback truly helps my blog grow!
FAQ
Absolutely. Simply swap in the same amount of flour (1/2 cup/60g) to reverse engineer this recipe. It’ll be even closer to classic shortbread.
They certainly will. It’ll even make the protein easier bioavailable and the gluten easier to digest for those with sensitivities. About 48 hours seem to be ideal for that purpose. (As celiac please do NOT eat anything with gluten. Sourdough or not.)
Other recipes you might enjoy

Looking for more cookies with protein?
Try these gorgeous Pistachio Chocolate ones. They are even sneakily gluten free (not that anyone will notice).

Or go all cosy fall flavors with my Pumpkin S’mores cookies. Of course also with sourdough and protein.

Lemony Sourdough Protein Shortbread Cookies
- Total Time: 4 hours 12 minutes
- Yield: 24 cookies 1x
Description
You can still enjoy the buttery, crumbly and rich indulgence of classic shortbread while boosting your protein. This recipe takes traditional shortbread, adds the tenderizing quality of sourdough discard, and incorporates vanilla whey protein for a delicious cookie. Enhanced with intense lemon zest, this dough is versatile—it’s perfect for stable cut-outs that hold their shape and is easily finished with an elegant Marbled Royal Icing.
Ingredients
The Dough
- 135g granulated sugar
- 1–2 Tbsp lemon zest (depending on how zesty you like your cookies. I used zest from 2 lemons)
- 170g unsalted butter at room temperature
- 135g sourdough discard unfed, at room temperature. (about 1/2 cup +1 tbsp but it’s best to weigh this.)
- 5g vanilla extract
- 225g all purpose flour
- 18g cornstarch
- 60g protein powder (I used vanilla whey concentrate)
- 3g kosher salt
Marbled Royal Icing
- 60ml aquafaba (the liquid from an unsalted can of chickpeas)
- 500g icing/powdered sugar
- 15ml lemon juice (you may need more, to get the right consistency, but start slowly)
- 5ml vanilla extract
- Gel food coloring – Choose your favorite colours. You only need a few drops.
Instructions
- For cookies all ingredients should ideally be at room temperature. Don’t melt your butter, or you’ll get greasy cookies.
- I will give the instructions using a stand mixer, but a hand mixer or simply a sturdy spoon and some elbow grease work just fine. There is no whipping until fluffy, so this is a quick one.
The Dough
Make Lemon Sugar
- Start by zesting your lemon into the sugar. If your lemons are treated, wash them first and dry thoroughly so you don’t get any bitter or waxy flavor in your cookies.
- Using your fingertips, rub the zest into the sugar until it turns a bright yellow and smells absolutely delicious. This will free the essential oils in the lemon zest and give the lemony shortbread its intense flavor.
Cream Butter and Sugar
- Now add the butter in large cubes and all that delicious lemon sugar to your stand mixer equipped with the paddle attachment.
- Start mixing on low just until butter and sugar are combined and creamy. Don’t whip this until fluffy!
- As opposed to sugar cookies, we don’t want the shortbread to rise (hence to baking powder or soda in the dough either) but rather stay crumbly and break with a gentle snap. Whipping would incorporate air into the dough, which would expand in the oven, leading to domed cookies, making it much harder to get an even icing coat.
Add Vanilla and Dry Ingredients
- Now mix in the vanilla extract, sourdough discard and the protein powder. Mix on low until it looks just incorporated.
- Now before adding them to the wet mix, briefly combine flour, cornstarch and salt in a bowl. This is to coat the flour with the cornstarch right away, stopping any unwanted gluten development and preserving the classic snap.
- Add the whole mix to your butter-protein cream and gently combine on low speed until it just starts to come together. Do not mix any longer.
Roll Out The Dough
- Here is the easy way:
- Line your worktop with clingfilm. I found 2 overlapping layers of about 25in/50cm work very well.
- Turn your still crumbly dough out onto the clingfilm.
- Add another overlapping layer of cling film on top.
- Using your hands, start pushing your dough together into a cohesive square (or round) shape.
- Now you can start rolling it out. Instead of lots of gentle strokes, try to apply relatively firm pressure with your rolling pin starting from the center, pushing the dough outward and away from you into all directions until you have one large disk.
For Cut Out Cookies:
- Aim for a large disk that is about 0.2in/5mm thick. The shape doesn’t matter very much, but it should fit onto a sheet pan/board and in your fridge.
For The Classic Shortbread Shape:
- Roll out into a rectangle 8.2in/21cm wide and about 0.3 in/8mm thick for the classic rectangular version.
- The length will essentially define itself when you keep width and height of the dough to these measurements. (Now obviously you absolutely don’t have to be this correct, but that shape will give you 3 rows of cookies in about the typical Walkers Shortbread Fingers size.)
- You could also form a roll and slice later, but because the dough is fairly soft at this point, it will flatten at the bottom. So I wasn’t a fan as it didn’t look very nice.
Refrigerate
- Fold the cling film edges gently over the dough.
- Essentially, the less you handle this dough, the closer to classic shortbread texture it will be. Hence the firm but few strokes while rolling.
- Now I like to slide the large dough disk onto a slim chopping board or a sheet pan, to keep it nice and flat.
- Store in the fridge for at least 2-3 hour or up to 3 days. You want a firm and cold dough for the cutting out. The colder, the easier it is and the sharper your edges will remain when baking.
Cutting Out Your Lemony Shortbread Cookies
- Once your dough is nice and firm, preheat your oven to 350°F/175°C.
- Line 2 sheet pans with baking parchment.
- For this buttery type of cookie I would not use a Silpat, as the bottoms can get a bit greasy without the slight bit of absorption from the parchment.
- Get your cookie cutters or a large knife, depending on your method.
- Lightly flour your worktop (I used a silicone mat) or even keep the dough for the first round of cut outs/ the slicing on the cling film to make them easier to pick up.
For The Rectangular Classic Shortbread Shape
- I like to trim the corners of my dough a little bit (and munch the trimmings as bakers snack), to get nice, sharp edges.
- Making some markings with your knife (I literally used a Walkers biscuit as my guideline, but a ruler or simply guesstimating is fine), divide the dough block into three lengthwise.
- Now cut cookies of about 1/2in/1cm width, until your dough is used up and transfer to your prepared sheet pan.
- These cookies don’t spread much, so leaving about 1in/2cm between them is plenty.
- Use a fork or skewer, to prick holes into them for the typical pattern. In theory this should prevent any unwanted rise. But I found that even the un-pricked roll out versions stayed nice and flat. So it’s purely optional.
The Cut Out Cookies
- I’m fairly sure you know how to cut out cookies just fine, but here are a few tips to make your life easier:
- Try and keep the shapes close together, using every corner of dough you can in the very first roll out. The less you work the dough, the better your texture will be. Crumbly is the aim here.
- Dip the sharp side of your cookie cutters into some flour, to prevent the dough from sticking in them. This is even more important for any fragile patterns that have, say antlers for Rudolf or very delicate star shapes.
- If you want to use the marbled royal icing later, I found bigger shapes that have a defined center with corners (like a star) work best. I tried dipping some of the leftovers and other shapes, but none looked as impressively patterned as the stars. But then, it’s a matter of taste, so do what makes you happy.
- A palette knife is super helpful when the dough gets a little warmer during the cut out process, as it can easily loosen any stuck pieces and transfer them to the sheet pan.
- Re-roll leftover dough by pushing it back together until you have a relatively smooth ball and the rolling again on a lightly floured surface. But take care to work the dough as little as possible.
- If the dough gets too warm and sticky, put it back into the fridge until firm again.
- Also, if you dough got warm (often the case when baking with kids, as they just take a little longer with the process) re-chill before baking, so it doesn’t spread too much.
Bake Your Sourdough Discard Cookies
- Adding ideally one sheet pan at a time to your oven for even heat, bake the cookies for about 10-14 minutes or until the edges are just starting to brown. They should still be very pale all over.
- I always rotate my trays once after 5-6 minutes, as my oven bakes unevenly.
- Remove from the oven and allow to cool on the pan for 10- 15 minutes, to let them finish baking and firm up a bit. You can now transfer them to a cooling rack to cool completely. I like to simply pull over the whole piece of parchment in one smooth motion, to disturb the still fragile cookies as little as possible.
Decorating Your Cookies
- Since I used the marbled royal icing as post picture, I’ll list this in the main recipe. You can find the other options below in the notes.
- Prepare some sheet pans lined with baking parchment (for easy cleanup), then top with cooling racks, so any drips can run off the cookies instead of pooling around the bases.
Marbled Royal Icing
- Using your stand mixer or a hand mixer with a whisk attachment, whip the aquafaba until foamy. I’m talking a little fluffy, but still liquid. Not meringue like foamy. https://forthepleasureofeating.com/stable-vegan-meringue/
- Add the lemon juice and vanilla, then mix in the icing sugar until smooth. Don’t whisk too long or you’ll have lots of bubbles on your cookies, that can disturb the smooth and shiny surface.
- Assess the texture. It should have about flooding consistency, i.e. drizzle off your spatula and settle into itself within 2-3 seconds. Not too thin though, or it won’t hold the marble patterns.
- If it’s too thin add a bit more icing sugar, too thick add more lemon juice. Some say to add more aquafaba, but I always feel lemon juice improves the flavor dramatically. Especially in these lemony cookies.
How To Apply Marbled Royal Icing
- Pour the icing into a relatively low rimmed bowl (or deep plate), big enough to dip your cookies.
- Using 1-2 (or as many as you like. I made mine with navy blue and sky blue) different gel colours, apply about 6-8 drops of the gel colours across the icing surface.
- Now use a skewer or toothpick to drag the drops across the surface. First vertical, then horizontal. Or leave it at one direction and try it out first. Don’t mix them in fully. You want a defined marble surface.
- Take a cookie and dip the top straight into the icing, then pull it up very straight, allowing the surplus to drizzle off, before turning the cookie over with one smooth motion.
- You might have to experiment with this a little (which is no hardship, as the whole process is pure fun!), to see which turning angle works best for your particular cookie shape. I found angling my stars so the last drip sort of settles on one corner of the star worked best.
- Transfer to a cooling rack and proceed dipping the next cookie. I got about 1/3 batch of cookies done, before the mix got very light in color. At that point simply add a few drops more colour and repeat until all cookies are coated.
- Royal icing needs about 24 hours to fully dry and harden. The cookies can then be stacked in an airtight container.
Notes
I gave the amounts in gram here, as I feel it’s particularly important to weigh flour and sourdough when it comes to cookies. If you don’t have food scales, simply switch the US units and you’ll get the classic cups and tablespoons. Keeping all amount in grams in the original should make the switch easy for the recipe card system.
The Nutrition calculation is without the icing, as you have different options and can happily eat the cookies without icing if you prefer.
Simple Zesty Lemon Frosting
- The amount in the recipe makes enough to brush the whole batch of cookies with it if you want.
- Mix the frosting by adding the lemon juice to the icing/confectioners sugar. Start with ¼, whisk it all in, the see if it needs more to get the right consistency. It should be drizzle-able, but not liquid. Think Royal icing consistency. Maybe a little softer. If you let it flow from your whisk, it forms visible streaks on itself that sink in after a few second it’s ready.
- You can store this in an airtight container in the fridge for up to 3 days, if you want to get ahead. Simply stir and add a little more lemon juice if it feels too firm.
- Now either brush your cookies with the frosting, using a pastry brush or simply dip one half into it as I did. Transfer to the cooling racks and finish all cookies.
- Decorate with a little lemon zest if you like and allow to dry for about 12-24 hours, depending on how thick your frosting is. After that it will be hard enough to stack the cookies in an airtight tin.
The Sparkling Citrus Sugar Finish
- You can use this finish on either of the above icings.
- To mix it, simply combine the sugar and citric acid. You can adjust the sourness to your taste. I like mine proper sour, so I used a 1:1 ration of sugar to citric acid. But feel free to use less if you prefer yours more subtle.
- Now you can either dip a freshly iced cookie directly into the zesty-sour sugar mix or just sprinkle over a little for a tiny sparkle.
- Of course, if you just want sparkle without the sour patch candy flavor, feel free to only use sugar.
- The drying time depends on the icing you used.
Coloured Zesty Sugar
- You could also colour the sugar-citric acid mix by adding a few drop of gel colouring to it, then whisking well. How many you need depends on your colour and how intense you’d like it to be. I found about 10 drops on ½ cup of mix are plenty for really bright color.
- After mixing, pour the coloured sugar onto a plate, flattening it a bit with the whisk or a fork and let it dry for a few hours. You can then store it in a sealed jar for at least a year and use whenever you need some bright sparkles on your food.
How To Store
- The iced and dried Lemony Sourdough Protein Shortbread Cookies keep in an airtight container on the counter for about 5 days (I’m pretty sure my grandma kept them much longer, but I wouldn’t advise it because of the butter) and 10 days in the fridge.
- You can freeze them for up to 3 months. For this I would pack them in boxes, layered with parchment paper, to keep them from sticking. Thaw in the container on the counter until they reach room temperature before eating.
- Prep Time: 1 hour
- Cook Time: 12 minutes
- Category: Dessert, sourdough discard, protein dessert
- Method: Bake
- Cuisine: American


These lemony sourdough protein shortbread cookies are delightfully crisp and tangy — a clever twist on a classic treat that’s actually kind of good for you.
Thanks Kevin, I couldn’t have said it better myself.
This is my dream recipe–a way to use sourdough discard AND higher protein. Hooray!
That just really made me giggle. 🙂
It sure is one of mine too! I’m so happy I’m not alone with the desire for them!
I recently got into sourdough and was looking for some unique recipes to try. This was a hit! My kids devoured them pretty quickly and requested another batch soon.
Sourdough is such a magical ingredient, isn’t it?
So happy your kids loved them. 🙂
I have a whole bunch of cookie recipes planned for the next weeks.
These came out beautifully! I always enjoy finding recipes I can use my sourdough discard for.
Oh good, so happy to hear this worked for you. 🙂
Thanks for letting me know!