Pillowy Soft Sourdough Sweet Potato Dinner Rolls (High Protein)
Imagine a dinner roll that’s as soft as a cloud, subtly sweet, and has a pleasant, gentle tang. These Sourdough Sweet Potato Rolls achieve just that. By blending the moisture-retaining power of sweet potatoes with the traditional Japanese Yudane method and the complex flavor of sourdough, these rolls are uniquely tender and stay fresh for days. I’ve also boosted the nutrition by adding protein, making this a delicious and beneficial addition to your holiday table or weeknight dinner. They are designed to fit your schedule, not the other way around – with suggestions on how to align the fermentation time to your plan.

This post may contain referral links for products I love.
For The Pleasure Of Eating earns a small commission on these links at no cost to you.
- Why You’ll Love This
- The Ingredients
- Substitutions
- Equipment Used
- How to Make this
- How To Store
- FAQ
- Other Recipes You Might Enjoy
Why You’ll Love This
TL;DR
- Pillowy Soft and Moist: Made with the Yudane method for an incredibly tender, melt-in-your-mouth texture that stays fresh for days.
- Tangy Sourdough Flavor: The natural tang balances the sweet potato, making them utterly moreish and perfect for dinner.
- High Protein Content: Includes cottage cheese and whey, with sourdough fermentation making the protein easier for the body to absorb (more bioavailable).
- Flexible Schedule: Designed for make-ahead baking, allowing for overnight cold fermentation to fit any busy schedule.
- Thanksgiving Centerpiece: The beautiful natural orange color makes them an ideal and stunning side dish.
Super Flavorful and Moist By Using Sourdough
While yeasted sweet potato rolls are lovely, I always feel sourdough adds an extra layer of flavor to any baked good. In this enriched sourdough recipe it balances the sweet potatoes by adding a gentle tang and a bit of maltiness, making them utterly moreish and an absolute crowd-pleaser.
You can bet that this will be one of the first dishes on the table to vanish and people will ask you for the recipe!
Pillowy Soft Pull-Apart Rolls thanks to The Yudane Method
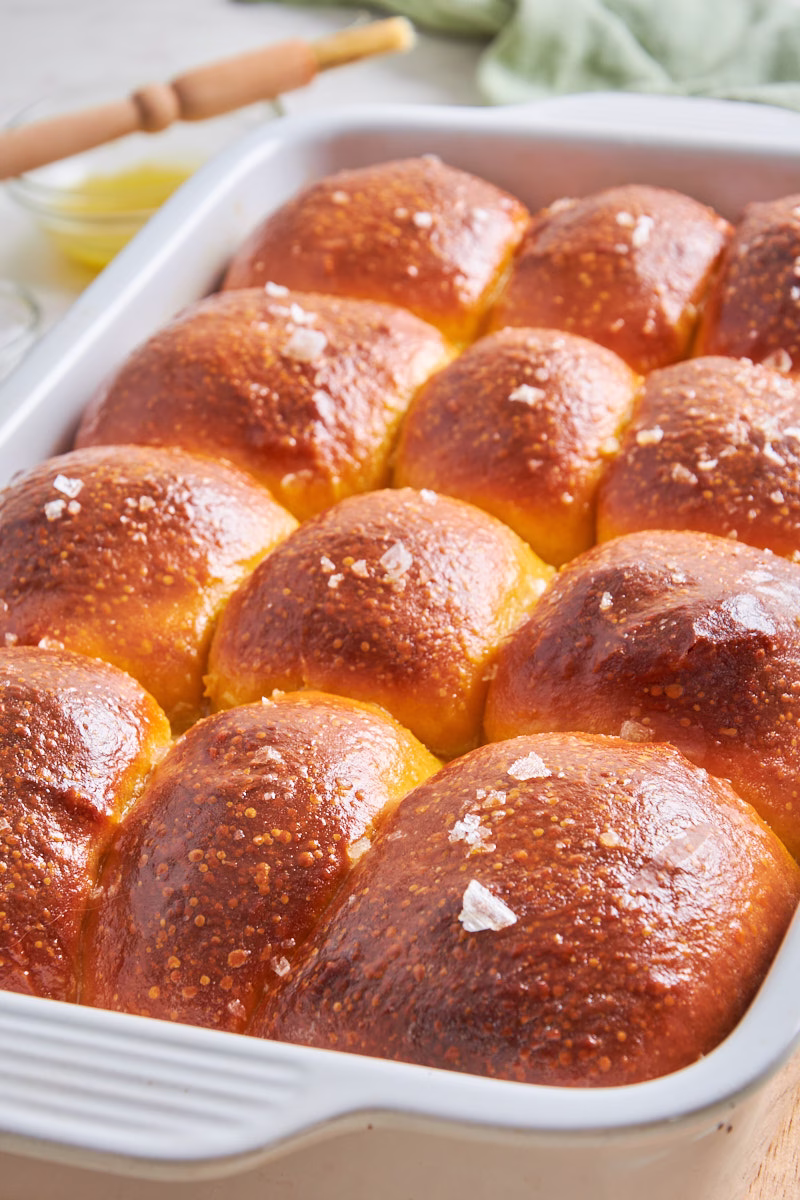
When I think about dinner rolls, I imagine a moist and fluffy roll, baked in a pan or casserole that keeps them close together, making them rise high and golden on top, while the sides stay pillowy soft, transforming them into pull-apart rolls, lacy strands and all.
The trick is usually a lot of butter, to keep the dough tender, and a slow ferment in the fridge, leading to fabulous gluten development.
I’m keeping the overnight fermentation, which is even improved by baking with sourdough instead of the more typical yeast, but reduced the butter a good bit and instead used the yudane method, a Japanese type of “pre-dough” that simply combines boiling water and part of the flour, which gelatinizes the starches in the flour, leading to a perfectly tender and moist dough, which stays fresh for longer.
The method is very similar to the Tangzhong method, which I used in my Sourdough Brioche Feuilletee a while ago, but you don’t need to actually cook the mix, making it even easier.
Stunning Thanksgiving Side
Now, you probably think of sweet potatoes more in terms of casserole and then have simple dinner rolls separately, but what if you could combine them? Ideally without the sugary shock of marshmallows?
Don’t get me wrong, I love roasted marshmallows, I just prefer them in dessert like these Pumpkin Sourdough S’mores Cookies, where they can be pulled into the most beautiful fluffy strings.
These pillowy soft sweet potato rolls instead use them to improve the dough due to the starches any potato contains, give them a gentle sweetness, raise the fiber content, add some vitamins and minerals and add a stunning orange colour that will make them stand out on your dinner table.
I bet with you these will be one of the first sides to disappear!
Perfect For Leftover Turkey Sandwiches
Talking of which: Can I suggest you make double? Because these fluffy buns are not just great as a side but also make a fabulous leftover Turkey sandwich! So you’ll regret it if there are none left the next day.
Sourdough is also particularly good at holding onto moisture, keeping these fresh for several days.
Though I frankly have a hard time deciding if I want them with turkey or honey butter. A whipped Honey Cranberry butter might be the solution!
Which you could also use as base for your sandwich. Problem solved.
Great For Making Ahead
One of the biggest advantages of sourdough is its flexibility.
What? I hear you exclaim, looking at all those meticulously planned out bakers schedules!
Let me share a secret with you: Sourdough is incredibly flexible and forgiving.
Personally I wildly switch between the bulk ferment on the same day or just preparing the dough and popping it in the fridge for an overnight cold ferment first all the way to getting to the shaping on day 1 and then letting it cold ferment in shaped form.
The steps are there as guideline. But as long as you do a few sets of stretch and folds at some point, to help the gluten strands to align well, shape it into nice, firm buns and allow it to double in volume before baking you’ll be fine.
Sourdough should fit your schedule, not the other way around. So make your dough up to 3 days ahead. Maybe shape the dinner rolls the day (or even two) before you want to bake them. Then allow them to rise while you prepare your Turkey and just pop them into the oven for about 20 minutes before the bird, coming out in golden perfection, with you being (reasonably) relaxed.
High Protein Sourdough Dinner Rolls With None Of The Downsides
I was introduced to dinner rolls shamefully late in life admittedly, as we have more the crusty rolls in Germany, so I clearly have to catch up enjoying them.
But these days I like to add protein to most of my baked goods. Especially those with sourdough, as its enzymes break down the protein during the overnight fermentation, making it easier bioavailable for the body. I explain this in more detail in my blog post on baking with sourdough and protein.
And while that already sounds very helpful (I mean, if we can get more bang for the buck in our protein, that can only be good, right?), sourdough also counters the typical dryness you usually get from adding protein powder, keeping these rolls perfectly moist and tender.
If you bring these rolls to a Thanksgiving party (or any party for that matter, you’ll want to eat them a lot once you’ve tried them!), all people will notice is how incredibly buttery, soft and tender these beauties are. And you can rest assured that you are doing something to feed your body the nutrients it needs. Even during the holidays. Great, isn’t it?
Ingredient Notes
A few notes on the most important ingredients here. As usual the full list with amounts is in the recipe card below.
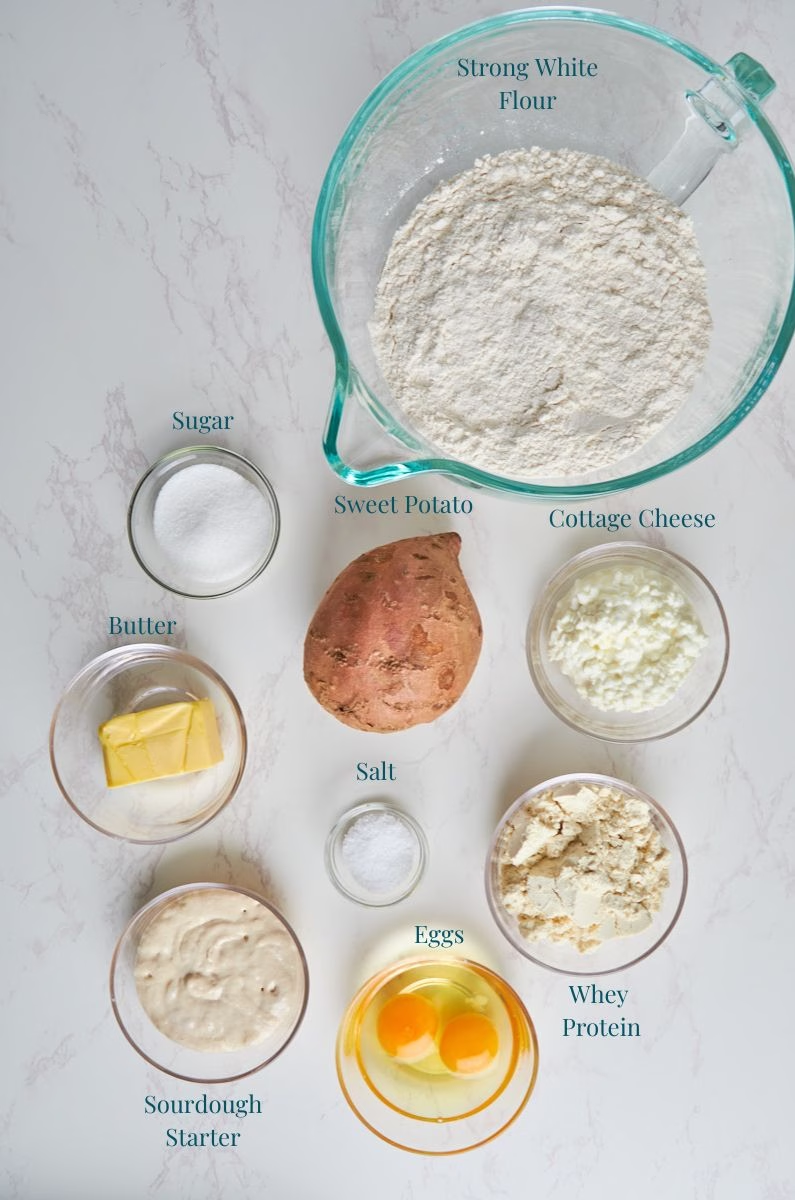
Dough For The Dinner Rolls
The Protein Boosters:
- Cottage Cheese – Mine is a really creamy looking one, which still has only 4% fat. I found there are big differences in texture, even with the same amount of fat, but since it gets blended and used as liquid essentially, it matters less than you’d think. I would not use 0% fat cottage cheese in this recipe (though you probably could) as the tiny bit of added fat content and milk protein makes a difference in the final tender texture.
- Whey Protein – Mine is the unflavored version of the whey concentrate from MyProtein.
- This is neither affiliated nor sponsored. Just the powder I found to taste best after trying a fair few. If you never found one you actually enjoy, give this one a try.
- If you want a more dessert-sweet vanilla flavor in your dinner rolls, feel free to use vanilla flavored powder.
The Dry:
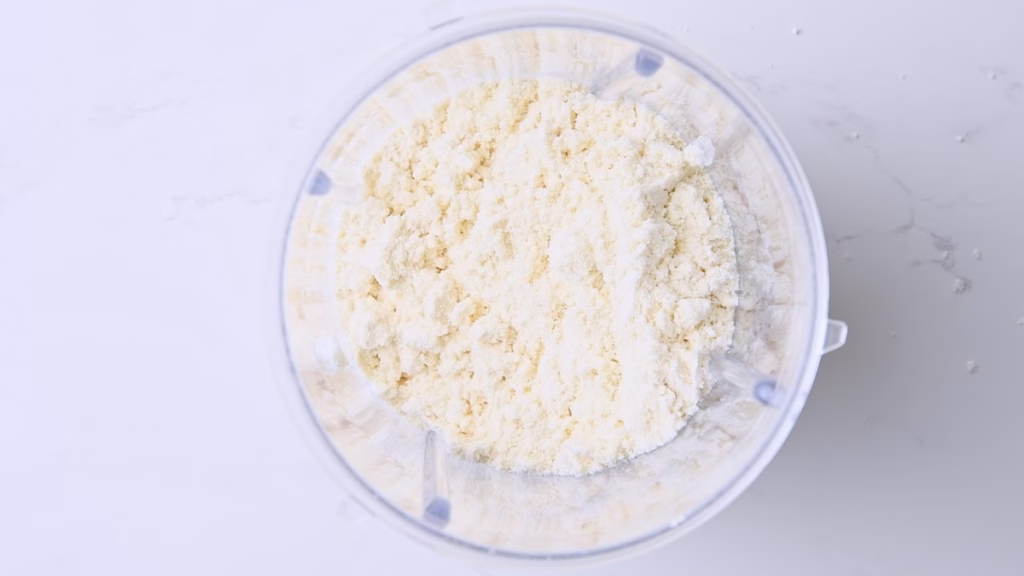
- Strong White Flour – Also called Bread flour is my choice in most typed of bread and rolls I make, as it develops a really nice and strong gluten network, has higher protein than AP flour and absorbs more water.
- Sugar – I switched to sugar from honey for this version, as I’m adding the Yudane, which needs a bit of extra water to activate. So I tried to reduce the water in the remaining ingredients a bit, without losing protein (otherwise the cottage cheese would have been my easiest way).
- Kosher Salt – I use Diamond Crystal in all my cooking and baking. It has a very fine structure, so it has less saltiness in volume than, say sea salt (but the same by weight). So if you use sea salt, use half the amount in volume than given in the recipe.
The Wet
- Sourdough Starter – You can use either active starter or a few days old discard for this recipe. I tried both version and it works just fine. The bread flour acts as food for the starter, and it’ll only need a bit more time to rise. So essentially decide if you want to spend the time before mixing the dough by feeding the starter or after, by waiting for the rise.
- Sweet Potato – I used a fairly large one, as I only found that size in my local supermarket. You’ll need about 8oz/250g of peeled and cooked sweet potato, which is usually about a medium sized one. But do measure, as it impacts the moisture of the dough if you use more or less.
- Butter – The flavor of butter, even though there isn’t much added, really shines through in these fluffy and rich rolls. So use the best you can afford. I’m living in Ireland, so of course I’m using Irish butter, which has the highest fat content among all types of butter, making it incredible for baking.
- For this recipe I brown it (as so often) to reduce the water content even further, making room for the above mentioned added water and giving the rolls a lovely nutty flavor while we are at it.
Toppings
These are optional but encouraged.
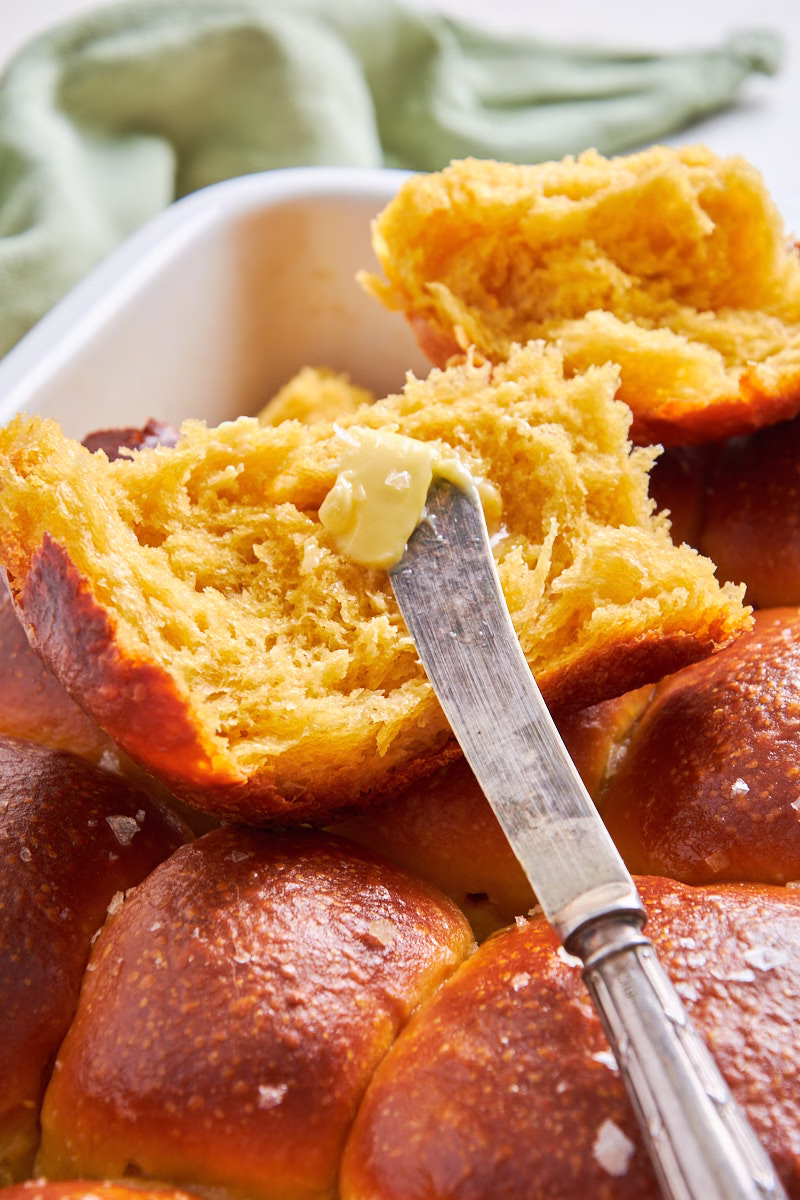
- Extra Butter for brushing – Not only does a finishing brush with butter add a lovely shine and mouthfeel to these bright orange beauties, but it also gives a croissant-like flavor and texture if you re-heat them in the air fryer a day later. There is an incredible flaky crispness to the outsides, which in itself is plenty of reason to make a double portion (or hide some to have leftovers!).
- Maldon salt – Or any flaky sea salt, is lovely sprinkled on top as finish. There is just something about the contrast of the slightly sweet insides and an intense burst from a flake of salt, that makes the rolls even more irresistible than they already are.
substitutions
Please note: Baked goods tend to have a careful balance of ingredients. While one swap will work, every additional one increases the risk of affecting the dough in various ways. So substitute carefully.
Protein Boosters:
- Eggs – Swapping eggs is always tricky, as they contribute so many different things to a dough: Fat from the yolks, moisture from the whites mainly, protein for structure and of course flavor. So while I would not advise to replace them in this recipe, you could try to use 40g more flour and 60g more cottage cheese instead. Beware that I have not tried this, but from a calculation perspective, taken from “The Elements of Baking” it should work reasonably well. Though you’ll have less protein.
- If you do try, I’d love to hear about the results!
- Cottage Cheese – You can replace it with 4% fat Greek yoghurt or the vegan version of it. Though for the vegan ones, be mindful of the ingredients. I found some have a lot of sugar in them, which really changes the flavor. Your protein content will be a little lower if using Greek yoghurt or any kind.
- Protein Powder – Casein powder works well, but needs about 1-2 tbsp more water. So does upcycled Barley protein, which needs 1-2 tbsp less water. (Reduce or add from/to the Yudane).
- I have not tried to bake with any pea based vegan protein powders, as I deeply dislike the flavor and texture of them to begin with, so I’d rather not have them in my baked goods. If you give it a try, please tell me what you think!
The Wet
- Sweet Potatoes – If you can find the purple sweet potato variety, it makes for a fun colour play. Pumpkin puree works too, making these into pumpkin dinner rolls, though you’ll want to reduce the water by 2 tbsp. Alternatively standard white potatoes will work but give you less sweetness and none of that pretty, seasonal orange tinge.
- Butter – Vegan butter will work great here, as it can be browned too. I haven’t tried oil, but since the butter gets browned and with that the water content evaporates, a neutral oil might work too.
- Sourdough Starter/Discard – If you don’t have sourdough, you can still make these rolls with a little modification. Add ¼ cup flour and ¼ cup water plus about 2 tsp active dry yeast. The flavor will be different, but still delicious.
The Dry
- Sugar – I know many of you are trying to reduce white sugar, so here are some options to use instead: Coconut sugar (lovely in these rolls), brown sugar and cane sugar all work very well.
- Xylitol will work too, though lead to less browning as it doesn’t caramelise.
- As for liquid sweeteners: I switched from 1/3 cup honey to sugar in this recipe to gain a bit of capacity for liquid in the Yudane. If you want to use maple syrup or honey you can but might need a few tablespoons more flour. Go by your feel for the dough.
- Strong White Flour – You can use AP flour instead but reduce the water by a few tablespoons. The rolls will be more tender and might not rise as high. If you want a slightly more wholesome recipe, you can replace 1/3 of the white flour with whole wheat flour. Ideally the strong version.
Variations
- As mentioned above in the substitutions you can transform these into pumpkin dinner rolls by using pumpkin puree and a little less water. They won’t be as soft, as pumpkin has less starch than potatoes, but still slightly sweet and pretty orange.
- Make them savory by adding just 2 tablespoons of sugar and frying some chopped herbs like fresh rosemary, thyme or sage in the butter while browning.
- Take the dinner rolls over the top by kneading in some grated cheese right before the bulk ferment. About 1 cup of sharp cheddar would be incredible.
- Make them even sweeter by brushing whipped honey and cranberry butter over the tops after baking. Cinnamon-honey butter is also lovely!
- Talking about sweet and cranberries: You could absolutely knead in 1 cup of dried cranberries before the bulk ferment.
- If you enjoy some crunch on top, dip each shaped roll into some seeds before putting them into the baking dish. Sesame is particularly lovely.
Equipment Used
- Saucepan – For both boiling the sweet potato and browning the butter
- Blender – I’m using a Nutribullet. Mainly to get the cottage cheese really lovely and smooth. But it also helps to blend protein powder, sweet potato and eggs into one super creamy mix.
- Dough Whisk – I use a dough whisk for sort of pre-mixing my dough, getting a feel for it’s moisture, before letting the stand mixer do the hard work. And for the times when the stand mixer just seems to spin through the buttery dough, without actually mixing it.
- Stand Mixer – While you can absolutely mix the dough by hand, it’s pretty sticky, so I find it easier to use the stand mixer. This is a fairly soft dough, so even one with lower power will be fine.
- Casserole Dish – About 9×13” or a large ovenproof pan. I feel a standard cast iron pan will be too small, but a large and deep sauté pan should work.
 Buy Now →
  Buy Now →
  Buy Now →
  Buy Now →
  Buy Now →
 How to Make this
These Sourdough Sweet Potato rolls with protein do take a bit of time to make, but most of it is hands off rising/fermentation time, which leaves you plenty of room to get any other prep in for the holidays and allows for easy planning ahead.
Bakers Schedule
Day 1
Feed Your Sourdough Starter, ideally in the evening.
Day 2
Start in the morning if you can.
Cook the sweet potato and brown your butter, so they can cool a little bit.
Mix your dough. This will take about 10 minutes.
Stretch and Folds
For the 90 minutes after mixing the dough, do a set of stretch and folds every about 30 minutes (don’t worry if this isn’t exact).
Bulk fermentation
You can do this on the day of mixing the dough or the day after. Allow the dough to rise at room temperature until about doubled for 3-6 hours. The time it takes hugely depends on room temperature, your flour, the temperature your ingredients had when mixing and how active your starter was.
Go by feel and look. If the dough looks about doubled, is bubbly underneath, comes away easily from the sides of the bowl and springs back slowly when you poke it gently, it’s ready.
Overnight Cold Ferment
This is not strictly necessary, and you can bake right after shaping and the last proof, but it hugely improves the flavor and make the protein easier bioavailable. Plus it frees time in the day I feel. You can leave your dough in the fridge for anywhere from 8 hours up to 3 days.
Shaping and Last Proof
The shaping only takes a few minutes and then the buns can proof right in the baking dish until doubled in volume. This takes 1-2 hours usually.
After that you can either bake right away or put them covered into the fridge for up to 3 days (all in all fridge time. So not 3 more after 3 days of the dough sitting in the fridge) until you are ready to bake.
Bake
These sweet potato rolls take about 25-35 minutes to bake.
This schedule and the rough time estimations, plus the fact that you can switch up the times when you do the cold fermentation and shaping mean this recipe, just as most sourdough recipes, is incredibly flexible and forgiving when it comes to busy holiday (or workday for that matter) schedules. Plan around what suits you.
Detailed Instructions
Day 1
Feed your starter.
I assume you have an existing sourdough starter. If not, either ask a bakers friend if they share theirs or start a week earlier and follow the instructions in this post on how to create your own sourdough starter. It works for both rye and white flour.
Simply stir together water and flour until you have a relatively stiff starter, then allow it to rest, loosely covered overnight or until nice and bubbly and about doubled in volume.


I found using just a tiny bit less water (about 10ml) than the weight of the flour and only 1 part existing starter gives me the most active and flexible starter with a much longer peak time. So it’s very forgiving in when I use it.
Day 2
Get all your ingredients ready
This will save you a lot of time and running back and forth (and, if you are like me, probably forgetting something in the process. You can essentially bet that I forget something in nearly every recipe test I do. It’s a miracle that most work out anyway!)
Brown The Butter
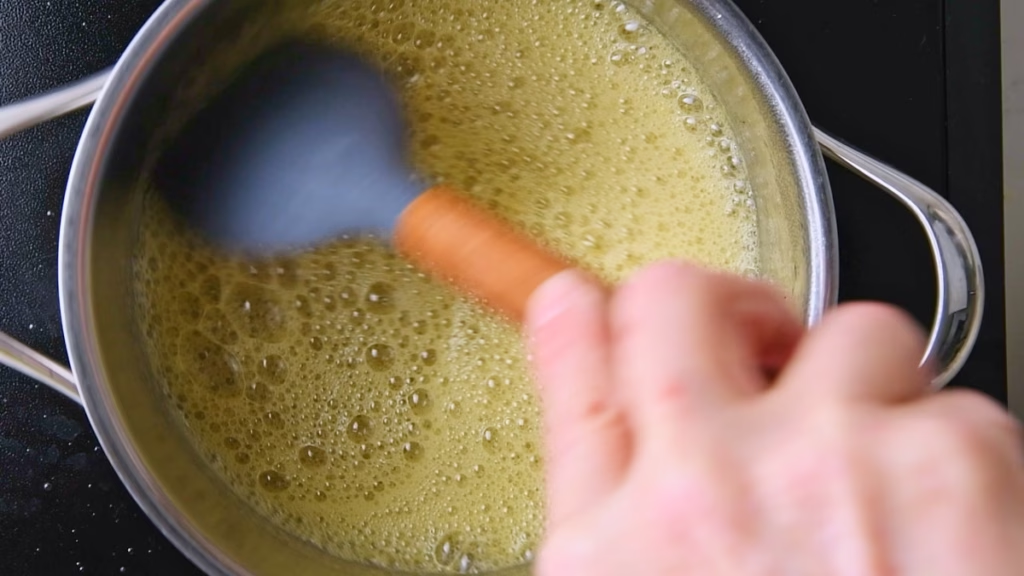
Start by browning your butter, as you’ll want it to come to room temperature before you use it. You could do this the day before as well.
Grab a heatproof bowl to transfer your browned butter into when it’s done.
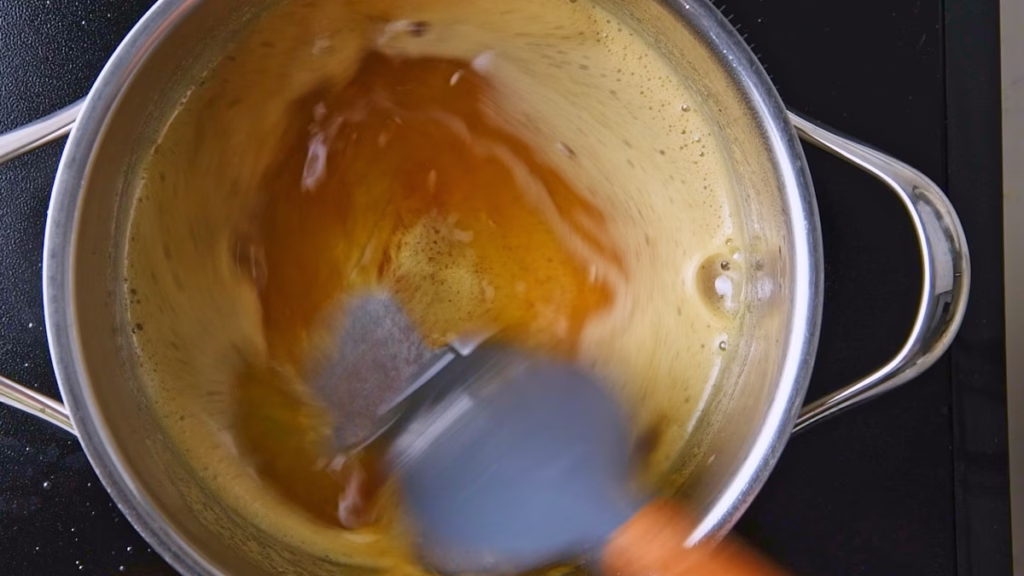
Add your butter to a saucepan and allow it to melt over medium high heat. Once it starts to wildly bubble, turn the heat down to medium/low and keep stirring, ideally with a silicone spatula or wooden spoon, to scrape off any sticky bits from the bottom of the pan constantly. This is where the flavor lives!
Once the foam changes in sound and bubble size (they will suddenly turn a lot smaller) watch it like a hawk. The water has evaporated, and the browning will now be very quick. Keep stirring and take it off the heat once it smells nutty and delicious and you see golden brown specks under the foam.
Pour into your waiting heat proof bowl to avoid burning in the still hot pan. Happened to me more than once!
Boil Sweet Potatoes
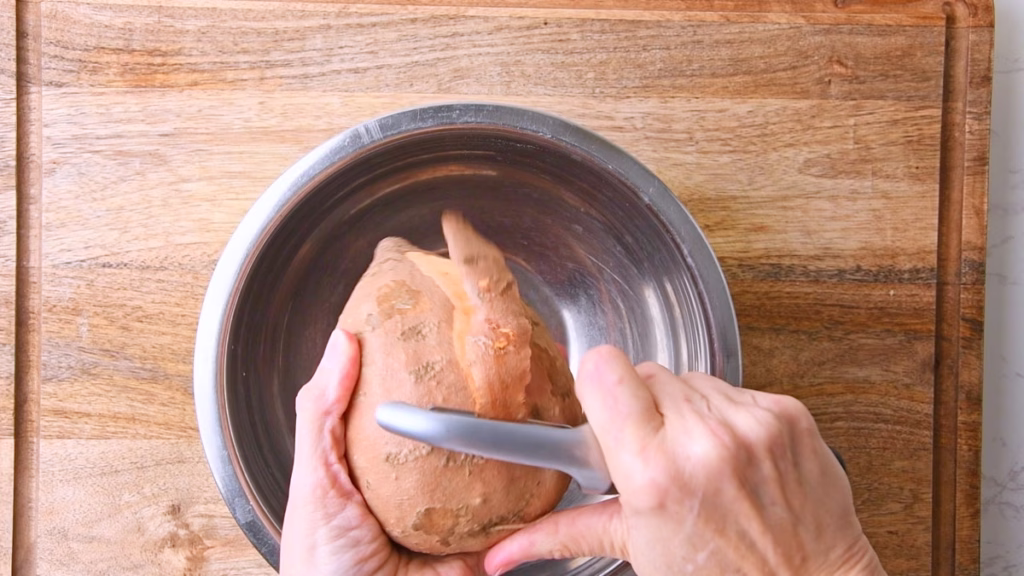
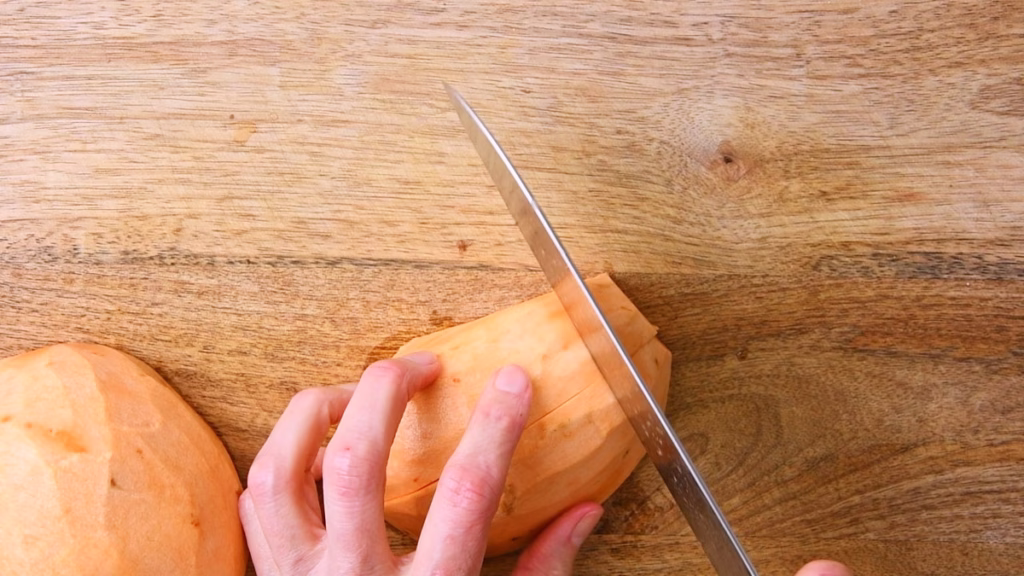
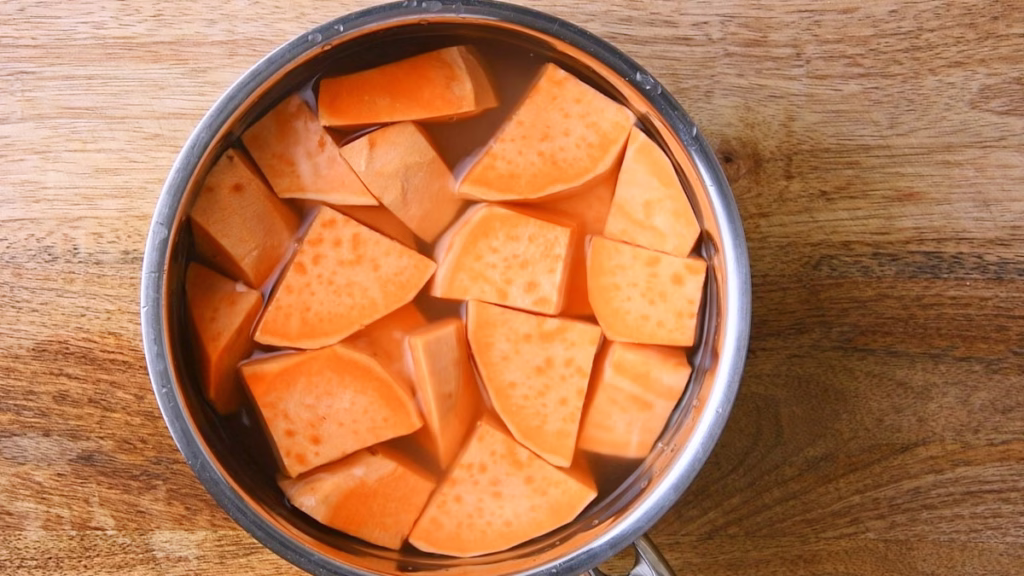
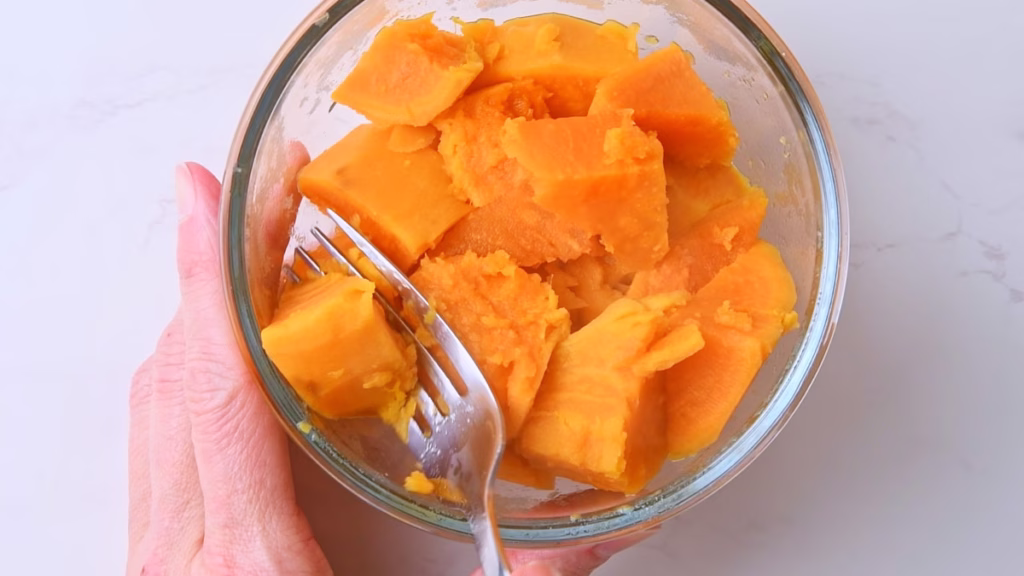
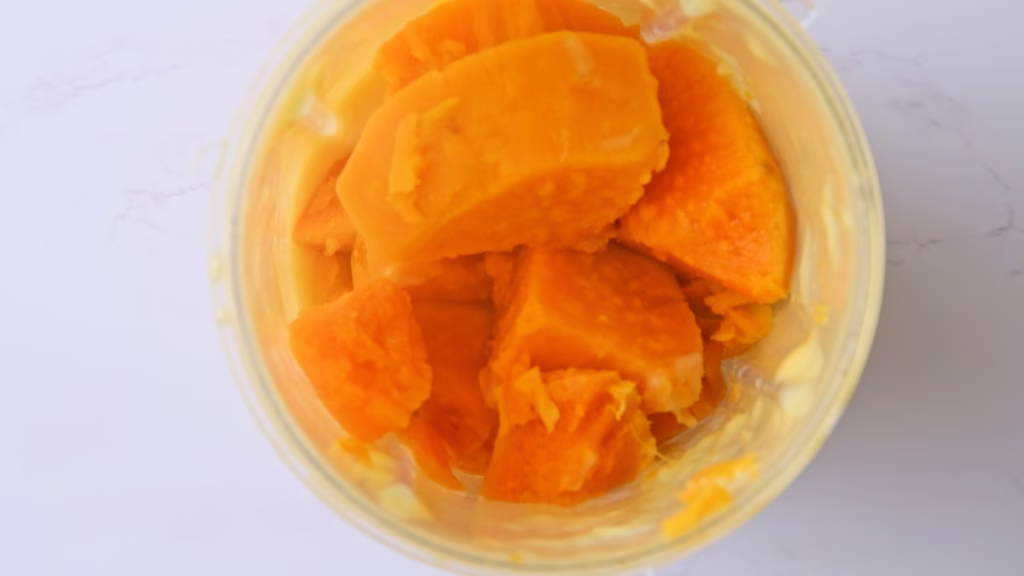
Peel your sweet potato and cut into large chunks. Just cover with water (don’t add salt) and boil for 15-20 minutes or until you can very easily smash them with a fork. They should be really tender.
Take the potato pieces out with a slotted spoon and allow them to drain and cool a bit in a colander.
Don’t throw out the cooking water, we still need all its starchy goodness for the Yudane.
Mix The Yudane
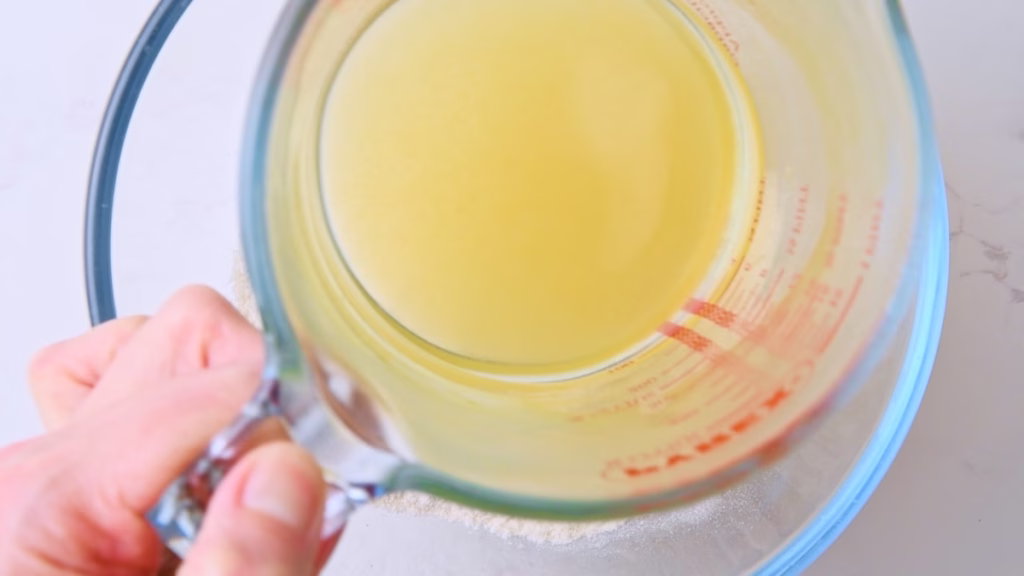
Now, while your cooking water is still boiling hot (if it cooled, just re-heat it) measure out ½ cup from your flour and put it into a heat proof bowl. Pour ½ cup of the sweet potato cooking water over it and stir with a spoon until you have a smooth mix.
This might seem weird if you never tried the Tangzhong or Yudane method, but it gelatinizes the starches from the flour and gives these dinner rolls their incredible softness, holding onto even more moisture than your flour and the starch from the potatoes usually would. If you ever tried one of those super soft Japanese white breads: This is their secret.
Allow to stand and cool down a little while you get on with the recipe.
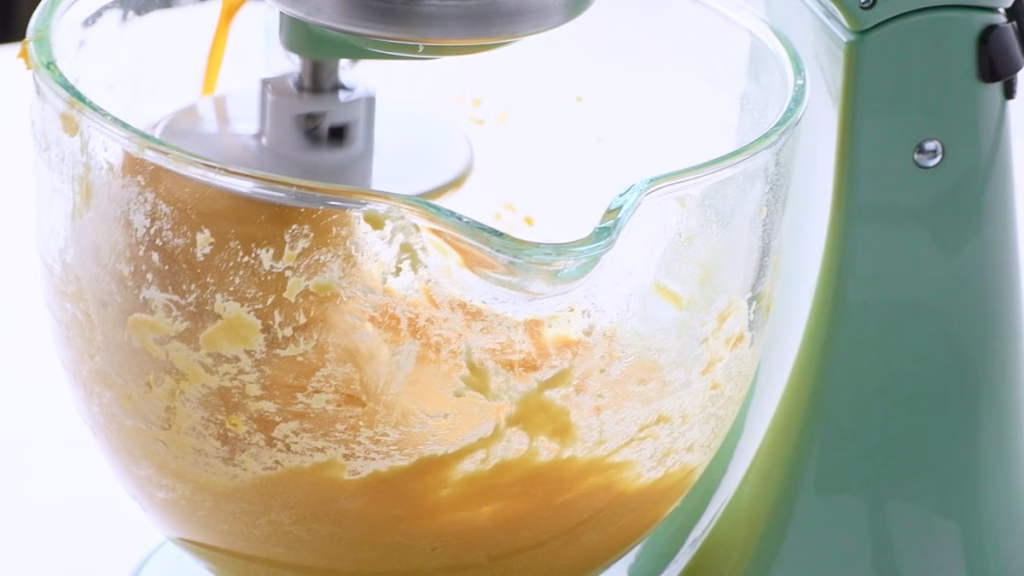
Blend The Protein Ingredients
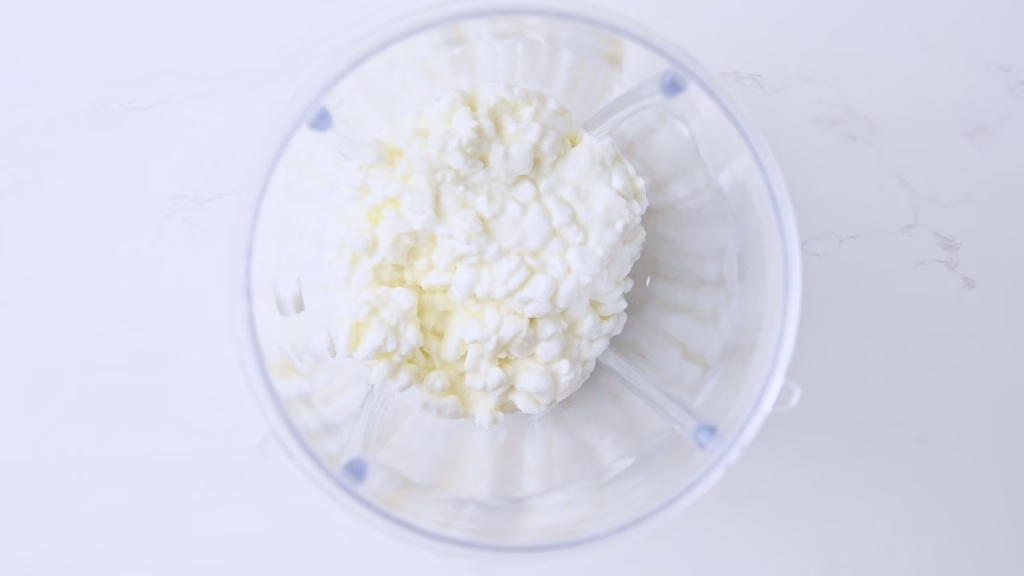
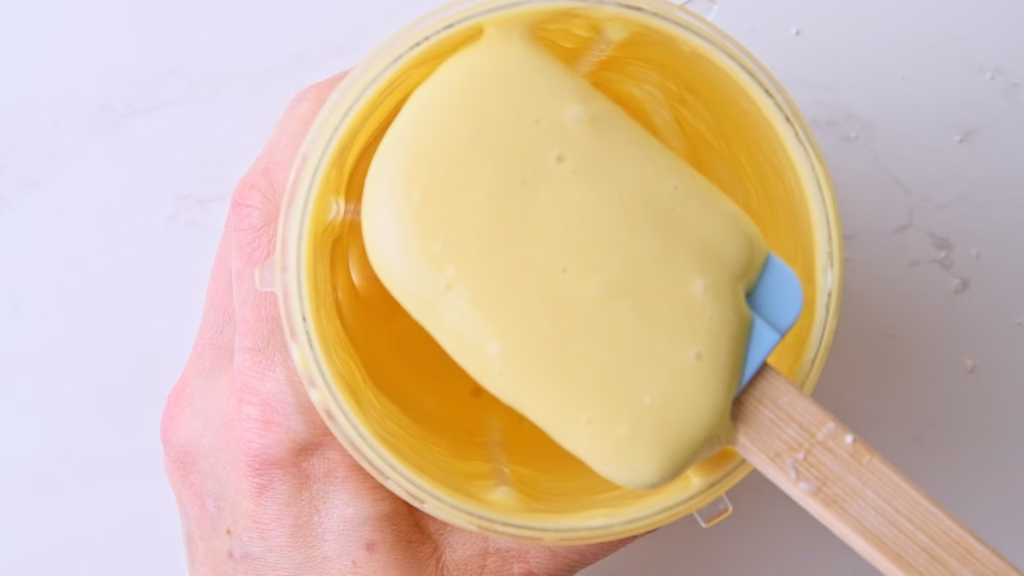
In your blender, add first the eggs, then protein powder, then top with the cottage cheese. These layering is your best chance to not end up with protein powder stuck to the lid, as it’s sandwiched between the two liquid ingredients. Blend until smooth. If any powder did get stuck to the sides, scrape them down and blend again.
Add the measured cup of sweet potato to the blender and blend that in too.

I’m a little mindful of not adding the hot sweet potato right next to the egg, to avoid any potential coagulation, but if yours has cooled down a bit first, you could add it straight away with the rest.
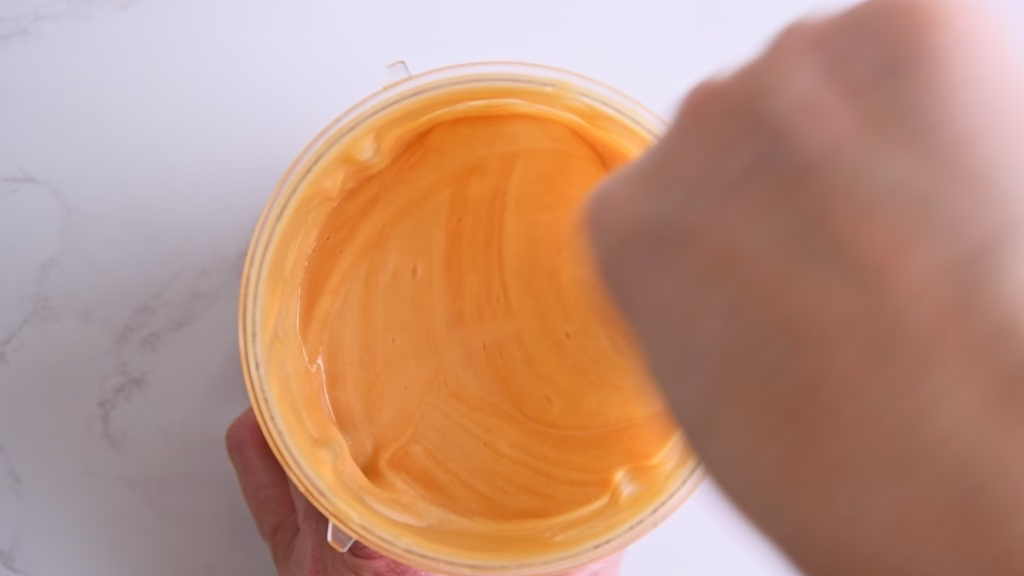
You’ll be left with a super creamy, lovely orange mix. Tempting, isn’t it?
Stir The Sourdough Starter In

Because I don’t want to damage the delicate gluten structure of my starter, I never blend it in.
This is the time to gently whisk it into your creamy cottage cheese blend.
I use a dough hook, but any whisk or even a fork will do just fine. You’ll just want it relatively smooth without any big “blobs” of starter.
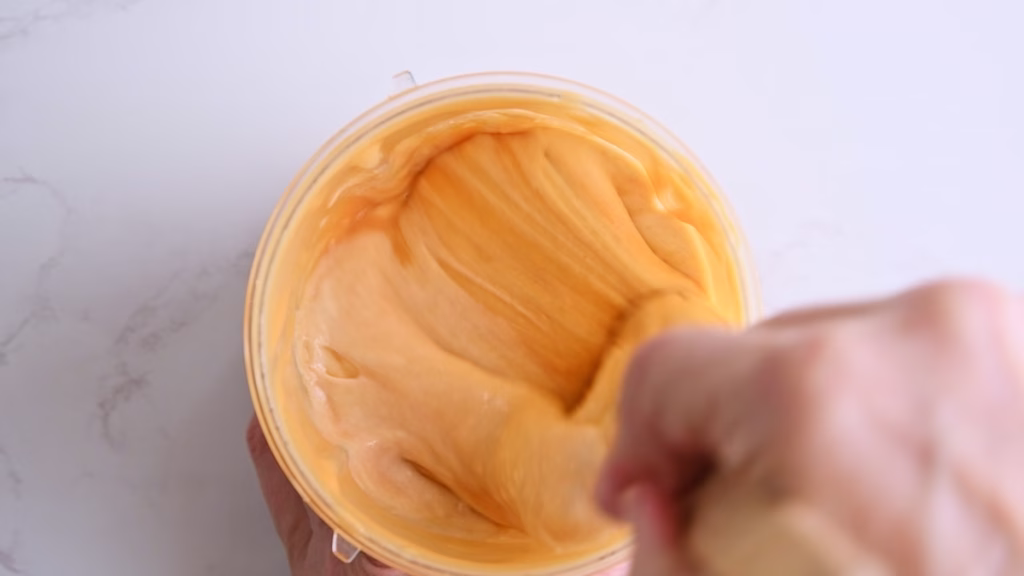
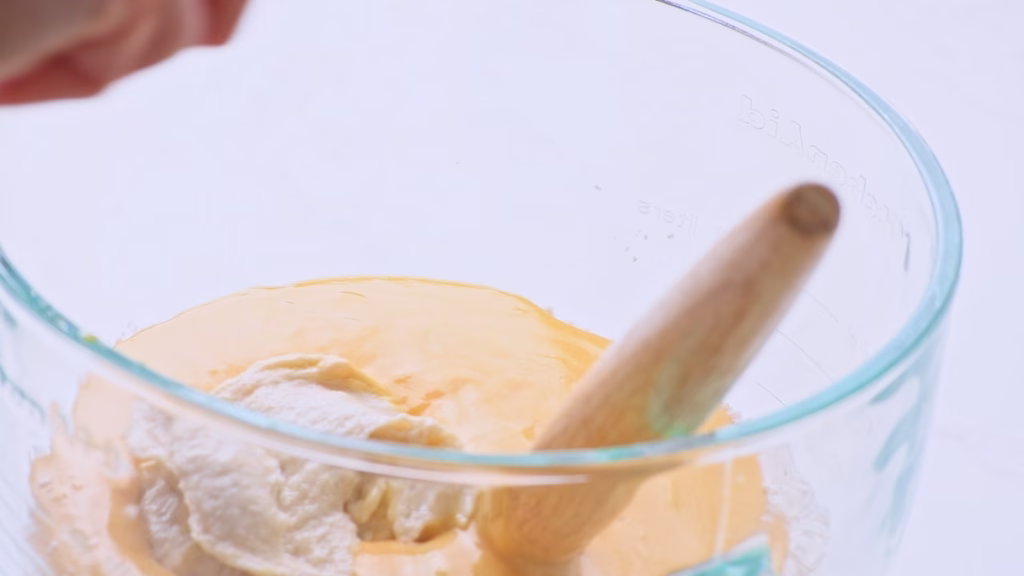
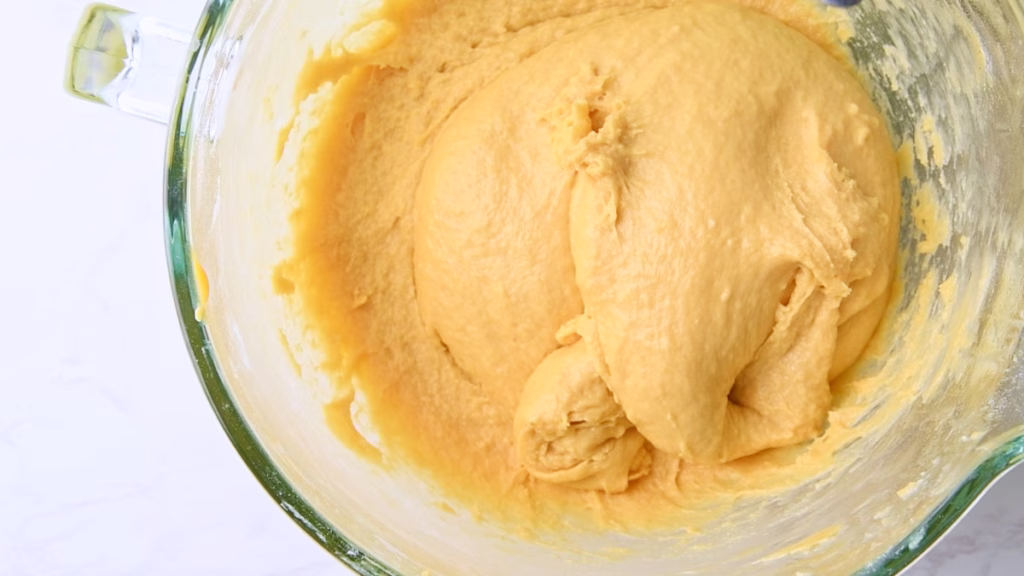
Mix The Dough
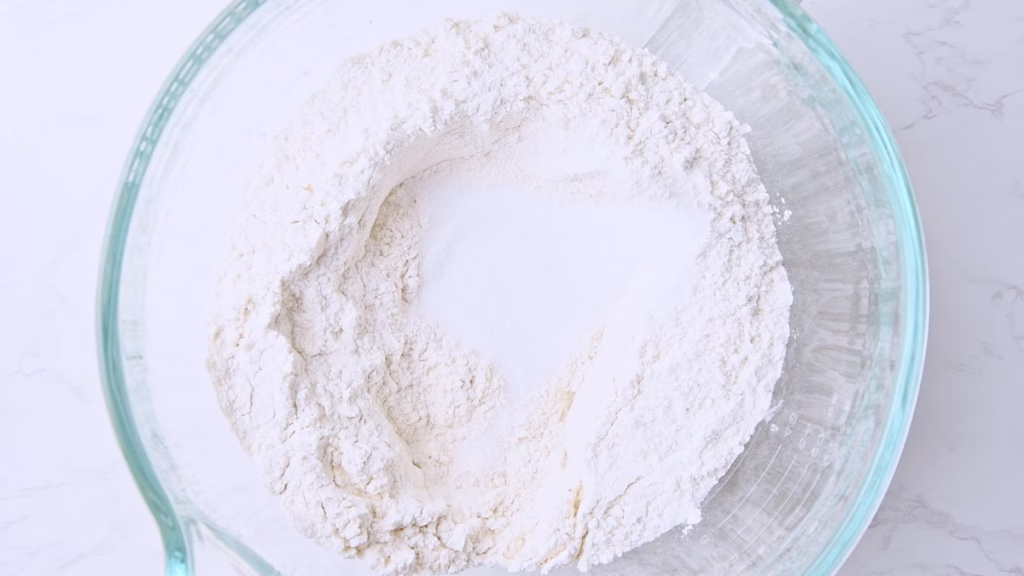
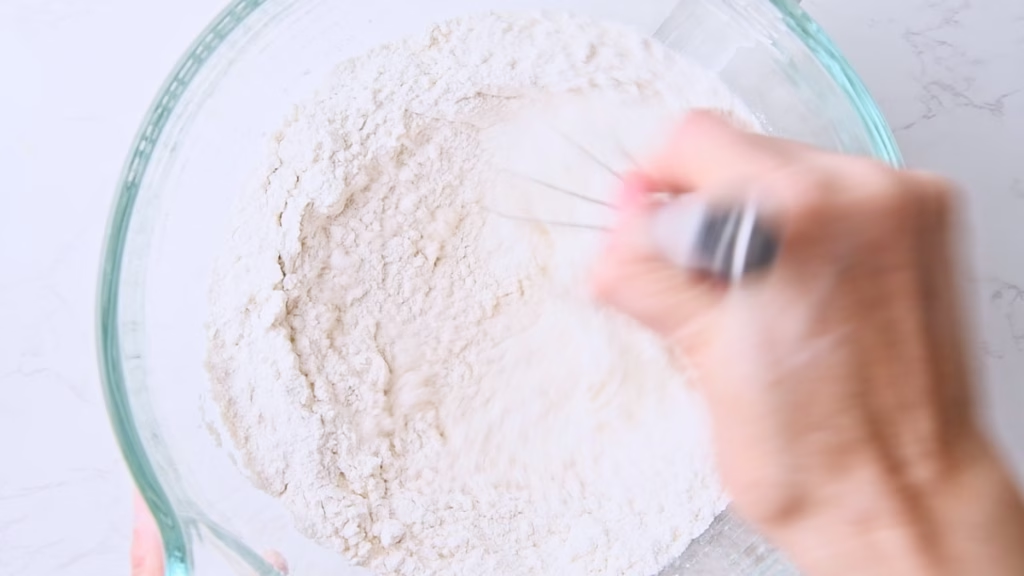
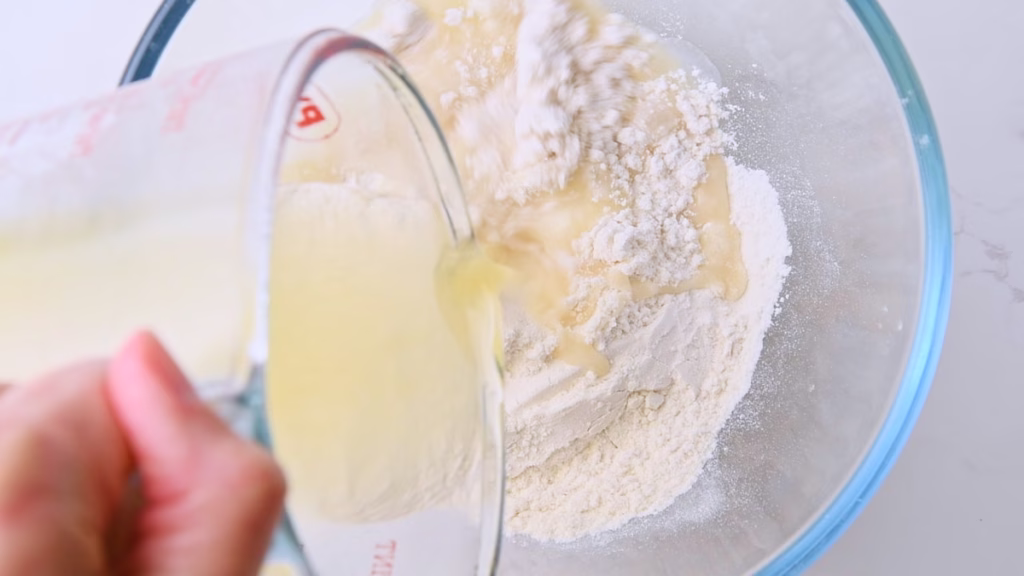
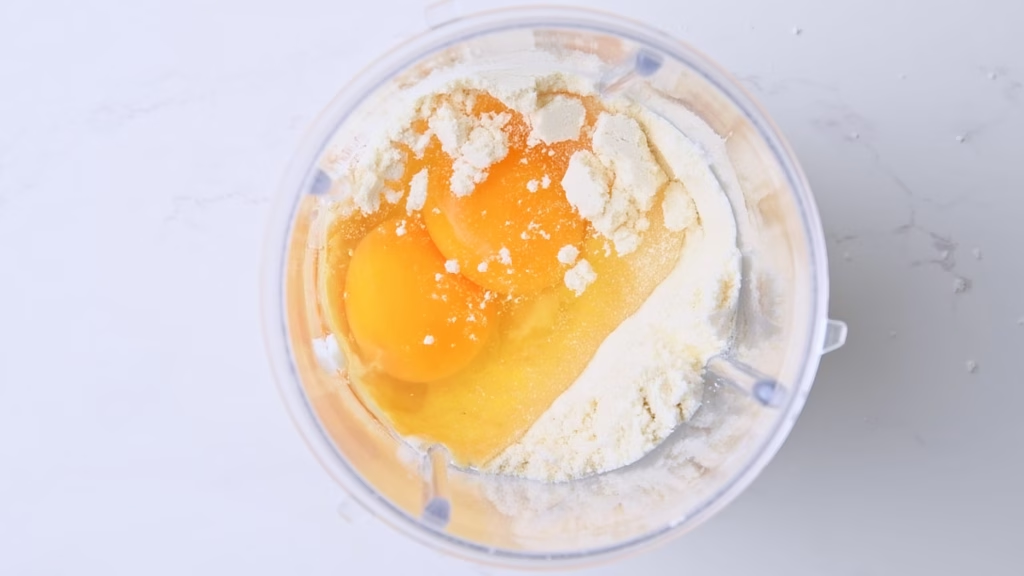
In a large bowl (I used the glass bowl from my Kitchen Aid), mix your flour, salt and sugar briefly.
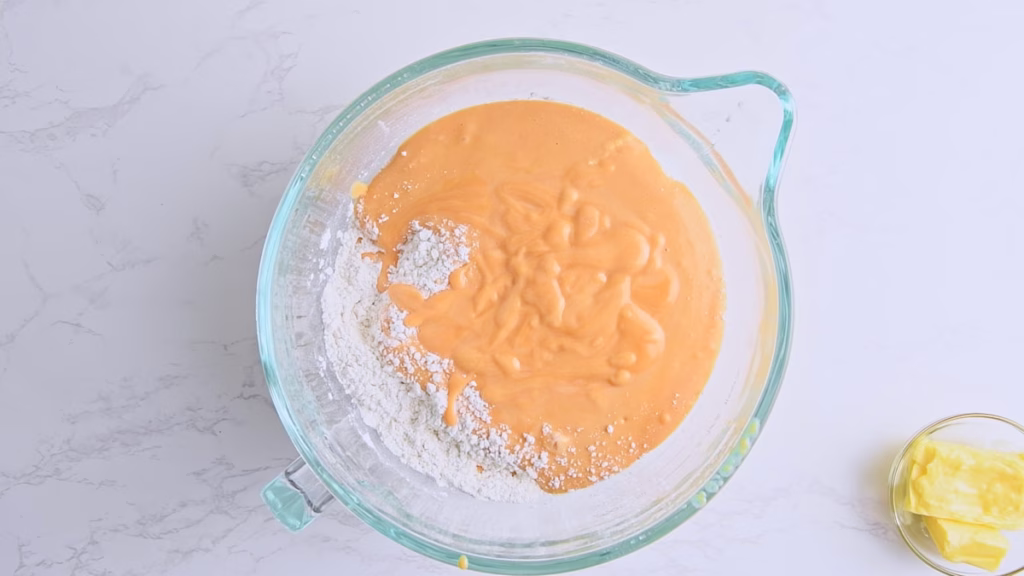
Then stir in the liquid mix and the Yudane but not the butter yet.
Butter will coat the flour and inhibit gluten formation, which we want later, but not quite yet. To get the perfect fluffy rise we are looking for, we need the flour to absorb most of the liquid and develop some gluten before the butter gets added.
You can use your stand mixer for this step but only mix briefly until just combined. Don’t knead for a long time or you might overdevelop your dough.
Autolyse
Now allow the dough to stand, covered with a damp towel or cling film, for about 30 minutes, so the flour can absorb most of the moisture.
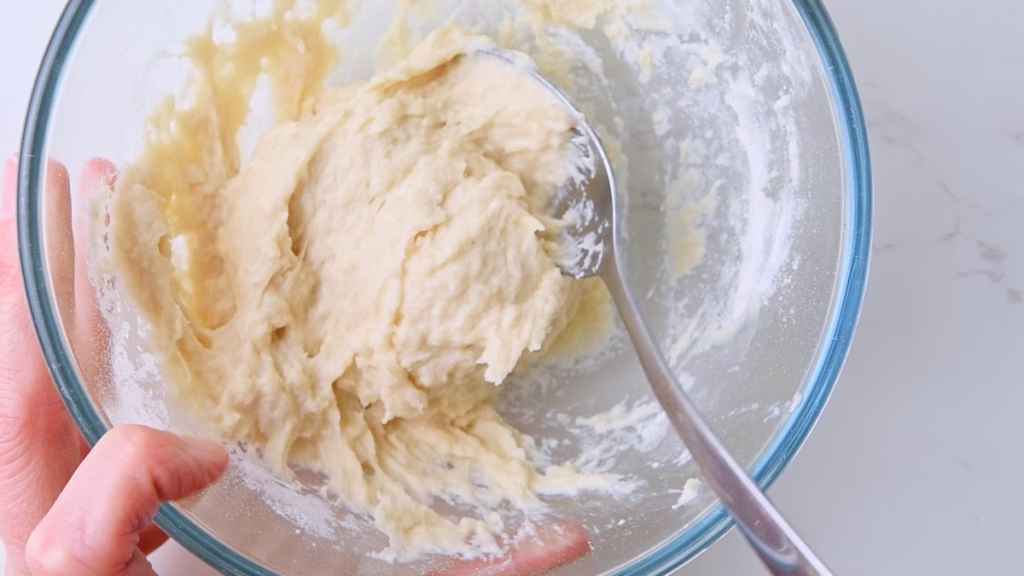
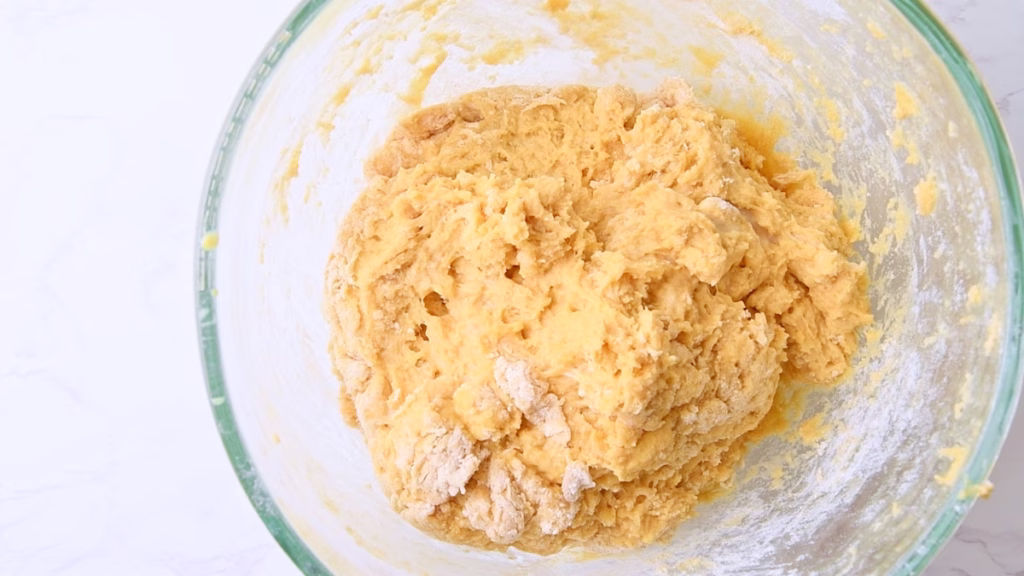
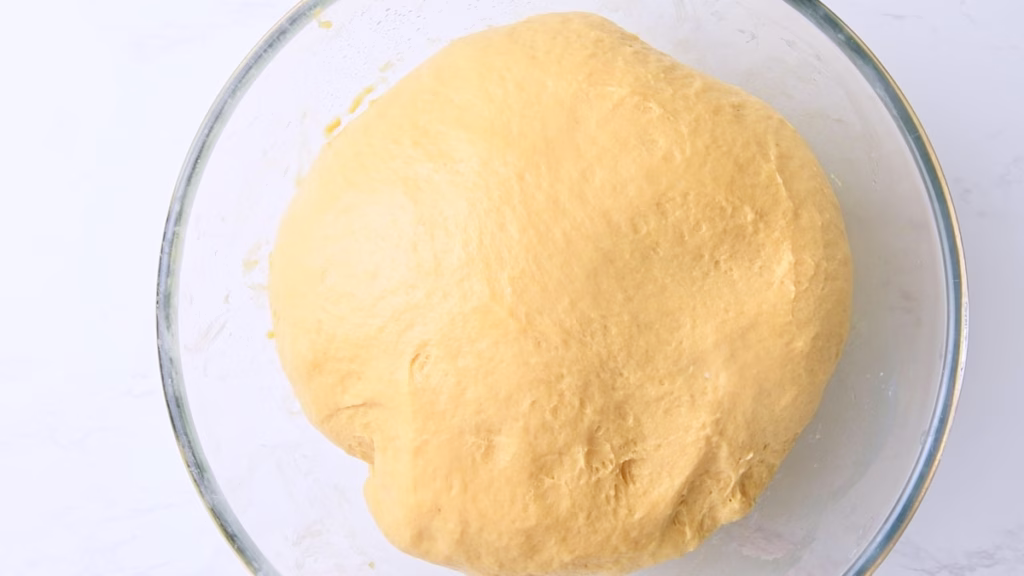
Knead In The Butter
You can do this by hand, but I used my stand mixer for this step, as it does get a bit messy and sticky.
Whichever method you use, add the butter slowly, kneading in a bit, then adding more.
Or, if you are as impatient as I am, pour it all in, then curse as the mixer spins in circles without grabbing the dough, use the dough whisk and then finish with the mixer until you have a smooth and uniform dough. Again, don’t mix too long.
Assess Your dough at this point, It should be soft and sticky, but not runny or batter-like. If it looks way too moist, add 2-4 tbsp of flour. This will depend on your flour, the moisture content of your potatoes and, frankly, even the weather. I added 2 tbsp in my second test run but didn’t need any in the first. Despite the same recipe.
Tip:
If you only made yeasted dough before, it’s good to note that sourdough behaves very differently.
It will always be much wetter and stickier than yeasted dough, which tends to be dry enough to come away from the sides of the bowl during the first kneading. Sourdough will not. This will start to happen during the stretch and fold process. But it remains wetter, which is what makes it so incredibly bubbly and moist after baking.
In short: Don’t apply yeasted dough logic to sourdough.
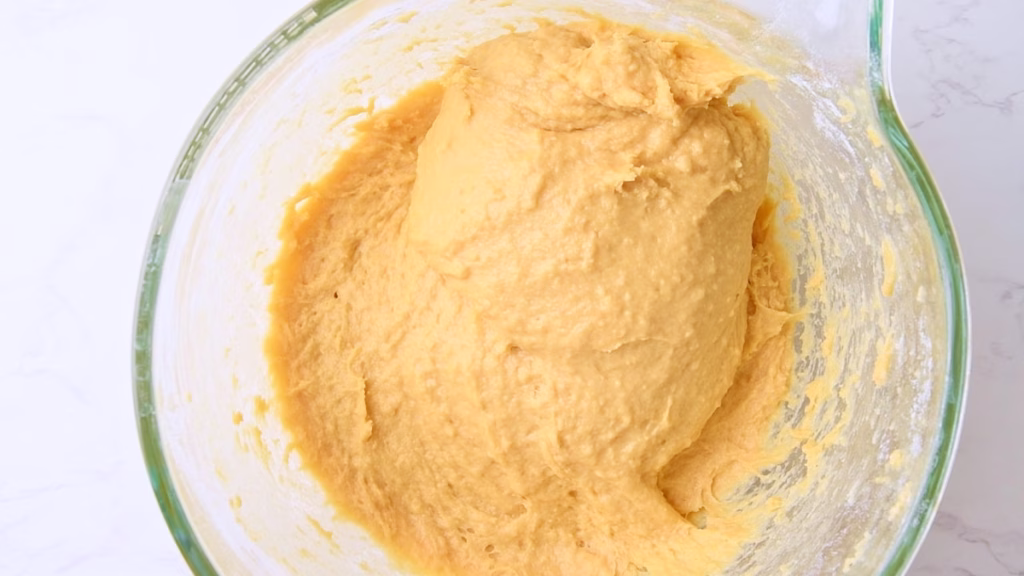
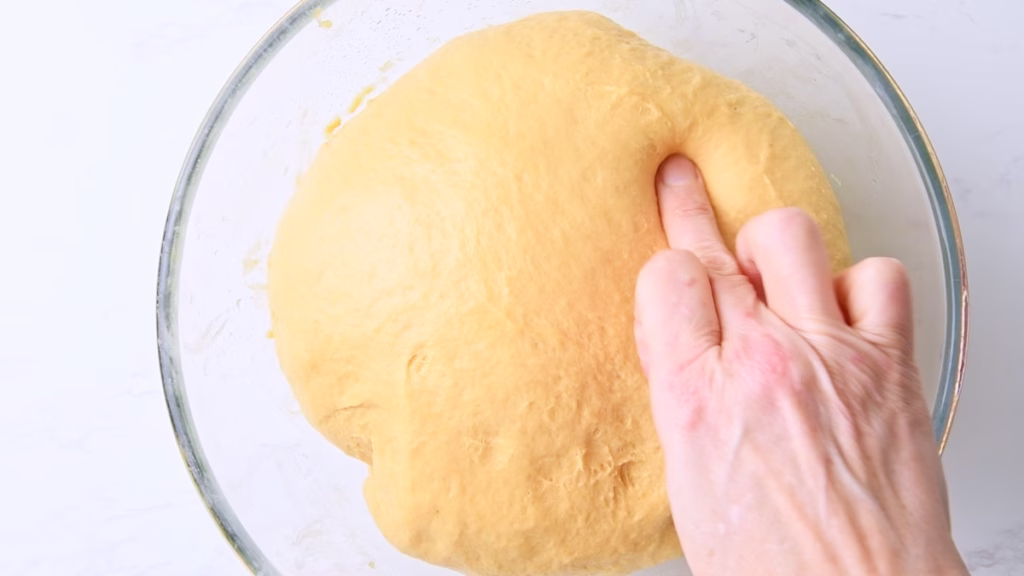
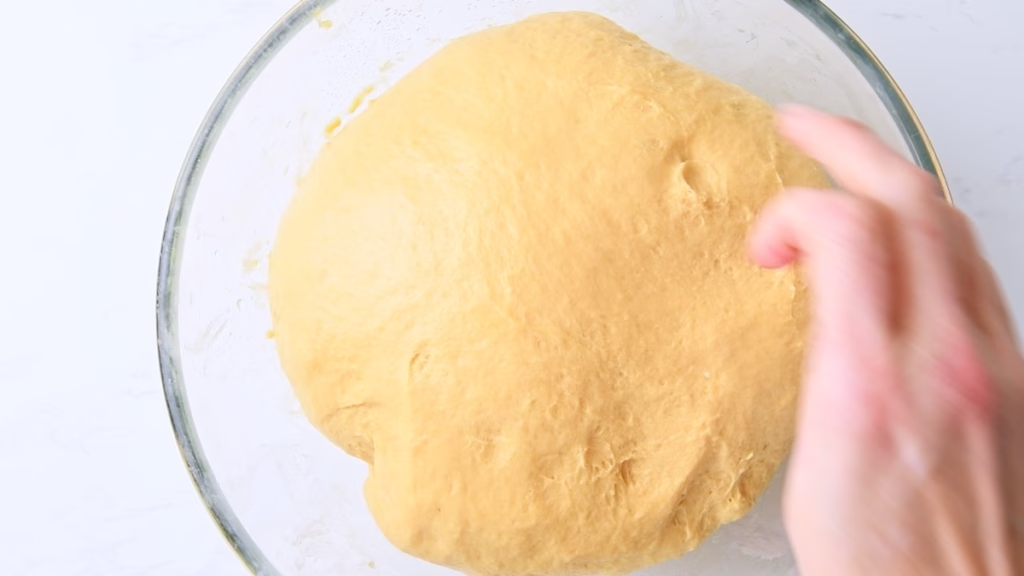
Stretch And Folds
Within the next 90 minutes or so, perform three sets of stretch and folds every 30 minutes.
To do this, wet your hands, stretch one side of your still very sticky dough up and fold it over the rest. Turn the bowl by 90 degrees, repeat twice. Then allow to rest for the next 30 minutes and perform the next set. Repeat once more.
Your dough should now look fairly smooth and be relatively easy to handle. It will still be slightly sticky. That’s perfectly normal for sourdough.
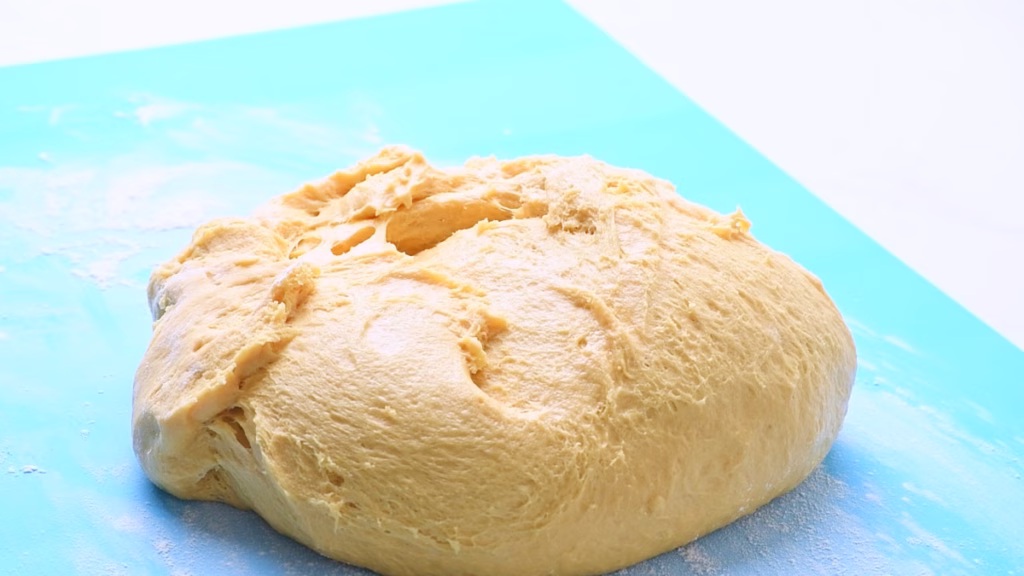
Bulk Fermentation
Transfer your dough into a lightly oiled and clean bowl, so it’s easier to turn out later.
Now you can either go ahead and let your dough bulk ferment covered outside (I usually use clingfilm or a lid, to keep it from drying out) of the fridge for 3-6 hours or until about doubled in volume or put it into the fridge overnight and do the bulk fermentation the next day. Decide depending on your schedule. Both methods work perfectly well.

The time it takes hugely depends on room temperature, your flour, the temperature your ingredients had when mixing, and how active your starter was.
My kitchen is around 70°F/21°C most of the time, which is perfect for this fairly buttery dough. It took about 6 hours to double in volume.
While I often say you can speed up the rising time with a cup of hot water in your switched off oven, I would not do that for this dough, as you don’t want the butter to get too warm and seep out.
The cool rise will keep a slight flakiness in your finished rolls. The dough is ready when it looks nice and puffed up, comes away from the sides of the bowl, showing a good network of bubbles and springs back slowly when you poke it with a fingertip.
Cold Fermentation
At this point you can cover your dough and allow it to cold ferment in the fridge overnight or for up to 3 days. The flavor will improve, adding a bit more of that delicious sourdough tang, nutrients will be broken down, to make them easier bioavailable and you’ll get all the gut friendly benefits from the sourdough.
You don’t have to do this, but it’s one of the best ways to get the perfect sourdough.
Shape your Sweet Potato Dinner Rolls
Once the bulk fermentation and cold fermentation (if you chose to do it) is done and your dough is nice and fluffy, grease your baking dish with a bit of butter.
Flour your work surface. I like using a silicone mat for easier cleanup.
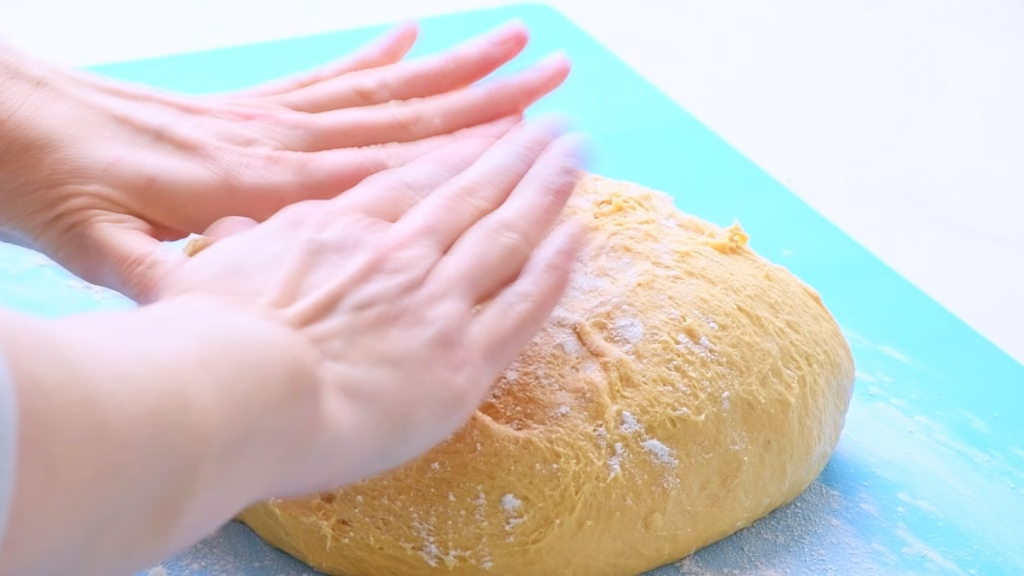

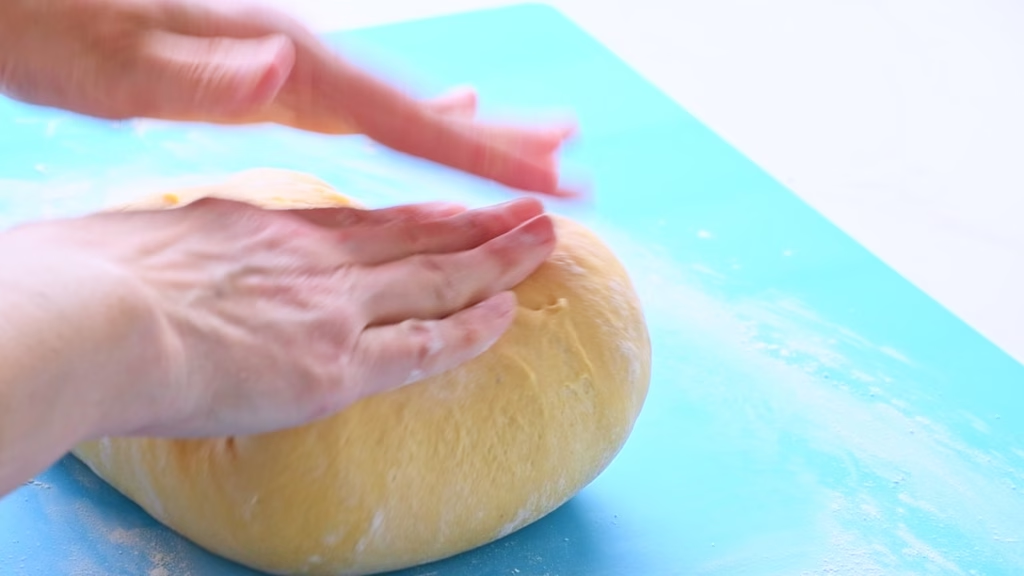
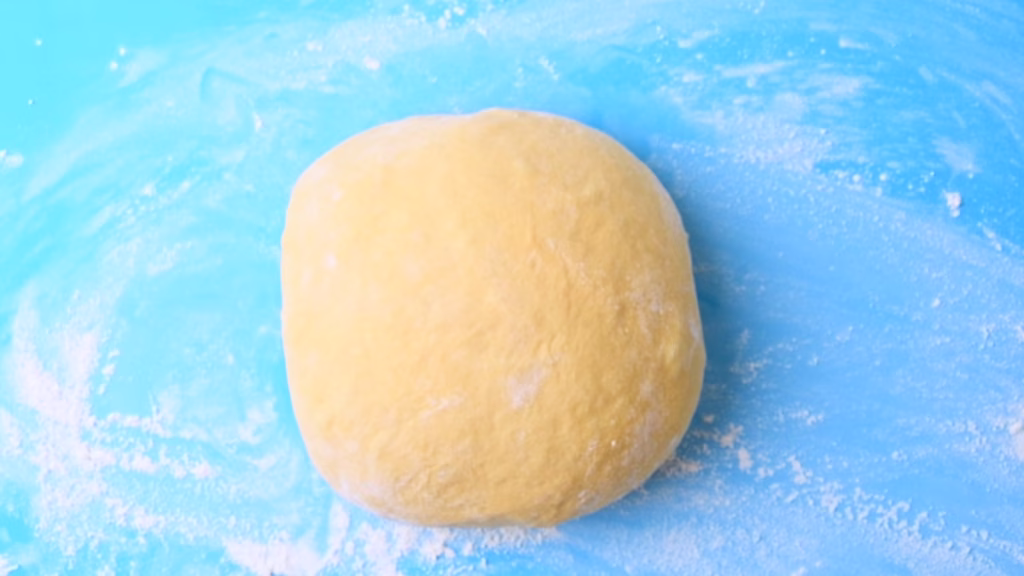
Turn out your dough, if needed using a dough scraper. Though with all the butter it usually comes out easily.
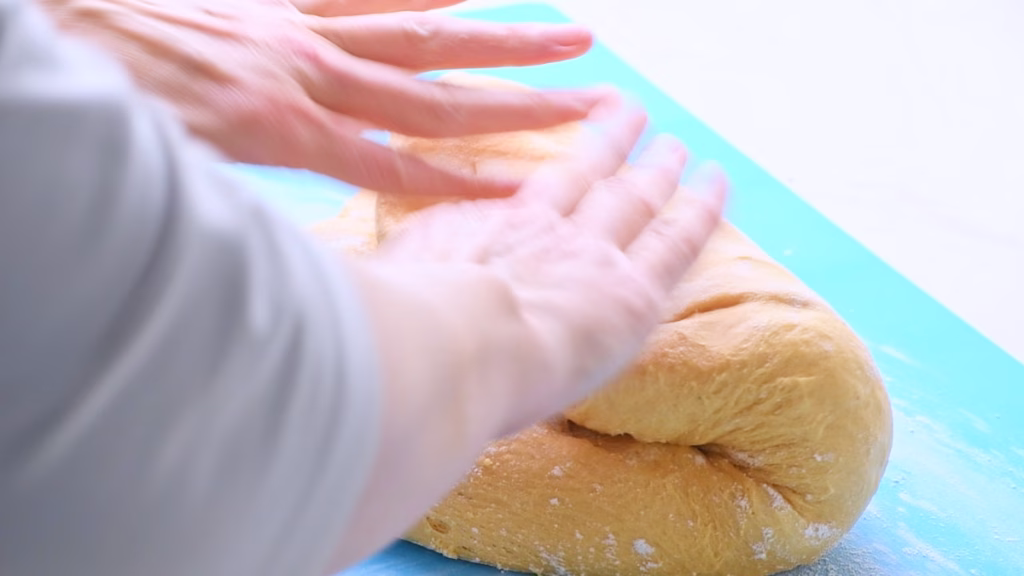
Now gently flatten in a bit and fold it into thirds like an envelope, then tuck under the sides and turn it with your hands, until you have a relatively round shape with a smooth top and a bit of surface tension.
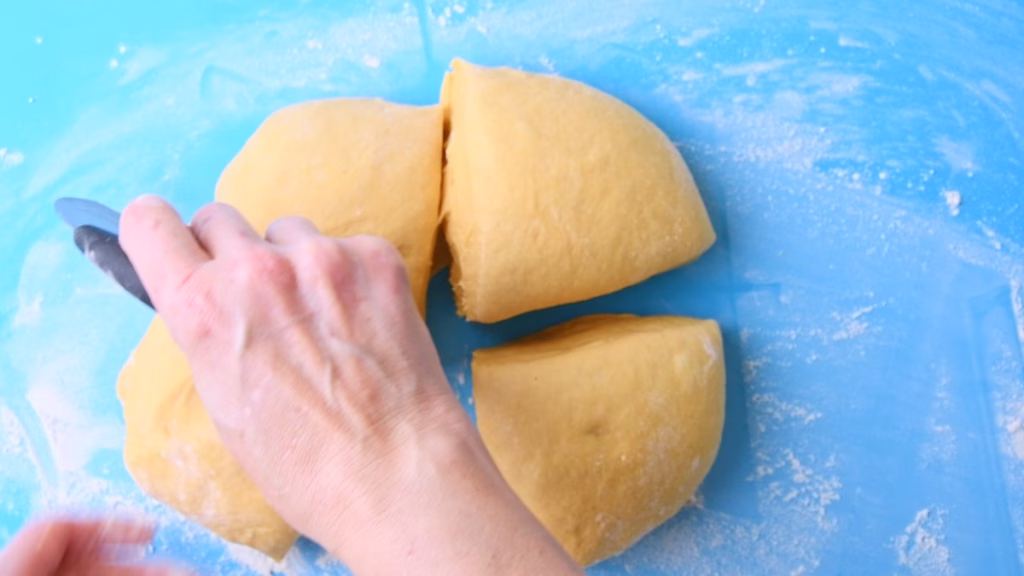
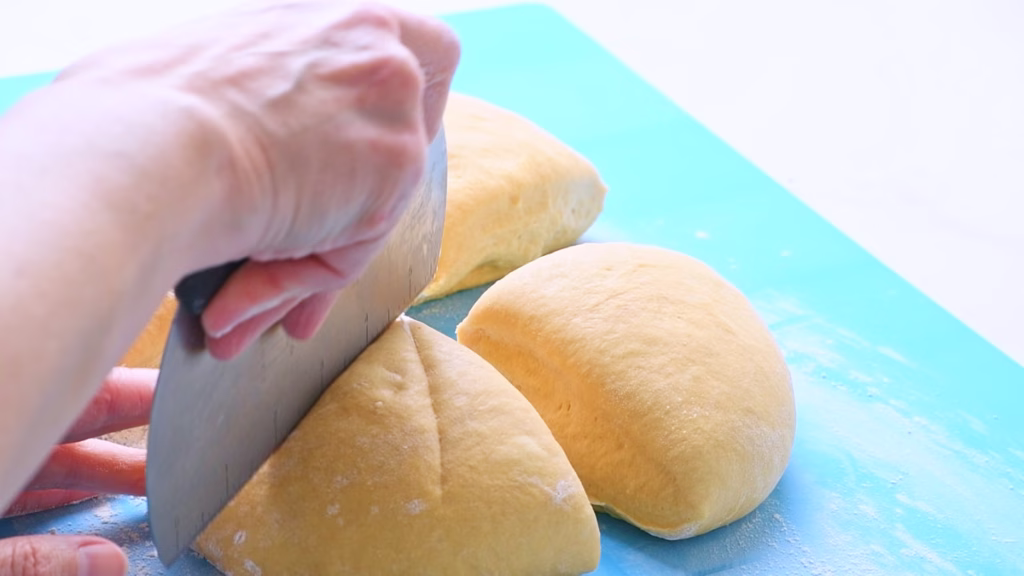
Using a dough scraper or knife, cut your dough into quarters. Then cut each quarter into three relatively even pieces. You could use scales, if you wanted them perfectly even, but I never bother. This is home cooking and should be as stress free as possible!
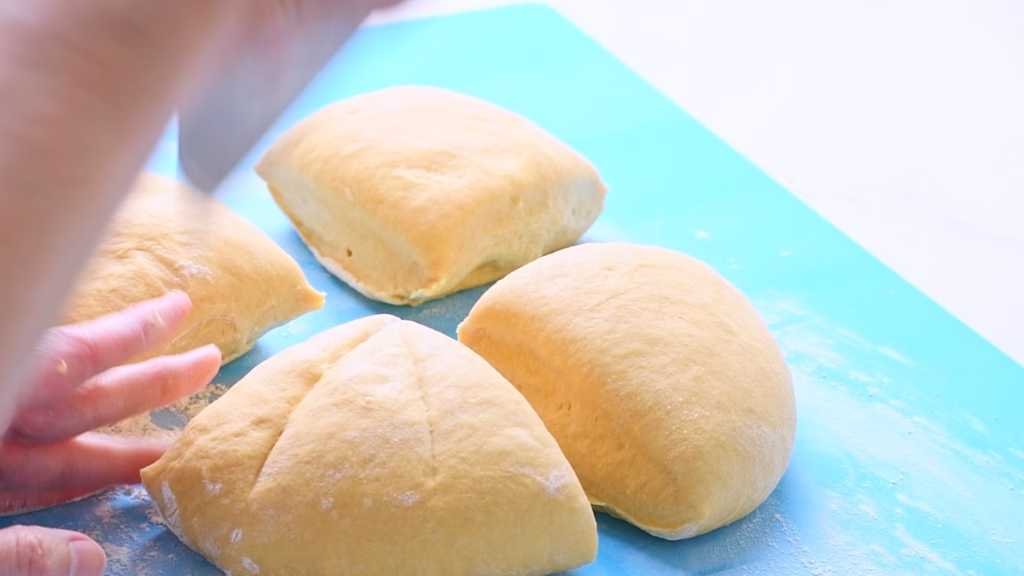

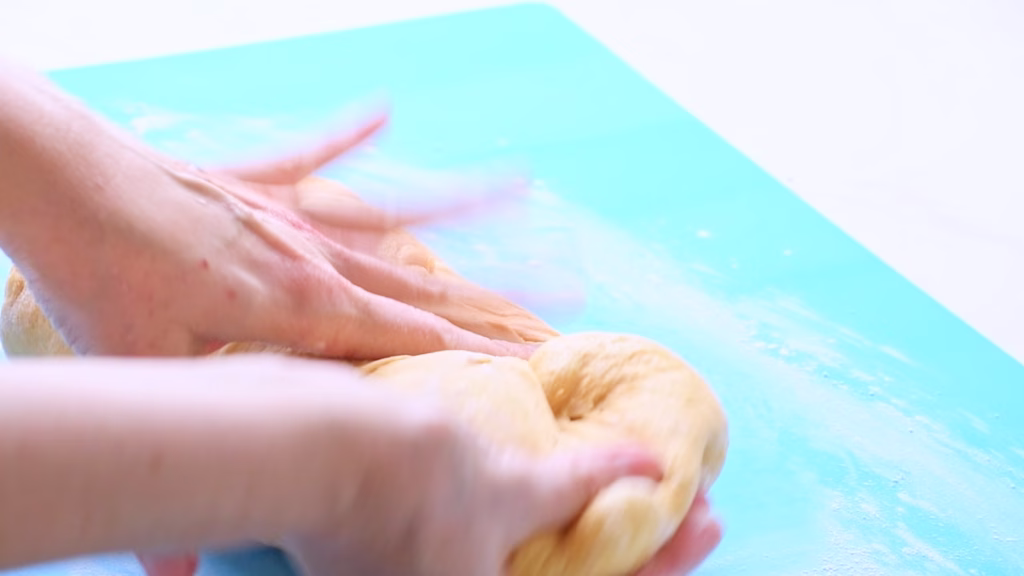
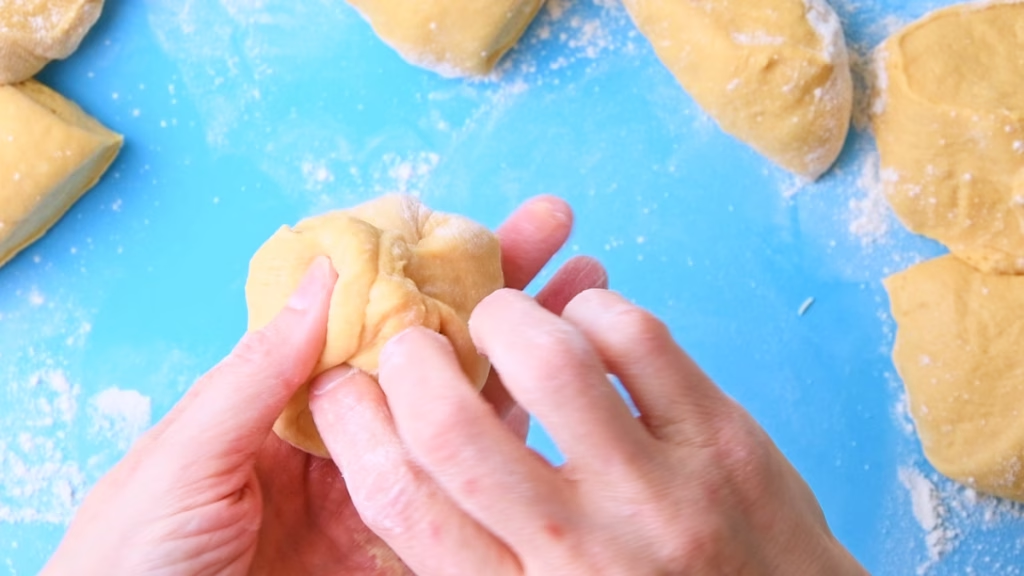
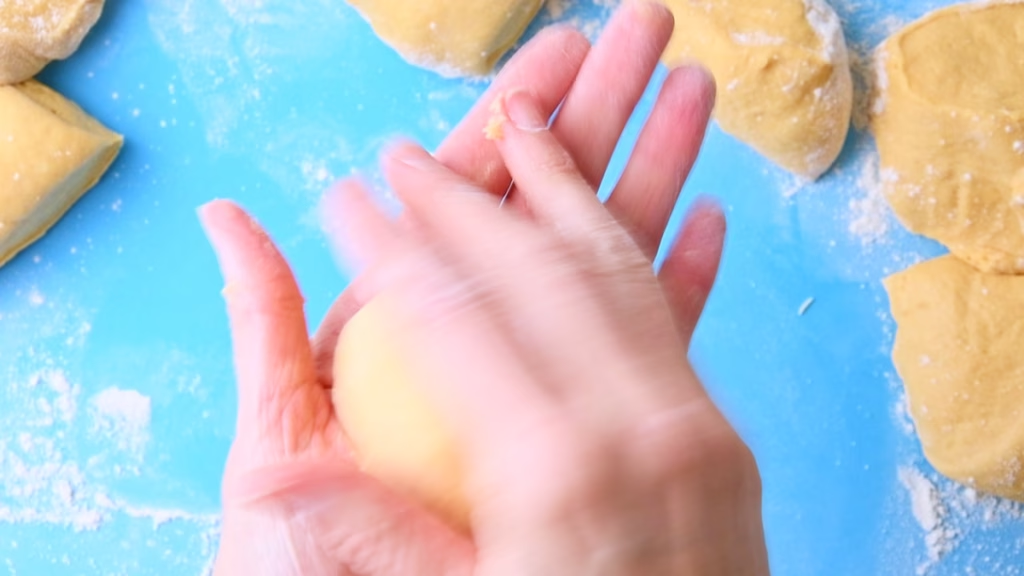
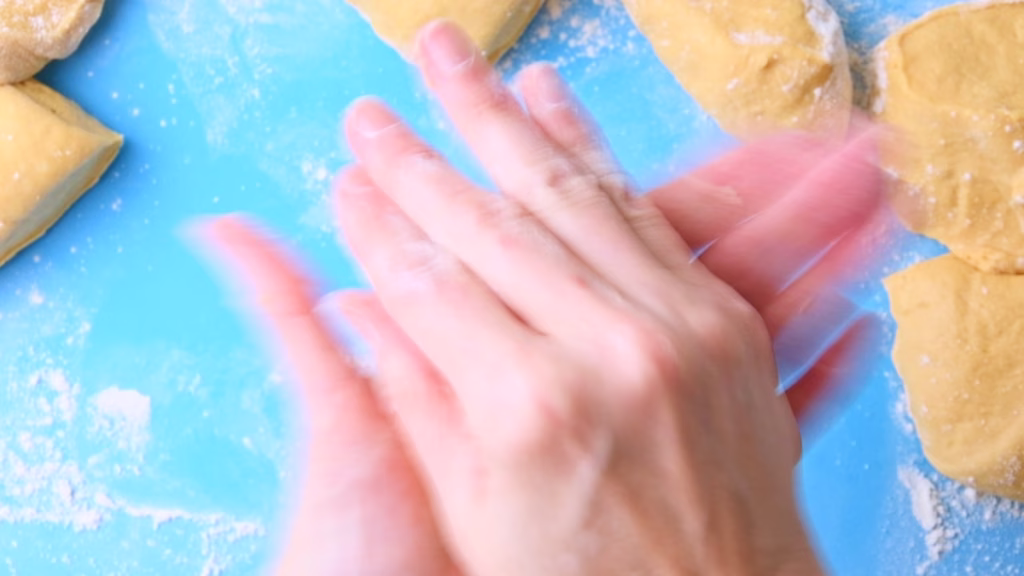
Now flour your hands a bit. The dough will still be a little sticky. Grab one piece of dough and pull all the corners up, as if you are making a little bag. Pinch them together, then turn the ball over, so the pinched corners are in your palm and, with a cupped hand on top, start rolling the ball in rapid little circles for a moment, until you have a smooth top.
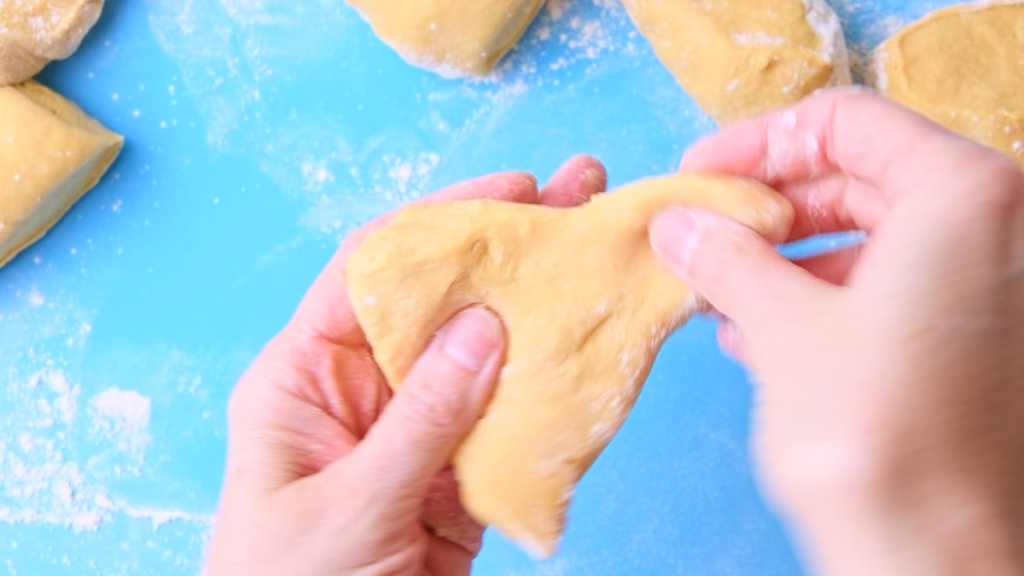
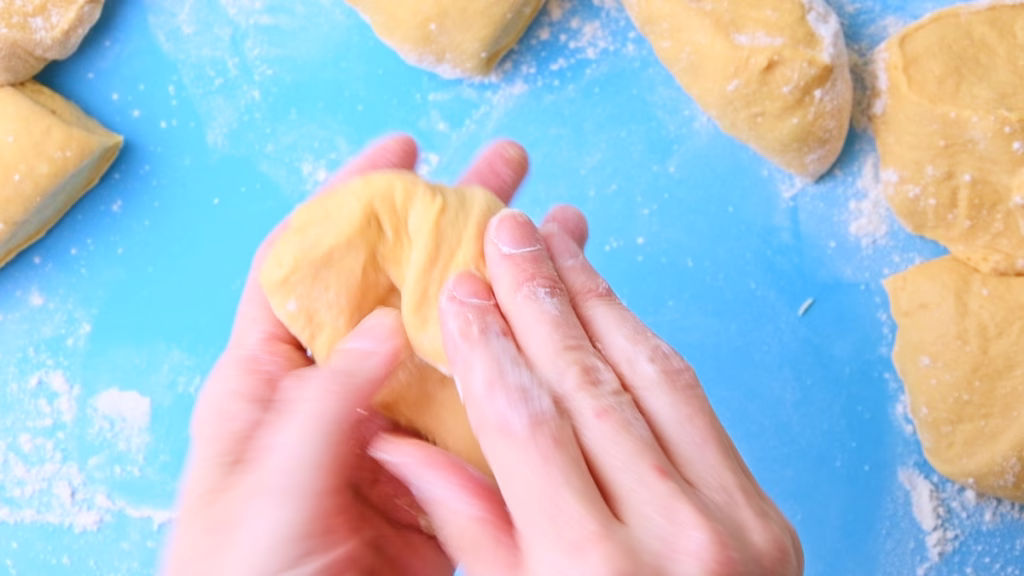
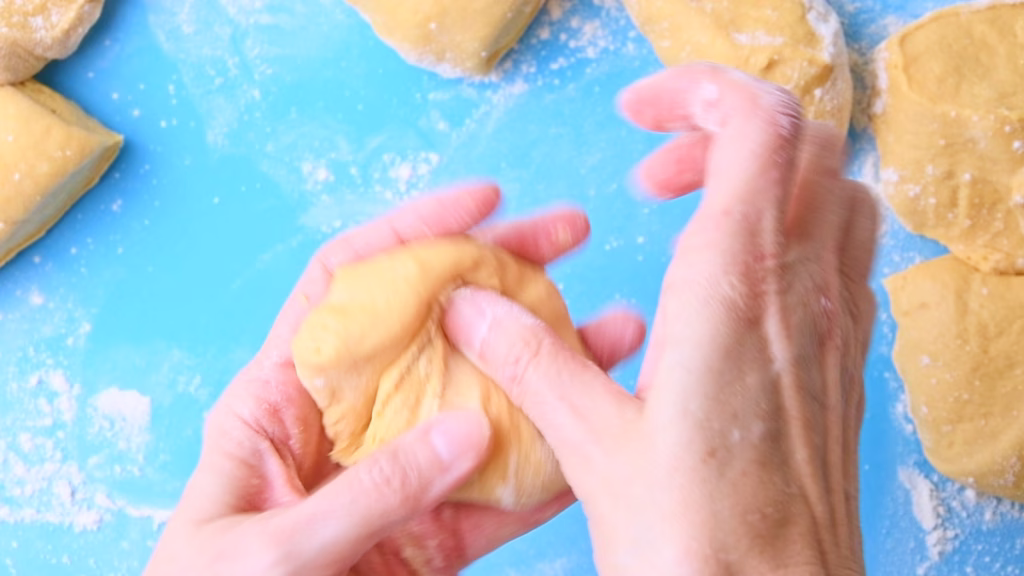
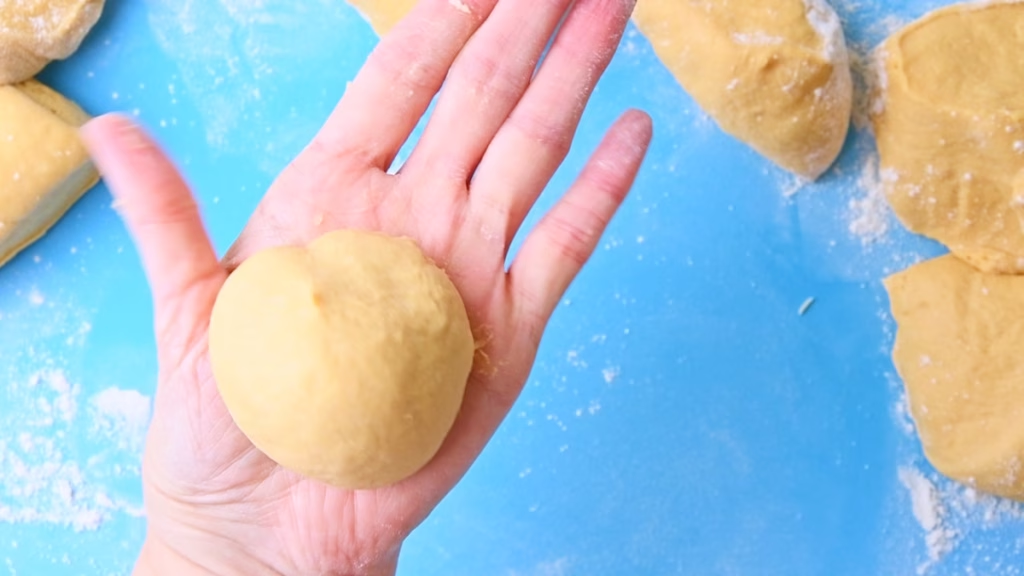
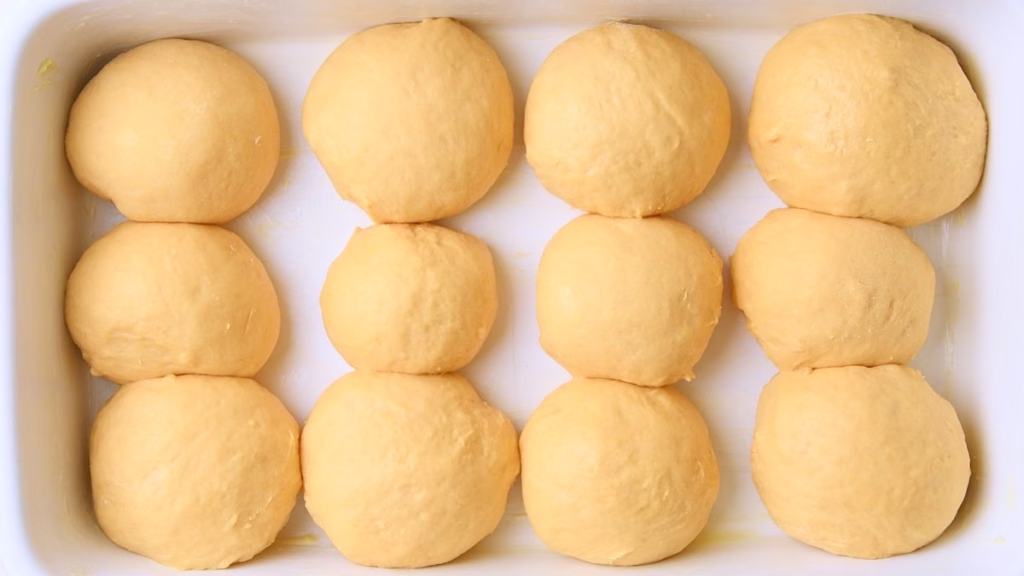
Place seam side down in your greased baking dish and repeat with the remaining dough pieces, spacing them slightly apart, to give them room for their last rise.
Last Rise
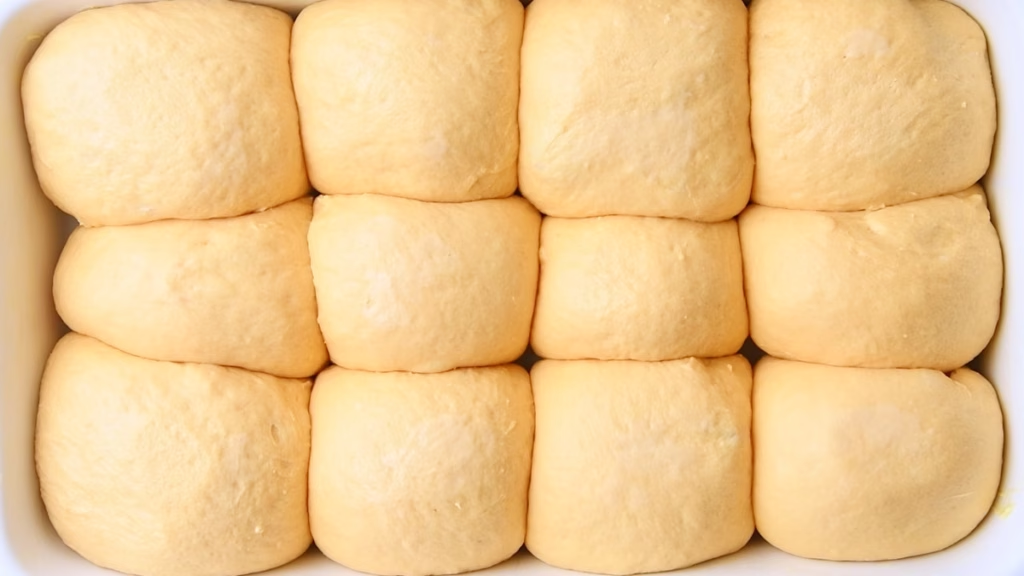
Cover the dish with a damp towel or, as I usually do, with clingfilm, to prevent the dough from drying out. Allow to rise for about 1-2 hours or until about doubled in volume.
You can now bake them or store in the fridge until ready to bake.
Baking Your Sourdough Protein Buns
Preheat your oven to 375°F/190°C.
If you like an even darker crust, brush them with some egg wash. I like them as they are and feel the butter after baking soaks in better if I don’t cover them with egg.
Bake the dinner rolls for about 25-35 minutes or until golden brown and fluffy. My oven bakes very unevenly and gets a little too hot in the upper half, so I set my rolls to the lower rack and rotated the baking dish once after about 15 minutes, to get even browning.
If yours brown too fast, cover loosely with some kitchen foil to finish baking. I covered mine for the last 10 minutes. Ovens can behave very differently, so my best tip is to get to know yours.
An instant read thermometer can help to check the internal temperature of the rolls in the center. It should read around 190°F/85°C when they are ready.
Alternatively carefully pull one of the rolls from the center out and gently pull it open, to see if it’s baked through.
Finish and Serve
Now it’s time for the final touches, letting these slightly sweet and super tender rolls really shine.
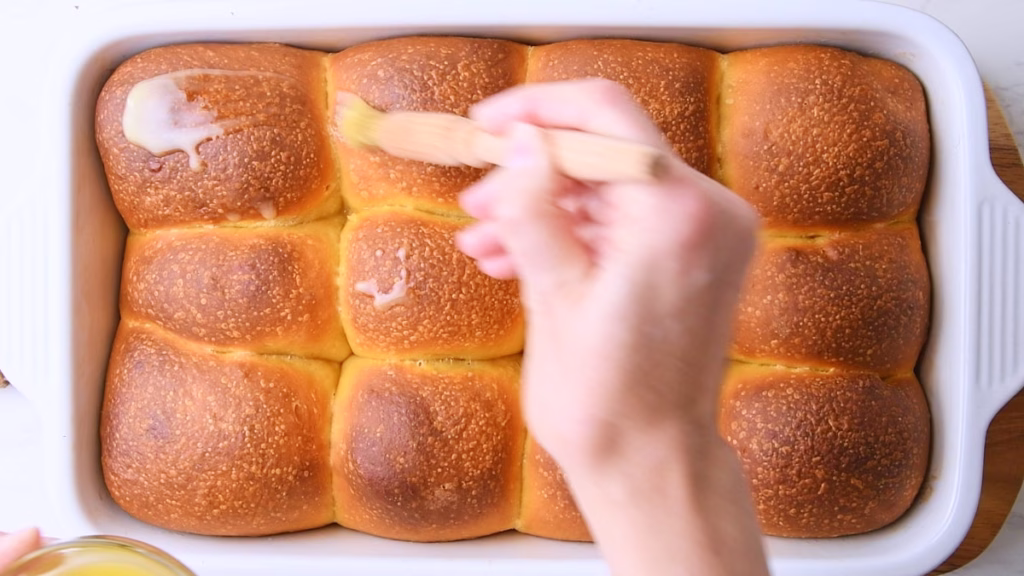
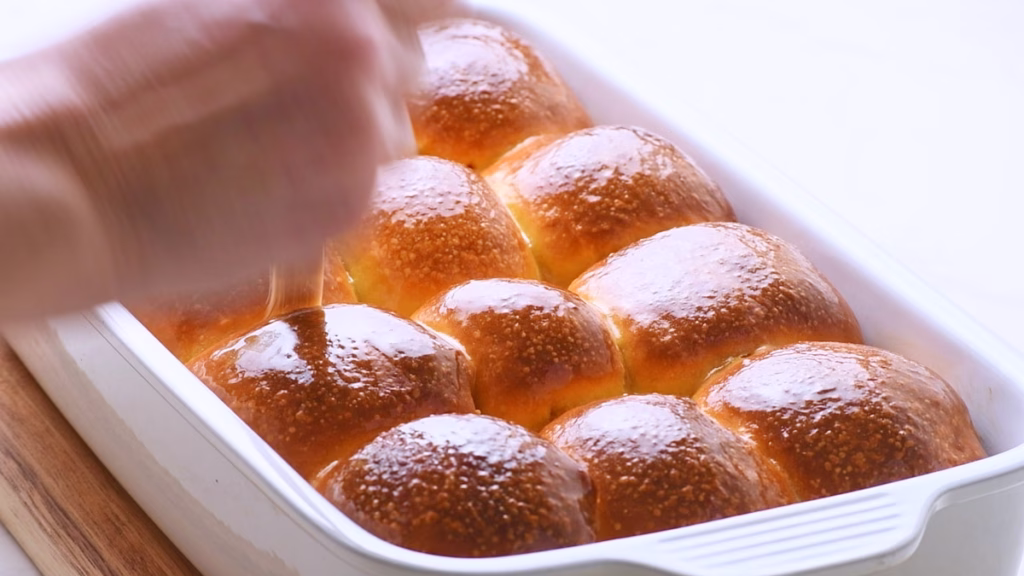
After taking them out of the oven, brush with some melted butter, then sprinkle with a little bit of flaky salt. Allow to cool for just a little, until you can reasonably touch them. Serve for dinner in their dish, so everyone can pull one out, enjoying the sweet smelling steam, buttery scent and flaky interior.
These are just as good served with a great Thanksgiving dinner to mop up all the Turkey juices, as they are just with some butter and maybe honey on top.
Oh and don’t forget to try them as leftover turkey sandwich. The sweet- tart cranberry sauce goes just incredibly well with the slightly sweet and tangy, buttery soft bun!
Watch The Video
How To Store
These squishy sourdough dinner rolls keep well in an airtight container for about 3 days.
They are, dare I say, nearly better reheated in the oven or air fryer at 350°F/175°C for a few minutes, which gets the buttery tops all crisped up and flaky, tasting like fresh croissants.
You can also freeze them for up to 3 months. Ideally in reusable portion sized freezer bags.
To reheat, either allow to defrost then bake as described above, or bake right from the freezer, but at slightly lower temperature for about 15 -20 minutes or until heated through.
Now I’d love to hear from you in the comments!
Have you tried this? Did you enjoy it?
What other recipes would you like to see?
And if you enjoyed this recipe, please consider rating, sharing, or leaving a comment – your feedback truly helps my blog grow!
FAQ
You absolutely can. The recipe will be slightly less sweet and doesn’t have the pretty orange tint when you do.
I would not advise it, as they can be much wetter than home cooked ones.
Plus you won’t have the lovely starchy cooking water to make the yudane.
You can (I did in my air fryer in an earlier recipe test), but you’ll need to use boiled water for the yudane anyway and without boiling the sweet potatoes in it, it will have a little less starch.
Sure. Your rising and baking times will be a bit faster if you do.
Other recipes you might enjoy

These dinner rolls are particularly good with my whipped honey cranberry butter.

They make a lovely side for your alternative to Turkey: The easy Cranberry Chicken.
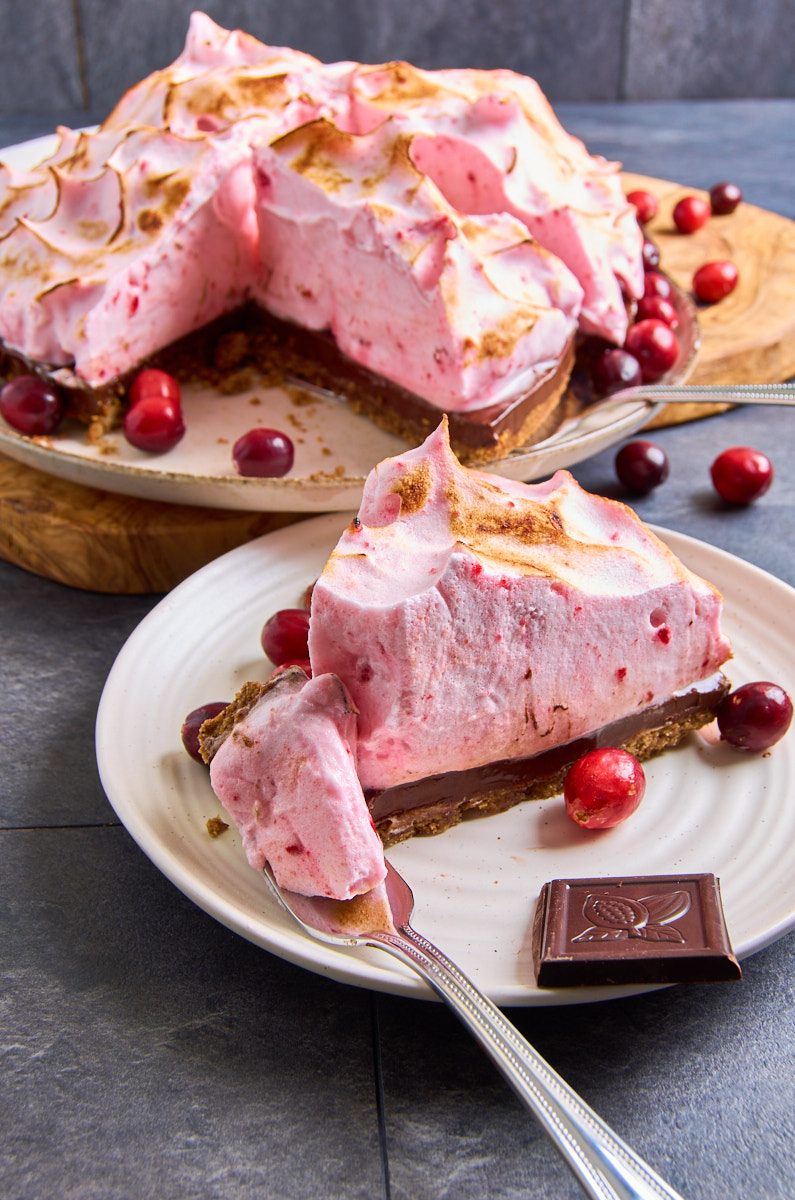
And if you, like me, are ever so slightly obsessed with cranberries, this show-stopping Cranberry Meringue Pie will be your new favorite dessert.
Pillowy Soft Sourdough Sweet Potato Dinner Rolls (High Protein)
- Total Time: 13 hours 35 minutes
- Yield: 12 dinner rolls 1x
- Diet: Vegetarian
Description
Imagine a dinner roll that’s as soft as a cloud, subtly sweet, and has a pleasant, gentle tang. These Sourdough Sweet Potato Rolls achieve just that. By blending the moisture-retaining power of sweet potatoes with the traditional Japanese Yudane method and the complex flavor of sourdough, these rolls are uniquely tender and stay fresh for days. I’ve also boosted the nutrition by adding protein, making this a delicious and beneficial addition to your holiday table or weeknight dinner. They are designed to fit your schedule, not the other way around – with suggestions on how to align the fermentation time to your plan.
Ingredients
Sourdough Starter (Levain)
I’m always making a bit more than needed, so I have leftovers for my next bake.
- 25g starter
- 100g flour
- 90ml water
Dough
- 1 medium sweet potato, about 8oz/250g
- 2 large eggs, at room temperature
- 1/2 cup cottage cheese
- 1/2 cup whey protein, unflavored
- 1/2 cup sourdough Starter
- 3 tbsp sugar
- 1/3 cup unsalted butter
- 2 tsp kosher salt
- 590g bread flour
Toppings
- 2 Tablespoons (28g) melted butter
- 1/2 tsp flaky sea salt, for topping. Optional.
Instructions
Bakers Schedule
Day 1
- Feed Your Sourdough Starter, ideally in the evening.
Day 2
- Start in the morning if you can.
- Cook the sweet potato and brown your butter, so they can cool a little bit.
- Mix your dough. This will take about 10 minutes.
Stretch and Folds
- For the 90 minutes after mixing the dough, do a set of stretch and folds every about 30 minutes (don’t worry if this isn’t exact).
Bulk fermentation
- You can do this on the day of mixing the dough or the day after. Allow the dough to rise at room temperature until about doubled for 3-6 hours. The time it takes hugely depends on room temperature, your flour, the temperature your ingredients had when mixing and how active your starter was.
- Go by feel and look. If the dough looks about doubled, is bubbly underneath, comes away easily from the sides of the bowl and springs back slowly when you poke it gently, it’s ready.
Overnight Cold Ferment
- This is not strictly necessary, and you can bake right after shaping and the last proof, but it hugely improves the flavor and make the protein easier bioavailable. Plus it frees time in the day I feel. You can leave your dough in the fridge for anywhere from 8 hours up to 3 days.
Shaping and Last Proof
- The shaping only takes a few minutes and then the buns can proof right in the baking dish until doubled in volume. This takes 1-2 hours usually.
- After that you can either bake right away or put them covered into the fridge for up to 3 days (all in all fridge time. So not 3 more after 3 days of the dough sitting in the fridge) until you are ready to bake.
Bake
- These sweet potato rolls take about 25-35 minutes to bake.
- This schedule and the rough time estimations, plus the fact that you can switch up the times when you do the cold fermentation and shaping mean this recipe, just as most sourdough recipes, is incredibly flexible and forgiving when it comes to busy holiday (or workday for that matter) schedules. Plan around what suits you.
Detailed Instructions
Day 1
Feed your starter.
- I assume you have an existing sourdough starter. If not, either ask a bakers friend if they share theirs or start a week earlier and follow the instructions in this post on how to create your own sourdough starter. It works for both rye and white flour.
- Simply stir together water and flour until you have a relatively stiff starter, then allow it to rest, loosely covered overnight or until nice and bubbly and about doubled in volume.
- I found using just a tiny bit less water (about 10ml) than the weight of the flour and only 1 part existing starter gives me the most active and flexible starter with a much longer peak time. So it’s very forgiving in when I use it.
Day 2
Get all your ingredients ready
- This will save you a lot of time and running back and forth (and, if you are like me, probably forgetting something in the process. You can essentially bet that I forget something in nearly every recipe test I do. It’s a miracle that most work out anyway!)
Brown The Butter
- Start by browning your butter, as you’ll want it to come to room temperature before you use it. You could do this the day before as well.
- Grab a heatproof bowl to transfer your browned butter into when it’s done.
- Add your butter to a saucepan and allow it to melt over medium high heat. Once it starts to wildly bubble, turn the heat down to medium/low and keep stirring, ideally with a silicone spatula or wooden spoon, to scrape off any sticky bits from the bottom of the pan constantly. This is where the flavor lives!
- Once the foam changes in sound and bubble size (they will suddenly turn a lot smaller) watch it like a hawk. The water has evaporated, and the browning will now be very quick. Keep stirring and take it off the heat once it smells nutty and delicious and you see golden brown specks under the foam.
- Pour into your waiting heat proof bowl to avoid burning in the still hot pan. Happened to me more than once!
Boil Sweet Potatoes
- Peel your sweet potato and cut into large chunks. Just cover with water (don’t add salt) and boil for 15-20 minutes or until you can very easily smash them with a fork. They should be really tender.
- Take the potato pieces out with a slotted spoon and allow them to drain and cool a bit in a colander.
- Don’t throw out the cooking water, we still need all its starchy goodness for the Yudane.
Mix The Yudane
- Now, while your cooking water is still boiling hot (if it cooled, just re-heat it) measure out ½ cup from your flour and put it into a heat proof bowl. Pour ½ cup of the sweet potato cooking water over it and stir with a spoon until you have a smooth mix.
- This might seem weird if you never tried the Tangzhong or Yudane method, but it gelatinizes the starches from the flour and gives these dinner rolls their incredible softness, holding onto even more moisture than your flour and the starch from the potatoes usually would. If you ever tried one of those super soft Japanese white breads: This is their secret.
- Allow to stand and cool down a little while you get on with the recipe.
Blend The Protein Ingredients
- In your blender, add first the eggs, then protein powder, then top with the cottage cheese. These layering is your best chance to not end up with protein powder stuck to the lid, as it’s sandwiched between the two liquid ingredients. Blend until smooth. If any powder did get stuck to the sides, scrape them down and blend again.
- Add the measured cup of sweet potato to the blender and blend that in too.
- I’m a little mindful of not adding the hot sweet potato right next to the egg, to avoid any potential coagulation, but if yours has cooled down a bit first, you could add it straight away with the rest.
- You’ll be left with a super creamy, lovely orange mix. Tempting, isn’t it?
Stir In The Sourdough Starter
- Because I don’t want to damage the delicate gluten structure of my starter, I never blend it in.
- This is the time to gently whisk it into your creamy cottage cheese blend.
- I use a dough hook, but any whisk or even a fork will do just fine. You’ll just want it relatively smooth without any big “blobs” of starter.
Mix The Dough
- In a large bowl (I used the glass bowl from my Kitchen Aid), mix your flour, salt and sugar briefly.
- Then stir in the liquid mix and the Yudane but not the butter yet.
- Butter will coat the flour and inhibit gluten formation, which we want later, but not quite yet. To get the perfect fluffy rise we are looking for, we need the flour to absorb most of the liquid and develop some gluten before the butter gets added.
- You can use your stand mixer for this step but only mix briefly until just combined. Don’t knead for a long time or you might overdevelop your dough.
Autolyse
- Now allow the dough to stand, covered with a damp towel or cling film, for about 30 minutes, so the flour can absorb most of the moisture.
Knead In The Butter
- You can do this by hand, but I used my stand mixer for this step, as it does get a bit messy and sticky.
- Whichever method you use, add the butter slowly, kneading in a bit, then adding more.
- Or, if you are as impatient as I am, pour it all in, then curse as the mixer spins in circles without grabbing the dough, use the dough whisk and then finish with the mixer until you have a smooth and uniform dough. Again, don’t mix too long.
- Assess Your dough at this point, It should be soft and sticky, but not runny or batter-like. If it looks way too moist, add 2-4 tbsp of flour. This will depend on your flour, the moisture content of your potatoes and, frankly, even the weather. I added 2 tbsp in my second test run but didn’t need any in the first. Despite the same recipe.
Stretch And Folds
- Within the next 90 minutes or so, perform three sets of stretch and folds every 30 minutes.
- To do this, wet your hands, stretch one side of your still very sticky dough up and fold it over the rest. Turn the bowl by 90 degrees, repeat twice. Then allow to rest for the next 30 minutes and perform the next set. Repeat once more.
- Your dough should now look fairly smooth and be relatively easy to handle. It will still be slightly sticky. That’s perfectly normal for sourdough.
Bulk Fermentation
- Transfer your dough into a lightly oiled and clean bowl, so it’s easier to turn out later.
- Now you can either go ahead and let your dough bulk ferment covered outside (I usually use clingfilm or a lid, to keep it from drying out) of the fridge for 3-6 hours or until about doubled in volume or put it into the fridge overnight and do the bulk fermentation the next day. Decide depending on your schedule. Both methods work perfectly well.
- The time it takes hugely depends on room temperature, your flour, the temperature your ingredients had when mixing, and how active your starter was.
- My kitchen is around 70°F/21°C most of the time, which is perfect for this fairly buttery dough. It took about 6 hours to double in volume.
- While I often say you can speed up the rising time with a cup of hot water in your switched off oven, I would not do that for this dough, as you don’t want the butter to get too warm and seep out.
- The cool rise will keep a slight flakiness in your finished rolls. The dough is ready when it looks nice and puffed up, comes away from the sides of the bowl, showing a good network of bubbles and springs back slowly when you poke it with a fingertip.
Cold Fermentation
- At this point you can cover your dough and allow it to cold ferment in the fridge overnight or for up to 3 days. The flavor will improve, adding a bit more of that delicious sourdough tang, nutrients will be broken down, to make them easier bioavailable and you’ll get all the gut friendly benefits from the sourdough.
- You don’t have to do this, but it’s one of the best ways to get the perfect sourdough.
Shape your Sweet Potato Dinner Rolls
- Once the bulk fermentation and cold fermentation (if you chose to do it) is done and your dough is nice and fluffy, grease your baking dish with a bit of butter.
- Flour your work surface. I like using a silicone mat for easier cleanup.
- Turn out your dough, if needed using a dough scraper. Though with all the butter it usually comes out easily.
- Now gently flatten in a bit and fold it into thirds like an envelope, then tuck under the sides and turn it with your hands, until you have a relatively round shape with a smooth top and a bit of surface tension.
- Using a dough scraper or knife, cut your dough into quarters. Then cut each quarter into three relatively even pieces. You could use scales, if you wanted them perfectly even, but I never bother. This is home cooking and should be as stress free as possible!
- Now flour your hands a bit. The dough will still be a little sticky. Grab one piece of dough and pull all the corners up, as if you are making a little bag. Pinch them together, then turn the ball over, so the pinched corners are in your palm and, with a cupped hand on top, start rolling the ball in rapid little circles for a moment, until you have a smooth top.
- Place seam side down in your greased baking dish and repeat with the remaining dough pieces, spacing them slightly apart, to give them room for their last rise.
Last Rise
- Cover the dish with a damp towel or, as I usually do, with clingfilm, to prevent the dough from drying out. Allow to rise for about 1-2 hours or until about doubled in volume.
- You can now bake them or store in the fridge until ready to bake.
Baking Your Sourdough Protein Buns
- Preheat your oven to 375°F/190°C.
- If you like an even darker crust, brush them with some egg wash. I like them as they are and feel the butter after baking soaks in better if I don’t cover them with egg.
- Bake the dinner rolls for about 25-35 minutes or until golden brown and fluffy. My oven bakes very unevenly and gets a little too hot in the upper half, so I set my rolls to the lower rack and rotated the baking dish once after about 15 minutes, to get even browning.
- If yours brown too fast, cover loosely with some kitchen foil to finish baking. I covered mine for the last 10 minutes. Ovens can behave very differently, so my best tip is to get to know yours.
- An instant read thermometer can help to check the internal temperature of the rolls in the center. It should read around 190°F/85°C when they are ready.
- Alternatively carefully pull one of the rolls from the center out and gently pull it open, to see if it’s baked through.
Finish and Serve
- Now it’s time for the final touches, letting these slightly sweet and super tender rolls really shine.
- After taking them out of the oven, brush with some melted butter, then sprinkle with a little bit of flaky salt. Allow to cool for just a little, until you can reasonably touch them. Serve for dinner in their dish, so everyone can pull one out, enjoying the sweet smelling steam, buttery scent and flaky interior.
- These are just as good served with a great Thanksgiving dinner to mop up all the Turkey juices, as they are just with some butter and maybe honey on top.
- Oh and don’t forget to try them as leftover turkey sandwich. The sweet- tart cranberry sauce goes just incredibly well with the slightly sweet and tangy, buttery soft bun!
Notes
Tip:
- If you only made yeasted dough before, it’s good to note that sourdough behaves very differently.
- It will always be much wetter and stickier than yeasted dough, which tends to be dry enough to come away from the sides of the bowl during the first kneading. Sourdough will not. This will start to happen during the stretch and fold process. But it remains wetter, which is what makes it so incredibly bubbly and moist after baking.
- In short: Don’t apply yeasted dough logic to sourdough.
How To Store
- These squishy sourdough dinner rolls keep well in an airtight container for about 3 days.
- They are, dare I say, nearly better reheated in the oven or air fryer at 350°F/175°C for a few minutes, which gets the buttery tops all crisped up and flaky, tasting like fresh croissants.
- You can also freeze them for up to 3 months. Ideally in reusable portion sized freezer bags.
- To reheat, either allow to defrost then bake as described above, or bake right from the freezer, but at slightly lower temperature for about 15 -20 minutes or until heated through.
- Prep Time: 1 hour
- Cook Time: 35 minutes
- Category: Sourdough Bread
- Method: Bake
- Cuisine: American


This are the perfect dinner rolls!
Thank you, that’s what I thought when biting into one. 🙂
Everyone raved about these sweet potato rolls. I’ve already had requests to make them for Thanksgiving!
That’s fabulous! So glad they enjoyed them! 🙂
These high-protein sweet potato dinner rolls are delicious and so fluffy. I am going to make this batch for Thanksgiving dinner.
Excellent! That makes me really happy. Let me know how they turn out. 🙂
These sourdough sweet potato rolls are soft, flavorful, and packed with nutrients. They stay tender for days and fit easily into any baking schedule.
Thanks so much, they do indeed. 🙂
Pillowy, high-protein, and sweet potato? These look absolutely incredible! I love the creative use of sweet potato in a sourdough roll. Bookmarked!
Aww, thanks so much. I’d love to hear how they turn out when you make them. 🙂